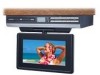
Audiovox VE927 Owners Manual
Audiovox VE927 - VE - 927 Manual
 |
UPC - 044476040023
View all Audiovox VE927 manuals
Add to My Manuals
Save this manual to your list of manuals |
Audiovox VE927 manual content summary:
- Audiovox VE927 | Owners Manual - Page 1
- Audiovox VE927 | Owners Manual - Page 2
instructions in this owner's manual. Caution marking is located on back enclosure of the unit. WARNING: TO REDUCE THE RISK OF FIRE OR ELECTRIC SHOCK, DO NOT REMOVE COVER (OR BACK). NO USER-SERVICEABLE PARTS INSIDE. REFER SERVICING TO QUALIFIED SERVICE or disconnecting the AC power cord, grip the - Audiovox VE927 | Owners Manual - Page 3
B digital device, pursuant to part 15 of the FCC Rules. in accordance with the instructions, may cause harmful interference the dealer or an experienced radio/TV technician for help. WARNING: Changes WARNING: Should any trouble occur, disconnect the AC power cord and refer servicing to a qualified - Audiovox VE927 | Owners Manual - Page 4
the manufacturer's instructions. Do Portable Cart Warning 13. Unplug this apparatus during lightning storms or when unused for long periods of time. 14. Refer all servicing to qualified service personnel. Servicing is required when the apparatus has been damaged in any way, such as the power-supply - Audiovox VE927 | Owners Manual - Page 5
Playback ...19 DVD Programmable Memory ...20 DVD Programmable Memory ...20 Important Safety Instructions Table of Contents ...4 Disc Formats ...5 Accessories ...6 Remote Control ...6 Control Reference Guide ...7-9 Mounting Instructions ...10-11 Connections ...12-13 Connecting the TV Antenna ...12 - Audiovox VE927 | Owners Manual - Page 6
the specific functions. Certain functions may not be available on some discs. Be sure to read the documentation provided with the DVD. Icons Used on DVDs Sample lcons Language selections for audio Language selections for subtitles Screen aspect ratio Multiple camera angles Region code indicator - Audiovox VE927 | Owners Manual - Page 7
(14.4mm) spacers ...x 4 .32" (8.2mm) spacers ...x 4 #M 5 x 69 mm screws ...x 4 #M 5 x 40 mm screws ...x 4 Warranty Card ...x 1 Registration Card ...x 1 REMOTE CONTROL Using the Remote Control • This remote control is magnetic and can be attached to most refrigerators. Some refrigerators panels are - Audiovox VE927 | Owners Manual - Page 8
CONTROL REFERENCE GUIDE Remote Control PICTURE 1 2 1 4 7 2 5 8 0 EXIT TV MENU 3 6 9 LAST CH 3 4 RETURN DVD MENU MUTE 5 6 STOP BAND 7 8 9 10 11 12 SOUND FORMAT MTS FUNCTION Button Use to select DVD, TV or RADIO mode. 2) PICTURE Button Selects from preset screen display settings to match the - Audiovox VE927 | Owners Manual - Page 9
CONTROL REFERENCE GUIDE Remote Control PICTURE 13 1 4 7 2 5 8 0 EXIT TV MENU 3 6 14 9 LAST CH 15 16 13) STANDBY/ON Button Turns on the unit and puts it in standby mode. 14) Number (0-9) Buttons 15) LAST CH Button Press to switch repeatedly between the last two channels displayed. 16) TV MENU - Audiovox VE927 | Owners Manual - Page 10
a disc on the disc tray, label side up. Display Window Displays system information. POWER ON Indicators DVD : DVD indicator TV : TV indicator RADIO : RADIO indicator Remote Sensor Receives the remote control unit signals. POWER Button Turns the unit on and off. OPEN/CLOSE Button Use to open/close - Audiovox VE927 | Owners Manual - Page 11
MOUNTING INSTRUCTIONS TOOLS NEEDED: 1) Electric drill with 1/4" bit; 2) Phillips-head (cross style) screwdriver. STEP 1 If your cabinet does NOT have an overhang: a) Place the Mounting Template in - Audiovox VE927 | Owners Manual - Page 12
MOUNTING INSTRUCTIONS (Continued from previous page) c) Insert the four selected screws through each hole from the inside of the cabinet going down (see Figure 5). e) Partially tighten each - Audiovox VE927 | Owners Manual - Page 13
of the unit to the VIDEO IN and R/L (right/left) jacks on your TV or other video equipment. FM ANTENNA TV or other Video Equipment (yellow) (white) (red) VIDEO IN L AUDIO IN R Audio/Video cable (not supplied) Connecting the Unit to a Stereo Receiver or Amplifier ANALOG CONNECTION Use the Audio - Audiovox VE927 | Owners Manual - Page 14
of the unit matches your local voltage. b) Plug the power cord directly into the nearest wall outlet, and wrap the , MATCH WIDE BLADE OF PLUG TO WIDE SLOT OF WALL OUTLET, THEN FULLY INSERT. AC power cord FM ANTENNA To AC outlet MONITOR OPERATION Follow the illustrations below to open the monitor. - Audiovox VE927 | Owners Manual - Page 15
Press the POWER button to turn the unit on and the DVD indicator lights up. After a short period of time, "DVD" will appear on the front display and the DVD logo (start-up picture) will appear on the screen. • Press the DVD/TV/RADIO button (the FUNCTION button on the remote control) to TV mode and - Audiovox VE927 | Owners Manual - Page 16
CLOCK button once to confirm. Then, the MINUTE blinks. 1. When the AC power cord is plugged in, the clock display will blink. 2. Press the SET CLOCK time "10" blinks. 3. When the preset time elapses, the ALARM will sound. 2. Press the / buttons to select your desired time from 1-99 minutes. - Audiovox VE927 | Owners Manual - Page 17
A DISC This owner's manual explains the basic instructions of this unit. Some DVDs are produced in a manner that allows specific or limited operation during playback. Such as, the unit may not respond to all operating commands. This is not a defect in the unit. Refer to the instruction notes of - Audiovox VE927 | Owners Manual - Page 18
discs on which subtitles have been recorded in multiple languages. • On some DVDs, subtitles are activated from the main menu of the DVD. Press the DVD MENU button to activate the main menu. Audio Selection On some discs, the sound is recorded in two or more formats. Follow the directions below to - Audiovox VE927 | Owners Manual - Page 19
the DISPLAY button on the remote control repeatedly to display information on DVD contains title/chapter/time numbers, you can locate a specific title/chapter/time by directly selecting a title/chapter/time number. 1. Press the GOTO button to display Title. 2. Press the or button on the remote - Audiovox VE927 | Owners Manual - Page 20
disc tray or turn the unit off. REPEAT PLAYBACK You can play a specific title or chapter repeatedly. Repeating a Chapter You can play the same chapter While the disc is playing, press the REPEAT DISC button on the remote control until the " indicator displays on the screen. The whole disc is - Audiovox VE927 | Owners Manual - Page 21
will be cleared when you open the disc tray or turn off the DVD player. VIEWING JPEG FILES This unit can play JPEG files recorded on a CD the remote control to jump immediately to the desired picture. • You can press the ANGLE buttonon the remote control to rotate direction of the picture by - Audiovox VE927 | Owners Manual - Page 22
Play Modes through the Toolkit which appears on the right in the window. Press the or button on the remote control to navigate between the left/right windows and the or button on the remote control to select files/tracks or play mode items. Then press the ENTER button. CD Track/JPEG File Programmed - Audiovox VE927 | Owners Manual - Page 23
the EXIT button to return to the normal screen. Note: Some DVDs may not include your pre-selected language. In this case, the DVD player automatically displays disc menus consistent with the disc's initial language setting. Video TV Shape 1. Press the SETUP button in stop mode. 2. Press the or - Audiovox VE927 | Owners Manual - Page 24
DVD. Therefore, the playback picture of some DVDs may not conform to the picture size you select. • When you play DVDs recorded in the 4:3 picture size only, the playback picture always appears in the 4:3 picture size regardless of the TV seconds to reset the DVD player to the factory default. - 23 - - Audiovox VE927 | Owners Manual - Page 25
the TV antenna terminal before searching TV channels 1. Connect the TV antenna. 2. Connect the AC power cord. POWER button to turn on the unit. 3. Press the 4. Press the DVD/TV/RADIO button (the FUNCTION button on the remote) to select TV mode. Manual searching for TV channels 1. Press the TV MENU - Audiovox VE927 | Owners Manual - Page 26
Repeat steps 2 and 3 to adjust other options. 5. To exit the TV SETUP MENU and return to the normal screen, press the EXIT button on the remote control. NOTE: You can also access these setting by pressing the PICTURE button. Picture Mode Contrast Brightness Sharpness Tint Color UP/DOWN Standard 50 - Audiovox VE927 | Owners Manual - Page 27
. Adjust the three color temperature of the picture. Select Normal (balanced) / Warm (red white) / Cool (blue white) mode. Restore Setting: If you reset the TV to the factory settings, all your present settings on picture & sound will be erased and replaced by the factory's default settings. - 26 - Audiovox VE927 | Owners Manual - Page 28
to adjust other options. 6. To exit the TV SETUP MENU and return to the normal screen, press the EXIT button on the remote control. NOTE: Channel No. : 2-69 Channel for CATV in TV CHANNEL SETTING, then you can select Cable System (AUTO / STD / HRC / IRC) in the sub menu as the picture shown. Channel - Audiovox VE927 | Owners Manual - Page 29
Manually 1. Press the DVD/TV/RADIO button (the FUNCTION button on the remote) until the radio frequency appears on the front panel display. 2. Press the STOP • BAND button to select AM or FM. 3. Press the TUNING buttons on the remote to tune in to a desired station. • When MUTE is pressed, the sound - Audiovox VE927 | Owners Manual - Page 30
AND REMEDY) • Ensure the AC power cord is connected. • The unit is not turned on Remove any obstacles between the remote and the unit. Use the remote near the unit. Point the remote at the remote sensor on the unit. Replace all batteries in the remote with new ones. DVD No sound or only a very low - Audiovox VE927 | Owners Manual - Page 31
defective or soiled disc inserted into the unit can cause sound to drop out during playback. Handle the disc by holding the unit, remove the disc from the disc compartment. SPECIFICATIONS Power source: AC 120V ~ 60Hz Specifications and external appearance are subject to change without notice. -
-
 1
1 -
 2
2 -
 3
3 -
 4
4 -
 5
5 -
 6
6 -
 7
7 -
8
-
9
-
10
-
11
-
12
-
13
-
14
-
15
-
16
-
17
-
18
-
19
-
20
-
21
-
22
-
23
-
24
-
25
-
26
-
27
-
28
-
29
-
30
-
31
 |
 |
