Audiovox VOD102 Operation Manual
Audiovox VOD102 - DVD Player With LCD Monitor Manual
 |
UPC - 044476032462
View all Audiovox VOD102 manuals
Add to My Manuals
Save this manual to your list of manuals |
Audiovox VOD102 manual content summary:
- Audiovox VOD102 | Operation Manual - Page 1
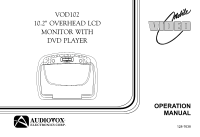
VOD102 10.2" OVERHEAD LCD MONITOR WITH DVD PLAYER OPERATION MANUAL ® 128-7638 - Audiovox VOD102 | Operation Manual - Page 2
driver if the LCD panel or video monitor is used for vehicle information, system control, rear or side observation or navigation. If the LCD panel or video monitor is used for television reception, video or DVD play, the LCD panel or video monitor must be installed so that these features will only - Audiovox VOD102 | Operation Manual - Page 3
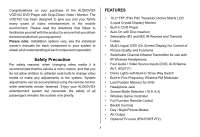
) Monitor • Built-in DVD Player * Auto On with Disc insertion • Selectable (M1 and M2) IR Receive and Transmit Codes • Multi-Lingual OSD (On Screen Display) for Control of Picture Quality and Functions • Switchable Channel Infrared Transmitter for use with IR Wireless Headphones • Four Audio / Video - Audiovox VOD102 | Operation Manual - Page 4
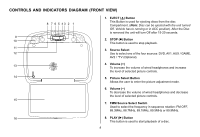
to stop playback. 3. Source Select Use to select one of the four sources: DVD, AV1, AUX / GAME, AV2 / *TV (Optional). 4. Volume (+) To increase the volume of wired headphones and increase the level of selected picture controls. 5. Picture Select Button Allows the user to enter the picture adjustment - Audiovox VOD102 | Operation Manual - Page 5
the system is on, dim when off. 10. Dome Lights Provide additional interior illumination. 11. Infrared Transmitter and Sensor Use to transmit audio the wireless headphone. Also allows the remote control to operate the VOD102 and to control other accessories in the system. 12. Three Position Dome - Audiovox VOD102 | Operation Manual - Page 6
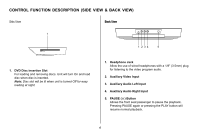
5 1. DVD Disc insertion Slot For loading and removing discs. Unit will turn On and load disc when disc is inserted. Note: Disc slot will be lit when unit is turned Off for easy loading at night. 1. Headphone Jack Allow the use of wired headphones with a 1/8" (3.5mm) plug for listening to the video - Audiovox VOD102 | Operation Manual - Page 7
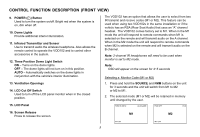
with the remote control and slide the cover until it locks. The remote control will operate the VOD102. It is not a universal remote control and will not control equipment from other manufacturers. 7 1 2 3 4 5 6 7 8 9 10 11 12 13 POWER MONITOR SELECT EJECT M1 M2 TV DVD SOURCE 1 2 3 AUTO - Audiovox VOD102 | Operation Manual - Page 8
only be displayed and the TV control functions are only available if the optional TV Tuner (P/N PODTVT2) is installed. 1. POWER Button* Press this button to turn the VOD102 ON and OFF. 2. MONITOR SELECT M1 Button - Change the remote control code to enable to control of the VOD102 when set to the M1 - Audiovox VOD102 | Operation Manual - Page 9
menu selections on the screen. Use the CHp to increase the channel number and use CHq to decrease the channel number. ** 14. OK Button (ENTER) Used to implement a selected setting or menu option. 15. MENU Button Allows the user to access the DVD (DVD MODE) root menu and system menu (TV mode). 9 - Audiovox VOD102 | Operation Manual - Page 10
16. REPEAT Button Allows the user to repeat a selected title, chapter, or track. 17. AUDIO Button Press to display and select the available AUDIO languages in DVD mode. Each time you press the button, the language repeatedly to change the search speed from 2, 4, 8, and 20 times the normal speed. 10 - Audiovox VOD102 | Operation Manual - Page 11
Menu which allows the user to change the DVD player options such as TV DISPLAY, OSD LANGUAGE, PARENTAL CONTROL etc. Refer to the settings and Adjustments section for more information. 29. IRT ON/OFF Button Turns the Infrared Transmitter IRT ON or OFF for IR Wireless Headphones. Pressing M1 then IRT - Audiovox VOD102 | Operation Manual - Page 12
the wireless headphone volume control or with your radio's volume control. 34. NUMBER Buttons Allow the user to enter numbers 0 to 9 for selection of selection of CD tracks, DVD chapters, password setting and direct access of TV channels if the optional TV tuner (P/N PODTVT2) is installed. 35. EJECT - Audiovox VOD102 | Operation Manual - Page 13
on the remote or the main unit and all of the picture settings (BRIGHTNESS, CONTRAST, COLOR and TINT) will return to the factory setting. 23 VOLUME VOLUME Use the Volume (-) or Volume (+) button on the unit or the remote control to decrease or increase the volume level of the wired headphones. 13 - Audiovox VOD102 | Operation Manual - Page 14
Remote Control only. (Items selected in the menu will have a green background) SCREEN MODE SELECT This allows the user to change the screen format (aspect ratio 16:9, 4:3). 1) To select the screen aspect ratio format highlight SCREEN MODE and then press the OK button to enter the sub menu. Then use - Audiovox VOD102 | Operation Manual - Page 15
OSD language. SYSTEM MENU SCREEN MODE OSD LANGUAGE SOURCE DEFAULT DVD OSD LANGUAGE ENGLISH SPANISH FRENCH GERMAN SOURCE DEFAULT DVD This allows the user to select from: DVD default on- When ever the unit is turned on it will return to DVD mode. DVD default off- When ever the unit is turned on it - Audiovox VOD102 | Operation Manual - Page 16
DVD player. For example, you can set a language for the onscreen display, limit playback for children. Using the Setup Menu 1. Press the SETUP button on the remote. The Setup Menu appears on the screen as shown per diagram. Language Video Rating Language Setup Video top part of the Setup Menu. Then - Audiovox VOD102 | Operation Manual - Page 17
: The OSD MENU setup allows you to select the language for the on-screen display. The user can either select English, French, Spanish, German or Italian for the OSD language. VIDEO SETUP TV Display The TV DISPLAY setup allows you to adjust screen setting (aspect ratio). 4:3 PS This displays the wide - Audiovox VOD102 | Operation Manual - Page 18
possibility of others using the default password to set the parental level and change the password, you can record this default password in another area and delete it from this manual. Some discs can be limited depending on the age of users while some discs cannot. Language Video Rating Password - Audiovox VOD102 | Operation Manual - Page 19
Playing Audio DVDs 1. When playing an audio CD, the DISPLAY banner appears automatically. It displays the track and amount of time for the track playing, the total amount of time on the disc and the elapsed time of the disc. 2. Selecting a Track You can skip to a specific track by using the numbers - Audiovox VOD102 | Operation Manual - Page 20
played on your DVD player. The DVD player plays the songs in the order they were burned on to the disc. Press DISPLAY button on the remote to display the 894044 10 Scenery Shangha Mode Folder Normal Skipping Songs Use the Next (:) button on the remote control to move to the next song. Use the - Audiovox VOD102 | Operation Manual - Page 21
friction will hold the screen in position while the system is in use. 2. Pressing the power button* on the unit or the remote control will turn the system on or off alternately. When in use the internal backlighting will illuminate the controls. 3. After the unit has been turned on and is displaying - Audiovox VOD102 | Operation Manual - Page 22
or if two of these monitors are installed in one vehicle. WIRED HEADPHONES (OPTIONAL) There is one 1/8" headphone jack on the VOD102 that can be used with any standard wired stereo headphones with a 1/8" plug. This jack is controlled by the volume up/down buttons on the VOD102 remote control. 22 - Audiovox VOD102 | Operation Manual - Page 23
Video Cassette Player (VCP), Video game system, on other audio / video device. To access the A/V inputs, turn the VOD102 on and press the source button on the VOD102 or the source button on the remote control until AV2 is displayed on the screen. Note: If the optional TV tuner (PODTVT2) is installed - Audiovox VOD102 | Operation Manual - Page 24
must be pointed toward the VOD102 for correct operation. Press the source button on the remote control or the unit until AUX/GAME* is displayed. GAME CONTROLLER FUNCTIONAL DESCRIPTION 1. Install two AAA batteries in the Game Controller. Observe the correct polarity. 2. Use the ON/OFF selector switch - Audiovox VOD102 | Operation Manual - Page 25
, press M2 on remote. - Insert a disc with the label side facing up. - Check the type of disc you put into disc tray. This DVD only plays DVDs, audio CDs and MP3s. - Both the unit and the disc are coded by region. If the regional codes don't match, the disc can't be played. This DVD player is set to - Audiovox VOD102 | Operation Manual - Page 26
PROBLEM The icon ( x) appears on screen Picture is distorted No forward or reverse scan SOLUTION - The feature or action cannot be completed at this time because: 1. The disc's software restricts it. 2. The disc's software doesn't support the feature (e.g., angles) 3. The feature is not available - Audiovox VOD102 | Operation Manual - Page 27
PARTS Remote Control 136-4196 SPECIFICATIONS LCD Backlighting Edge Light Tube Resolution 2400 x 480 Pixels 1,152,000 Operation Temperature 32 ~131º F (0 ~ 55º C) Storage Temperature -4 ~ 158º F (-20 ~ 70º C) Backlit life 30,000 Hours Video Display System NTSC / PAL Headphone - Audiovox VOD102 | Operation Manual - Page 28
) without charge for parts and repair labor. A game controller, if supplied, is similarly warranted for ninety days. To obtain repair or replacement within the terms of this Warranty, the product is to be delivered with proof of warranty coverage (e.g. dated bill of sale), specification of defect - Audiovox VOD102 | Operation Manual - Page 29
© 2006 Audiovox Electronics Corp., Hauppauge, NY 11788 WWW 128-7638
-
 1
1 -
 2
2 -
 3
3 -
 4
4 -
 5
5 -
 6
6 -
 7
7 -
8
-
9
-
10
-
11
-
12
-
13
-
14
-
15
-
16
-
17
-
18
-
19
-
20
-
21
-
22
-
23
-
24
-
25
-
26
-
27
-
28
-
29
 |
 |
