Audiovox XMC-10A Installation Guide
Audiovox XMC-10A - XM Satellite Radio Receiver Manual
 |
UPC - 044476036958
View all Audiovox XMC-10A manuals
Add to My Manuals
Save this manual to your list of manuals |
Audiovox XMC-10A manual content summary:
- Audiovox XMC-10A | Installation Guide - Page 1
Xpress® Satellite Radio Receiver XMC10 Car Cradle Installation Guide -1- Released: 9-15-05 128-7472 1 of 16 - Audiovox XMC-10A | Installation Guide - Page 2
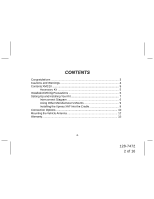
and Warnings 4 Contents XMC10 5 Accessory Kit 5 Installation/Wiring Precautions 6 Setting Up and Installing Your Kit 7 Interconnect Diagram 6 Using Other Manufacturer's Mounts 9 Installing the Xpress XM® Into the Cradle 9 Connection Options 10 Mounting the Vehicle Antenna 12 Warranty 15 - Audiovox XMC-10A | Installation Guide - Page 3
! XM® Satellite Radio service gives you the power to choose what you want to hear - wherever and whenever you want it. XM® is America's #1 Satellite Radio provider with over 4 million customers. Your Audiovox Xpress XM® receiver must be used with an accessory kit, such as the Audiovox Home Kit, Boom - Audiovox XMC-10A | Installation Guide - Page 4
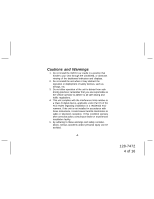
Cautions and Warnings 1. Do not install the XMC10 car cradle in a position that hinders your view through the windshield, or the unit is not installed in accordance with these instructions, it could cause harmful interference to radio or television reception. If this condition persists after - Audiovox XMC-10A | Installation Guide - Page 5
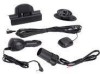
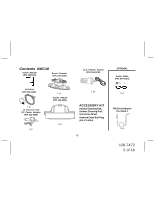
(P/N 118-1133) 1 pc. 12 Volt-to-5 Volt DC Power Adapter (P/N 112-3456) 1 pc. 1 pc. Cradle XMC10 (P/N 136-4041) 1 pc. 1 pc. ACCESSORY KIT Alcohol Cleaning Pad, Surface Cleaning Pad, Instruction Sheet, Antenna Cable Exit Plug (P/N 170-0054) -5- 1 pc. FM Direct Adapter P/N XMFM-1 1 pc. 128-7472 5 of - Audiovox XMC-10A | Installation Guide - Page 6
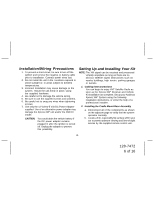
the Xpress XM® unit and/or the XMC10 cradle. XM® Satellite Radio as soon as the Xpress XM® Receiver and Vehicle Kit installation are complete. Set up your Audiovox Xpress XM® System using the following installation instructions, or enlist the help of a professional installer: 2. Installing the Cradle - Audiovox XMC-10A | Installation Guide - Page 7
PORTABLE CD PLAYER OR MP3 PLAYER TO BE PLAYED THROUGH THE XPRESS XM WIRELESS FM TRANSMITTER. OR CLA FEMALE SOCKET WIRES TO VEHICLE +12 VDC POWER RECEPTACLE XMC10 CRADLE (REAR VIEW) +12V to +5V DC POWER ADAPTER TO VEHICLE RADIO ANTENNA JACK TO VEHICLE +12 VDC POWER RECEPTACLE OPTIONAL FM DIRECT - Audiovox XMC-10A | Installation Guide - Page 8
vehicle dashboard controls and/or radio CD/ cassetteoperational displays. NOTE Using the alcohol swab supplied with your kit, clean the mounting surface and thoroughly XMC10 cradle atop the swivel bracket, line up the slot at the rear of the cradle with the bracket retainer tab, and slide the cradle - Audiovox XMC-10A | Installation Guide - Page 9
the Xpress XM® Receiver into the Cradle SCREW HOLES (2) FOR DIRECT HARD MOUNTING Install the Receiver as follows: a. After making sure the connectors and guide pin hole are properly lined up, gently lower the Xpress XM® Receiver into the cradle and press down on the Xpress XM® Receiver to - Audiovox XMC-10A | Installation Guide - Page 10
Transmitter - When using the XMC10 cradle with the wireless FM transmitter option, the XM audio signal can be received through your vehicle radio on selectable FM frequencies using the menu options included in your Xpress Receiver. (Refer to the Receiver owner's manual.) The XM audio signal can then - Audiovox XMC-10A | Installation Guide - Page 11
VEHICLE RADIO ANTENNA JACK c. Low-Level Audio Output - For vehicles equipped with radio head radio or entertainment system. In this case, it is best to turn the Xpress Receiver FM modulator option off to avoid interference. OPTIONAL FM DIRECT ADAPTER XMFM-1 (PURCHASED SEPARATELY) XMC10 CRADLE - Audiovox XMC-10A | Installation Guide - Page 12
position. c. Apply power to the Xpress XM system as outlined in the associated User Guide and obtain an audio output. If no audio is heard, first check the signal strength indicator located on the bottom left corner of the display to ensure the antenna is receiving an optimum signal. If necessary - Audiovox XMC-10A | Installation Guide - Page 13
method. d. After determining the optimum position, turn off Xpress XM power, disconnect the power adapter from the vehicle cigarette lighter receptacle and disconnect the antenna cable. e. Plan the routing of the antenna cable to the cradle. Make sure you avoid any obstructions that could crimp - Audiovox XMC-10A | Installation Guide - Page 14
Then snake the cable around the passenger compartment to the back of the XMC10 cradle. h. In SUV's, minivans, etc., route the cable into the vehicle feet or other objects. i. Plug the antenna cable into the ANT connector on the back of the cradle; then plug the cigarette lighter adapter into the - Audiovox XMC-10A | Installation Guide - Page 15
vehicle and home electrical systems, malfunction of satellite transmissions, repeater signal or receiver unit. This Warranty does not apply may also have other rights which vary from state to state. U.S.A. : AUDIOVOX ELECTRONICS CORPORATION, 150 MARCUS BLVD., HAUPPAUGE, NEW YORK 11788 (1-800-645 - Audiovox XMC-10A | Installation Guide - Page 16
© 2005 Audiovox Electronics Corporation, 150 Marcus Blvd., Hauppauge, New York 11788 128-7472 -16- 128-7472 16 of 16
-
 1
1 -
 2
2 -
 3
3 -
 4
4 -
 5
5 -
 6
6 -
 7
7 -
8
-
9
-
10
-
11
-
12
-
13
-
14
-
15
-
16
 |
 |

128-7472
1 of 16
XMC10 Car Cradle
Installation Guide
Released: 9-15-05
Xpress
®
Satellite
Radio Receiver