Avanti DG2450SS-1 Instruction Manual
Avanti DG2450SS-1 Manual
 |
View all Avanti DG2450SS-1 manuals
Add to My Manuals
Save this manual to your list of manuals |
Avanti DG2450SS-1 manual content summary:
- Avanti DG2450SS-1 | Instruction Manual - Page 1
INSTRUCTION MANUAL MANUAL DE INSTRUCCIONES Model Numbers / Nos. de Modelos: DG2450SS Stainless Steel DG2451W White DG2450SS-1 Stainless Steel DG2452B Black GAS RANGE COCINA DE GAS BEFORE USE, PLEASE READ AND FOLLOW ALL SAFETY RULES AND OPERATING INSTRUCTIONS. AND SAVE FOR LOCAL GAS AND ELECTRICAL - Avanti DG2450SS-1 | Instruction Manual - Page 2
Us Help You ... Parts and Features Before Using Your Gas Range Important Precautions and Recommendations How to use the top burners How to use the Gas oven Oven light Care and Maintenance Troubleshooting Guide Wiring Diagram Service for Your Appliance Your Avanti Products Warranty Instrucciones en - Avanti DG2450SS-1 | Instruction Manual - Page 3
RANGE SAFETY Your safety and the safety of others are very important. We have provided many important safety messages in this manual know what can happen if the instructions are not followed. IN THE Part 3280 [formerly the Federal Standard for Mobile Home Construction and Safety, Title 24, HUD (Part - Avanti DG2450SS-1 | Instruction Manual - Page 4
in this manual, so read the manual carefully. • Electrical Grounding Instructions - The appliance Parts - Only authorized replacement parts may be used in performing service on the range. Replacement parts are available from factory authorized parts distributors. Contact the nearest Avanti service - Avanti DG2450SS-1 | Instruction Manual - Page 5
be secured by properly installed anti-tip devices packed with the appliance. Range Foot Anti-tip Bracket WARNING • ALL RANGES CAN TIP • INJURY TO PERSON COULD RESULT • INSTALL ANTI-TIP DEVICE PACKED WITH RANGE • SEE INSTALLATION INSTRUCTIONS Making sure the anti-tip bracket is installed: • Slide - Avanti DG2450SS-1 | Instruction Manual - Page 6
the dealer (or builder) that sold you the Gas Range. Save time and money. Before you call for service, check the Troubleshooting Guide. It lists causes of minor operating problems that you can correct yourself. IF YOU NEED SERVICE We're proud of our service and want you to be pleased. If for some - Avanti DG2450SS-1 | Instruction Manual - Page 7
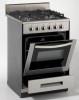
8 Drawer 9 Leveling Legs (Total 4) 10 Anti-tip Bracket 11 Cooktop 12 Pan Supports (Total 2)* NOTE: *For Model DG2450SS-1, the pan support is Cast Iron material; for other models it is Wired Iron. Back of the Range 1 Inlet Pipe 2 Regulator(not pre-installed) 3 Anti-tip bracket 4 Power Cord 5 Access - Avanti DG2450SS-1 | Instruction Manual - Page 8
COOKTOP 1. Auxiliary burner (AUX) - 3200 BTU/hr 2. Right semi-rapid burner (SR) - 4800 BTU/hr 3. Left semi-rapid burner (SR) - 4800 BTU/hr 4. Rapid burner (R) - 10000 BTU/hr Note: -The electric gas-lighting device is incorporated into the knobs. CAUTION: If the burner is accidentally extinguished, - Avanti DG2450SS-1 | Instruction Manual - Page 9
by a qualified installer in accordance with the installation instructions. √ Do not attempt to repair or replace any part of your range unless it is specifically recommended in this manual. √ Be sure your range is correctly adjusted by a qualified service technician or installer for the type of gas - Avanti DG2450SS-1 | Instruction Manual - Page 10
this appliance must only be installed in a permanently ventilated room in compliance with the applicable regulations. It is advised to follow these instructions: √ Clean the interior of the oven with a clean cloth soaked in water and detergent (neutral, then dry carefully). √ Furnish the interior of - Avanti DG2450SS-1 | Instruction Manual - Page 11
longer (or decide to substitute an older model), before disposing of it, it is Such work should be carried out by qualified service personnel only. √ Danger of burns! The oven clothes and gloves when handling hot parts or utensils. √ Stand away from the range when opening oven door. Hot air - Avanti DG2450SS-1 | Instruction Manual - Page 12
, sitting, or leaning on them) can result in potential hazards and/or injuries. 8. When installing or removing the range for service, a rolling lift jack should be used. Do not push against any of the edges of the range in an attempt to slide it into or out of the installation. Pushing or pulling - Avanti DG2450SS-1 | Instruction Manual - Page 13
WARNING!! ELECTRICAL GROUNDING INSTRUCTIONS FOR PERSONAL SAFETY, THIS APPLIANCE MUST BE PROPERLY PARTS Only authorized replacement parts may be used in performing service on the range. Replacement parts are available from factory authorized parts distributors. Contact the nearest AVANTI parts - Avanti DG2450SS-1 | Instruction Manual - Page 14
Lo positions, and never between the HI and OFF positions. When the range is not being used, set the gas knobs to their OFF positions and knob to the OFF position and repeat the operations for lighting. Caution! The range becomes very hot during operation. Keep children well out of reach. CHOICE - Avanti DG2450SS-1 | Instruction Manual - Page 15
High - Altitude effects on burners: The surface burners used on this unit range from 3,200 BTU to 10,000 BTU on natural gas installation under lower part of the oven: Broil burner, mounted on the upper part of the oven: USING THE OVEN FOR THE FIRST TIME It is advised to follow these instructions - Avanti DG2450SS-1 | Instruction Manual - Page 16
the temperature, set the chosen number onto the control knob indicator. The position BROIL serves only to turn on the broil burner. NOTE: When the range will not be used for long periods of time, set the gas knobs to their positions and also close the gas shut-off valve placed - Avanti DG2450SS-1 | Instruction Manual - Page 17
is lit, release the knob. In case of power outage, you can manually light the burner by pressing the knob inward and immediately approach a lighted wait for about 1 minute prior to repeating the ignition. 4) When using the range for the first time or after long period of non-usage, keep pressing - Avanti DG2450SS-1 | Instruction Manual - Page 18
is lit, release the knob. In case of power outage, you can manually light the burner by pressing the knob inward and immediately approach a lighted wait for about 1 minute prior to repeating the ignition. 4) When using the range for the first time or after long period of non-usage, keep pressing - Avanti DG2450SS-1 | Instruction Manual - Page 19
becomes very hot during operation. Keep children away. OVEN LIGHT The range is equipped with a light that illuminates the oven to enable visually controlling pans on other cooking utensils from the oven. • Attention: the range becomes very hot during operation • Attention: the oven door becomes very - Avanti DG2450SS-1 | Instruction Manual - Page 20
left on the enamel for a long time they will etch it, making it opaque. STAINLESS STEEL ELEMENTS Stainless steel parts must be rinsed with water and dried with a soft and clean cloth or with a chamois leather. For difficult the gas valves, shut the main gas supply and call the Service Department. 20 - Avanti DG2450SS-1 | Instruction Manual - Page 21
into the appliance making it dangerous. BURNERS AND GRIDS ✓ These parts can be removed and cleaned with appropriate products. ✓ After cleaning, so can cause serious problems. In appliances with electric ignition, check that the electrode "S" is always clean to ensure trouble-free sparking. The - Avanti DG2450SS-1 | Instruction Manual - Page 22
the oven or in the bottom drawer. REMOVING THE OVEN DOOR To facilitate oven cleaning, it is possible to remove the door. Please follow the instructions carefully: REMOVING THE OVEN DOOR - The oven door can easily be removed as follows: - Open the door to the full extends. - Lift the left and - Avanti DG2450SS-1 | Instruction Manual - Page 23
500°F) having the same specifications: 120V 60Hz, 15W, E14. • Replace the protective cover. NOTE: Oven bulb replacement is not covered by your guarantee. LEVELING THE RANGE The range must be level to obtain proper operating. The four screws type leveling legs located on the corners at the bottom of - Avanti DG2450SS-1 | Instruction Manual - Page 24
WITH YOUR GAS RANGE? You can solve many common appliance problems easily, saving you the cost of a possible service call. Try the suggestions below to see if you can solve the problem before calling the servicer. TROUBLESHOOTING GUIDE FIND YOUR PROBLEM HERE Surface burners do not light. Flame - Avanti DG2450SS-1 | Instruction Manual - Page 25
problem Reposition the broiler pan to provide more clearance between the meat and the broiler burner Remove excess fat from meat. SERVICE FOR YOUR GAS RANGE We are proud of our customer service organization and the network of professional service technicians that provide service on your Avanti - Avanti DG2450SS-1 | Instruction Manual - Page 26
PAINTED OR MATERIAL OR WORKMANSHIP. BRIGHT METAL FINISHED PARTS SERVICE MUST BE PROVIDED BY AN AUTHORIZED SERVICE COMPANY. WE WILL NOT PAY FOR A. Service calls to: 1. Correct the installation of your range. 2. Instruct you how to use your range. 3. Replace house fuses or correct house wiring - Avanti DG2450SS-1 | Instruction Manual - Page 27
de otros son muy importantes. Hemos incluido muchos mensajes de seguridad en este manual y también en su artefacto. Siempre lea y siga todos los mensajes Titulo 24 CFR, Parte 3280 [previamente el Estándar Federal de Construcción y Seguridad de Casas Móviles , Titulo 24, HUD (Parte 280)} o, cuando - Avanti DG2450SS-1 | Instruction Manual - Page 28
. El no hacerlo puede resultar en choque eléctrico o muerte. • No intente reparar o reemplazar ninguna parte de su electrodoméstico a no ser que sea recomendado específicamente en este manual. Cualquier otro tipo de mantenimiento debe ser hecho por un técnico especializado. ADVERTENCIA: Si la - Avanti DG2450SS-1 | Instruction Manual - Page 29
Distribuidores de Fabrica autorizados. Contáctese con el Centro de Servicio de Avanti más cercano a ud. EL ELEMENTO ANTI-VOLTEO La cocina no se la cocina quede debajo del elemento antivolteo. ADVERTENCIA: Si la información de este manual no se sigue al pie de la letra, un fuego o explosión podrían - Avanti DG2450SS-1 | Instruction Manual - Page 30
de la gaveta de almacenamiento 8 Gaveta de almacenamiento 9 Patas niveladoras 10 Elemento Anti-volteo 11 Superficie 12 Rejillas NOTA: *Por el modelo DG2450SS-1, las rejillas son de hierro fundido; los otros modelos son de alambre de hierro. Trasero de la unidad 1 Linea de gas 2 Regulador - Avanti DG2450SS-1 | Instruction Manual - Page 31
COCINA 1. Hornilla auxiliar (AUX) 2. Hornilla derecha semi-rápida (SR) - 3. Hornilla izquierda semi-rápida (SR) 4. Hornilla Rápida (R) Nota: -El elemento para encender el gas está incorporado a las perillas. PRECAUCION: Si la hornilla se apaga por accidente, gire la perilla apagando el gas. Espere - Avanti DG2450SS-1 | Instruction Manual - Page 32
siga las instrucciones de instalación. ✓No intente reparar o reemplazar ninguna pieza de su cocina a no ser que sea específicamente recomendado en este manual. ✓Asegúrese que su cocina esté correctamente ajustada por un técnico instalador calificado, de acuerdo al tipo de gas (natural o LP) que se - Avanti DG2450SS-1 | Instruction Manual - Page 33
✓ Limpie el interior del horno con un trapito limpio, humedecido con agua y detergente neutral, luego seque cuidadosamente. ✓ Coloque las rejillas y bandeja del horno en su lugar. ✓ Encienda el horno a la temperatura máxima para eliminar cualquier resto de grasa del CALENTADOR del horno. Haga lo - Avanti DG2450SS-1 | Instruction Manual - Page 34
). ✓No permita que los niños u otras personas no calificadas usen el electrodoméstico sin su supervisión. ✓Durante y después de usar la cocina, algunas partes quedan muy calientes. No las toque. ✓Mantenga a los niños lejos de la cocina cuando la esté usando. ✓Riesgo de fuego! No almacene material - Avanti DG2450SS-1 | Instruction Manual - Page 35
úrese que los niños no estén al alcance y adviértales al respecto. Para evitar quemaduras utilice pañitos de cocina o guantes cuando deba manipular partes o utensilios calientes. ✓Aléjese de la cocina cuando abra la puerta del horno. El aire caliente o vapor que escapa puede causar quemaduras en las - Avanti DG2450SS-1 | Instruction Manual - Page 36
INFORMACION GENERAL ADVERTENCIA!! 1. Este electrodoméstico no se debe usar para calentar la habitación. Esta información está basada en consideración a la seguridad. 2. La pared detrás de este electrodoméstico y el piso bajo este electrodoméstico deben estar sellados y no tener aperturas. 3. - Avanti DG2450SS-1 | Instruction Manual - Page 37
mantenimiento a la cocina. Piezas de repuesto están disponibles en los Distribuidores de Fabrica autorizados. Contáctese con el Centro de Servicio de Avanti más cercano a ud. : ADVERTENCIA: MONOXIDO DE CARBONO El Monóxido de Carbono es un peligro posible cuando use cualquier electrodoméstico de gas - Avanti DG2450SS-1 | Instruction Manual - Page 38
COMO USAR LAS HORNILLAS HORNILLAS A GAS El flujo de gas a las hornillas se ajusta al girar las perillas que controlan las válvulas. Girando la perilla para que la línea indicadora apunte a los símbolos marcados en el panel logra las siguientes funciones: La posición de rotación máxima permite que - Avanti DG2450SS-1 | Instruction Manual - Page 39
DE GAS CARACTERISTICAS GENERALES El horno viene con dos Calentadores: a) Calentador del horno, instalado en la parte baja del horno. b) Calentador de parrilla, instalado en la parte alta del horno. USANDO EL HORNO POR PRIMERA VEZ Se recomienda seguir estas instrucciones: - Inserte las rejillas - Avanti DG2450SS-1 | Instruction Manual - Page 40
CALENTADOR DEL HORNO Permite cocción normal del horno. El flujo de gas al CALENTADOR se regula con un termostato que permite que la temperatura del horno se mantenga constante. El control de la temperatura se asegura con un termostato localizado en el interior del horno. El termostato se debe - Avanti DG2450SS-1 | Instruction Manual - Page 41
ENCENDIDO DEL CALENTADOR DEL HORNO El termostato permite el control automático de la temperatura. El suministro de gas al calentador del horno se controla con una llave termostática de dos lados (calentador del horno y de la parrilla) con un elemento de llama-falla. Para encender el calentador del - Avanti DG2450SS-1 | Instruction Manual - Page 42
COCINANDO EN EL HORNO Antes de introducir los alimentos, precaliente el horno a la temperatura deseada. Para una operación de precalentamiento, se recomienda retirar la bandeja del horno e introducirla al mismo tiempo con los alimentos cuando el horno haya llegado a la temperatura deseada. - Avanti DG2450SS-1 | Instruction Manual - Page 43
La cocina está equipada con una luz que ilumina el horno la cual permite control visual para los alimentos que está cocinando. Esta luz se controla con un botón de presión en el panel de control. USANDO LA PARRILLA (BROILING) Muy importante: el calentador de la parrilla se debe usar siempre con la - Avanti DG2450SS-1 | Instruction Manual - Page 44
ADVERTENCIA!! ADVERTENCIA-NOTA MUY IMPORTANTE Nunca obstruya las aperturas de ventilación del panel anti-salpicaduras. No use la parrilla sin la bandeja de cocción. Importante: Siempre use guantes protectores apropiados cuando inserte o remueva la bandeja de parrilla, rejillas, ollas, cacerolas u - Avanti DG2450SS-1 | Instruction Manual - Page 45
, etc se dejan en la superficie esmaltada por un período largo, esta se quemará tornándose opaca. ELEMENTOS DE ACERO INOXIDABLE Las partes de acero inoxidable deben ser enjuagadas con agua y secadas con un trapo limpio o con una gamusa. Para suciedad persistente, use un producto comercial espec - Avanti DG2450SS-1 | Instruction Manual - Page 46
de cualquier operación de mantenimiento, desenchufe el electrodoméstico de la fuente de poder/energía o electricidad. HORNILLAS Y REJILLAS Estas partes se pueden remover y limpiar con los productos apropiados. Después de limpiarlas, seque bien las hornillas y las tapitas distribuidoras de la - Avanti DG2450SS-1 | Instruction Manual - Page 47
En electrodomésticos con encendido eléctrico, verifique que el electrodo "S" esté siempre limpio para asegurar producción de chispas sin problemas. El enchufe de encendido debe ser limpiado cuidadosamente. INSTALACION Y RETIRO DE LA REJILLA DEL HORNO Las rejillas del horno vienen con un bloqueo - Avanti DG2450SS-1 | Instruction Manual - Page 48
moviéndola hacia arriba. Nunca almacene materiales inflamables en la gaveta. REEMPLAZANDO LA LUZ DEL HORNO Antes que se efectúe cualquier mantenimiento de partes eléctricas del electrodoméstico, asegúrese que esté desenchufado de la fuente de poder/energía o electricidad. • Deje que el horno y los - Avanti DG2450SS-1 | Instruction Manual - Page 49
of appliance Anti-tip Bracket Move the appliance to the final position. Instale el elemento anti-volteo en el dado izquierdo o derecho cerca de la parte posterior del electrodoméstico . Deslice la cocina hacia la posición final. 49 - Avanti DG2450SS-1 | Instruction Manual - Page 50
your input. Your responses will help us develop products designed to best meet your future needs. detach here Avanti Registration Form Name Model # Serial # Address Date Purchased Store/Dealer Name City State Zip Occupation Area Code Phone Number As Your Primary - Avanti DG2450SS-1 | Instruction Manual - Page 51
Ver: 002-12/6/2012 PRINTED IN CHINA 51
-
 1
1 -
 2
2 -
 3
3 -
 4
4 -
 5
5 -
 6
6 -
 7
7 -
8
-
9
-
10
-
11
-
12
-
13
-
14
-
15
-
16
-
17
-
18
-
19
-
20
-
21
-
22
-
23
-
24
-
25
-
26
-
27
-
28
-
29
-
30
-
31
-
32
-
33
-
34
-
35
-
36
-
37
-
38
-
39
-
40
-
41
-
42
-
43
-
44
-
45
-
46
-
47
-
48
-
49
-
50
-
51
 |
 |

INSTRUCTION MANUAL
MANUAL DE INSTRUCCIONES
Model Numbers / Nos. de Modelos:
DG2450SS
Stainless Steel
DG2451W
White
DG2450SS-1
Stainless Steel
DG2452B
Black
GAS RANGE
COCINA DE GAS
BEFORE USE, PLEASE READ AND FOLLOW ALL SAFETY RULES AND OPERATING
INSTRUCTIONS. AND SAVE FOR LOCAL GAS AND ELECTRICAL INSPECTOR’S USE.
La sección en español empieza en la página 27
Avanti Products has a policy of continuous improvement on its products and reserves the right to change materials and
specifications without notice.
Avanti Products, A Division of The Mackle Co., Inc.
P.O. Box 520604 -
Miami, Florida 33152
www.avantiproducts.com