Behringer 182 SEQUENCER Quick Start Guide
Behringer 182 SEQUENCER Manual
 |
View all Behringer 182 SEQUENCER manuals
Add to My Manuals
Save this manual to your list of manuals |
Behringer 182 SEQUENCER manual content summary:
- Behringer 182 SEQUENCER | Quick Start Guide - Page 1
Quick Start Guide SYSTEM 100 182 SEQUENCER Legendary Analog Sequencer Module for Eurorack Controls (1) (3) DELAY - Use this knob to set the amount of time taken (0 to 10 seconds) to shift to the sequence's next step voltage, which is set by the 16 knobs in the CH-1/CH-2 SEQUENCER COLUMNS. The - Behringer 182 SEQUENCER | Quick Start Guide - Page 2
V CV scaling 1 V/oct. The 182 ANALOG SEQUENCER module comes with the required power cable 10 s 10 % to 90 % duty cycle 1 to 8 steps Repeat / manual / single Momentary 8 step / 16 step Eurorack 30 mA (+12 V), 30 mA Turbosound, TC Electronic, TC Helicon, Behringer, Bugera, Auratone and Coolaudio are
-
 1
1 -
 2
2
 |
 |
Quick Start Guide
SYSTEM 100
182 SEQUENCER
Legendary Analog Sequencer
Module for Eurorack
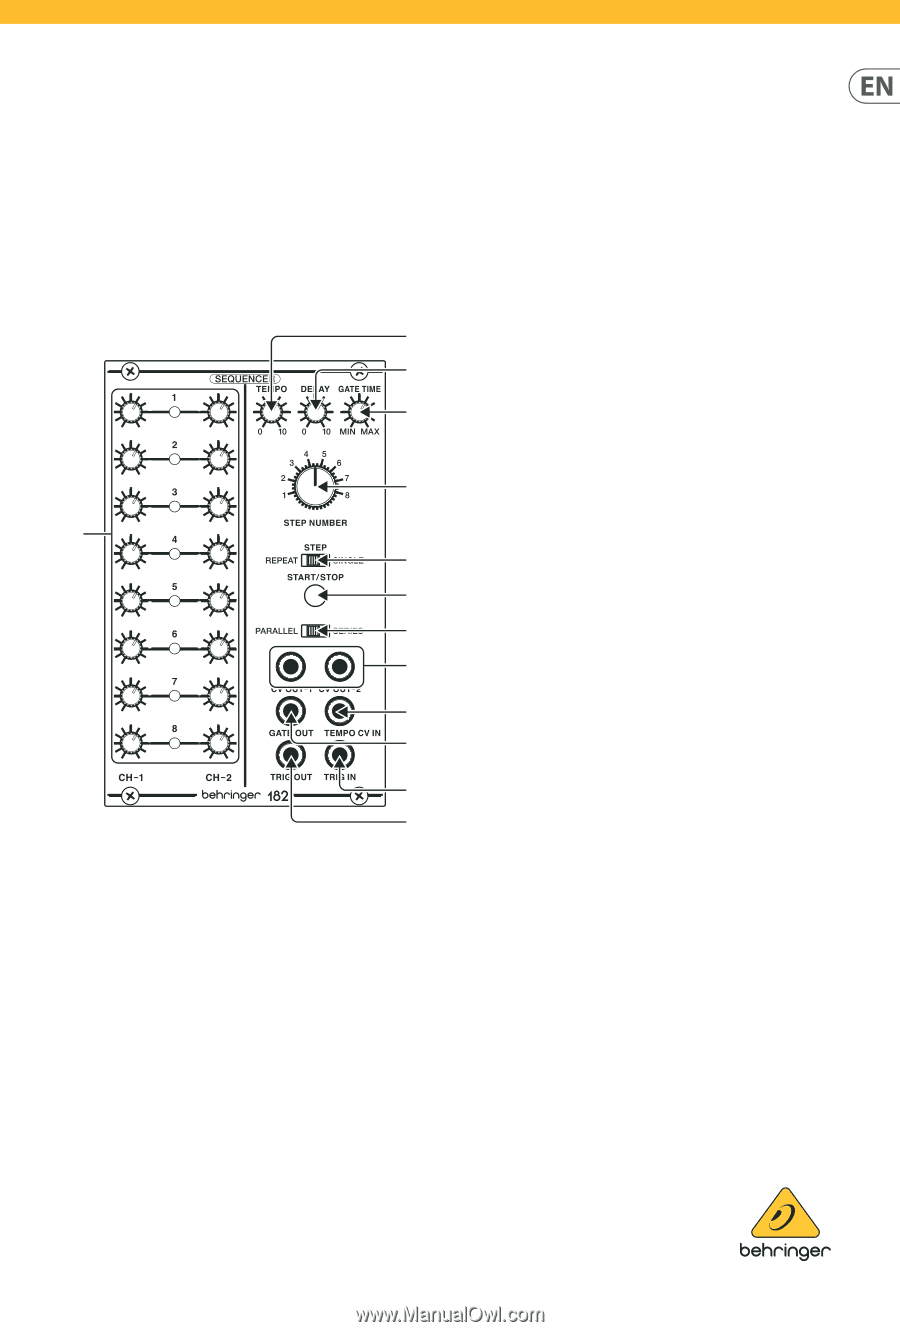
Controls
(1)
CH-1/CH-2 SEQUENCER COLUMNS
– Use the knobs to
set the control voltage output for each step. Each column
sends out control voltages over a dedicated output
jack (CV OUT-1 and CV OUT-2). In PARALLEL mode,
two independent voltages can be set for each step for a
total of up to 8 steps. In SERIES mode, you can program
sequences of up to 16 steps.
(2)
TEMPO
– This knob controls the step speed of the
sequencer. The internal tempo clock can also be controlled
via the TEMPO CV IN jack. You can also route control
voltages from the CV OUT-1 or CV OUT-2 output jacks
back into the clock via the TEMPO CV IN jack to program
variable timing between each step.
(3)
DELAY
– Use this knob to set the amount of time taken
(0 to 10 seconds)
to shift to the sequence’s next step
voltage, which is set by the 16 knobs in the CH-1/CH-2
SEQUENCER COLUMNS. The DELAY parameter creates
an effect similar to a portamento effect, except with an
exponential response. The DELAY function only operates
on the CV OUT-1 output jack (in both PARALLEL and SERIES
modes). The CV OUT-2 output jack is unaffected by the
DELAY control.
(4)
GATE TIME
– This knob controls the length of time
the GATE OUT control voltage is active – known as the
“duty cycle”
– in a range from 10% to 90%.
(5)
STEP NUMBER
– Rotate this knob to set the number of
steps counted before the sequencer re-starts. In PARALLEL
mode, the STEP NUMBER setting affects both columns
simultaneously. In SERIES mode, the STEP NUMBER setting
affects only the CH-2 row so that you may create longer
sequences of 9 to 16 steps.
(6)
STEP (REPEAT/SINGLE)
– This sliding switch determines
how the sequencer responds to triggering. In the REPEAT
setting, the sequence repeats every time it reaches the
end. The SINGLE setting stops the sequence after one full
cycle. The middle STEP setting advances the sequence one
step each time a trigger control voltage is received a the
TRIG IN jack.
(7)
START/STOP
– Press this button to trigger or stop
the sequence.
(8)
PARALLEL/SERIES
– This sliding switching determines
whether each step of the CH-1 and CH-2 columns trigger
separately and simultaneously (PARALLEL) for sequences
of up 8 steps, or if the two columns trigger one after the
other (SERIES) with the CH-1 column triggering first,
followed by the CH-2 column. In SERIES mode, you can
create sequences of 8 to 16 steps.
(9)
CV OUT-1/CV OUT-2
– These jacks send out separate
control voltage signals for the CH-1 (CV OUT-1 jack)
and CH-2 (CV OUT-2 jack) columns. When in SERIES mode,
CV OUT-1 provides the 16-step output and the CV OUT-2
jack provides an 8-step output.
(10)
TEMPO CV IN
– This jack routes in a control voltage signal
to control the tempo clock.
(11)
GATE OUT
– This jack sends out a gate trigger signal for
every sequencer step via cables with 3.5 mm connectors.
(12)
TRIG IN
– This input allows you to route in a trigger
voltage via cables with 3.5 mm connectors.
(13)
TRIG OUT
– Use this jack to send out a trigger voltage
signal for use with other modules. This trigger voltage is
generated when the sequencer reaches its end step.
(1)
(2)
(3)
(4)
(5)
(6)
(7)
(8)
(9)
(10)
(11)
(12)
(13)
V 1.0