Behringer ADI21 Manual
Behringer ADI21 Manual
 |
View all Behringer ADI21 manuals
Add to My Manuals
Save this manual to your list of manuals |
Behringer ADI21 manual content summary:
- Behringer ADI21 | Manual - Page 1
-impedance output (like an electric guitar) and connect it directly to the balanced mic input of a mixing console. Whether for stage, recording, rehearsal or warm-up, BEHRINGER's V-TONE ACOUSTIC ADI21 is a natural choice for those who are seeking great tone with a simple set-up. 1. Control Elements - Behringer ADI21 | Manual - Page 2
notice. Specifications and appearance may differ from those listed or illustrated. BASS GUITAR V-TONE ACOUSTIC DRIVER DI ADI21 TECHNICAL SPECIFICATIONS AND APPEARANCES ARE SUBJECT TO CHANGE WITHOUT NOTICE AND ACCURACY IS NOT GUARANTEED. BEHRINGER IS PART OF THE MUSIC GROUP (MUSIC-GROUP.COM). ALL
-
 1
1 -
 2
2
 |
 |
V-TONE ACOUSTIC DRIVER DI ADI21
Acoustic Amp Modeler/Direct Recording Preamp/DI Box
Thank you for showing your confidence in us by purchasing the V-TONE
ACOUSTIC ADI21. This high-quality acoustic guitar driver is designed for all
acoustic guitar players who are looking for more sounds to reach maximum
flexibility and creativity. Thanks to its high-performance EQ section
(including parametric mids) and the integrated Tube/Microphone Emulation,
the ADI21 gives your guitar natural sound with smooth saturation, just as if it
were being miked. In addition, the ADI21 functions as a standard ultra-transparent
direct injection box when used in bypass mode.
A DI (Direct Injection) box allows you to send a signal directly from an unbalanced,
high-impedance output (like an electric guitar) and connect it directly to the
balanced mic input of a mixing console.
Whether for stage, recording, rehearsal or warm-up, BEHRINGER’s V-TONE ACOUSTIC
ADI21 is a natural choice for those who are seeking great tone with a simple set-up.
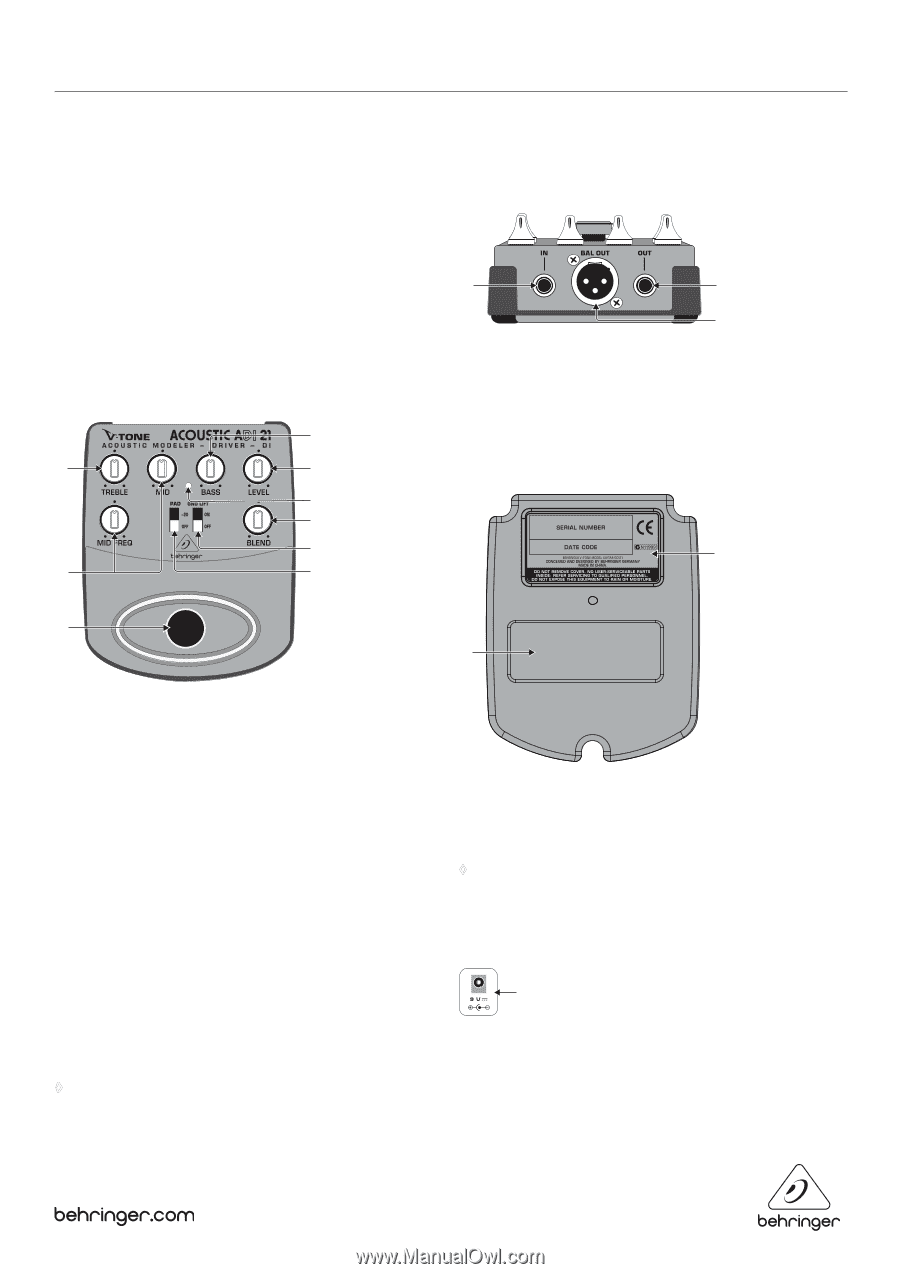
1.
Control Elements
Control elements
(1)
The
TREBLE
control governs the high-frequency range of the signal (
±
12 dB).
(2)
The
BASS
control allows you to boost/cut the low-frequency range (
±
12 dB).
(3)
Use the
MID
control to boost or cut the mid-range frequencies (
±
12 dB).
The
MID FREQ
control lets you select the middle frequency (170 Hz to 3.5 kHz)
that will be boost/cut.
(4)
The
LEVEL
control adjusts the output level of the ADI21.
(5)
The
BLEND
control activates the integrated tube/microphone emulation circuitry.
In most cases, you will probably set it to maximum (100%). If you want to
hear some of the distinct timbre of a piezo pickup or reduce the amount
of compression, simply turn the control counterclockwise.
(6)
When activated, the
GND LIFT
disconnects the ground connection between
input and output. Depending on the grounding of the connected equipment,
this can eliminate hum or ground loops.
(7)
The
-20 dB PAD
switch attenuates the output level of the BAL OUT (see
(10)
)
by -20 dB. It should be activated when the output level is too high for the
microphone input of the mixer channel.
◊
Before using the PAD switch, be sure that it is the mic preamp on the
mixing console that is clipping and not the ADI21. You should only
attenuate the output signal via the PAD switch if the CLIP LED of the
mic channel lights up frequently or remains lit.
(1)
(8)
(5)
(4)
(3)
(2)
(6)
(9)
(7)
(8)
Use the footswitch to activate/deactivate all the tone functions
(EQ, microphone/tube emulation). When deactivated, the ADI21
functions solely as a standard transparent DI box.
(9)
This LED illuminates when the effect is activated (see
(8)
).
Connectors
(10)
Use this ¼" TS
INPUT
connector to plug in the instrument cable of your
acoustic guitar or other instruments.
(11)
BAL OUT
is the ADI21’s balanced mic level output. Use a high-quality,
balanced XLR (microphone) cable to connect the driver to a mixing console.
(12)
The unbalanced ¼" TS
OUT
connector sends the signal to your guitar amp.
Bottom of the ADI21
(13)
SERIAL NUMBER
. The serial number of the ADI21 is located at the bottom.
(14)
BATTERY COMPARTMENT
. Open the lid to install or replace the 9 V battery.
◊
The ADI21 is powered as soon you insert a plug into the INPUT.
The battery is “disconnected” when the plug is removed.
For this reason, the ADI21 has no on/off switch. To prolong
battery life, always disconnect the input when the driver is
not in use.
(15)
Power supply connector
(15)
Use the
DC IN
connection to plug in a 9 V power supply (not included).
(10)
(12)
(11)
(14)
(13)