Behringer AM400 Manual
Behringer AM400 Manual
 |
View all Behringer AM400 manuals
Add to My Manuals
Save this manual to your list of manuals |
Behringer AM400 manual content summary:
- Behringer AM400 | Manual - Page 1
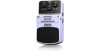
ULTRA ACOUSTIC MODELER AM400 Ultimate Electric-to-Acoustic Guitar Modeling Effects Pedal Thank you for showing your confidence in us by purchasing the BEHRINGER ULTRA ACOUSTIC MODELER AM400. This high-quality modelling effects pedal is designed for all electric guitar players who want to add - Behringer AM400 | Manual - Page 2
ULTRA ACOUSTIC MODELER AM400 ◊ The AM400 has no on/off switch. As soon as you insert the jack into the in connector, the AM400 begins running. When not using the AM400, remove the jack from the in connector. This extends the life of the battery. The SERIAL NUMBER is located at the bottom. ◊ In rare
-
 1
1 -
 2
2
 |
 |

ULTRA ACOUSTIC MODELER AM400
Ultimate Electric-to-Acoustic Guitar Modeling Effects Pedal
Thank you for showing your confidence in us by purchasing the BEHRINGER ULTRA ACOUSTIC MODELER
AM400. This high-quality modelling effects pedal is designed for all electric guitar players who want to
add incredibly realistic acoustic guitar sounds to their playing. Thanks to its Real Sound Modeling (RSM)
technology that combines state-of-the-art DSP technology with sophisticated algorithms to emulate real
acoustic environments, you can create everything from standard, large-resonant, brilliant to bright Piezo
pickup simulations.
1.
Controls
(1)
The
LEVEL
control adjusts the output
level of the effect.
(2)
The
REVERB
control adjusts the
amount of reverb effect that can be
added to the signal.
(3)
The
RES
(onance) control adjusts the
resonance of the simulated acoustic
guitar body.
(4)
The
ATTACK
control adjusts the amount
of attack and harmonic content of the
high frequencies.
(5)
The
MODE
control lets you choose
between four different acoustic modes:
STANDARD
produces a typical acoustic
guitar sound.
LARGE
delivers a large,
more resonant acoustic.
PIEZO
simulates the distinct brightness of a classic piezo pickup.
BRIGHT
gives you a brilliant and ultra-present sound, perfect for cutting
through in a live environment.
(6)
The
ON/BATT
-LED illuminates when the effect is activated. It also serves as a battery level indicator.
(7)
Use the footswitch to activate/deactivate the effect.
(8)
Use this °" TS
IN
connector to plug in the instrument cable.
(9)
This is the °" TS
OUT
connector. When you only use this output, it carries the affected
signal when the effect is active, and the direct signal (without effect) when the effect is
inactive—both optimized for connecting to guitar amplifiers. When both the OUT and the
DIR OUT (see
(10)
) connectors are used, the OUT connector carries the affected signal optimized
for connecting to a mixer/PA when the effect is active. When the effect is inactive the
OUT connector is muted.
(10)
This is the °" TS
DIR OUT
connector, which is muted when the effect is active. When inactive it
carries the direct signal (without effect) optimized for connecting to guitar amplifiers. It works the
same way, when both the DIR OUT and the OUT (see
(9)
) connectors are used.
Use the
DC IN
connection at the front of the unit to plug in a 9 V power supply (not included).
The
BATTERY COMPARTMENT
is located underneath the pedal cover. To install or replace the 9 V
battery, press the hinges with a ballpen and remove the pedal cover. Be careful not to scratch the unit.
(1)
(2)
(9)
(10)
(5)
(6)
(8)
(7)
(4)
(3)