Behringer DR600 Manual
Behringer DR600 Manual
 |
View all Behringer DR600 manuals
Add to My Manuals
Save this manual to your list of manuals |
Behringer DR600 manual content summary:
- Behringer DR600 | Manual - Page 1
DIGITAL REVERB DR600 Digital Stereo Reverb Effects Pedal Thank you for showing your confidence in us by purchasing the BEHRINGER DIGITAL REVERB DR600. This ultimate effects pedal is specifically designed to deliver 24-bit high-resolution stereo reverbs comparable to state-of-the-art studio - Behringer DR600 | Manual - Page 2
DIGITAL REVERB DR600 Use the DC IN connection to plug in a 9 V power supply (not included). The BATTERY COMPARTMENT is located underneath the pedal cover. To install or replace the 9 V battery (not included), press the hinges with a ballpoint pen and remove the pedal cover. Be careful not to scratch
-
 1
1 -
 2
2
 |
 |

DIGITAL REVERB DR600
Digital Stereo Reverb Effects Pedal
Thank you for showing your confidence in us by purchasing the BEHRINGER DIGITAL REVERB DR600.
This ultimate effects pedal is specifically designed to deliver 24-bit high-resolution stereo reverbs
comparable to state-of-the-art studio processors. Thanks to six renowned modes and extensive parameter
control for maximum creativity you’ll have plenty of cool sounds at your disposal for every situation.
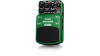
1.
Controls
(1)
The
LEVEL
control adjusts the output level.
(2)
The
TONE
controlallows you to shape your overall sound.
(3)
The
TIME
control determines the rever time.
(4)
The
MODE
control lets you chose between six different reverb sounds:
SPRING:
Simulates classic spring reverberation.
PLATE:
Simulates the sound of plat reverberation.
HALL:
Very bright reverb that simulates the reflections of a concert hall.
GATE:
This effect snthetically cuts off reverberation after a period of time.
ROOM:
Clearly hear natural room acoustics.
MODULATE:
By detuning the reverb tail it creates spacious, almost choir-like reverb that reminds a
little bit of a chorus effect.
(5)
The
ON/BATT
LED illuminates when the effect is activated. It also serves as a battery level indicator.
(6)
Use the footswitch to activate/deactivate the effect.
(7)
Use the two °" TS connectors
IN A
and
IN B
to plug in a stereo input signal. For mono use just plug
in IN A.
(8)
The two °" TS connectors
OUT A
and
OUT
B
send the signal to your amp. Use both connectors if
you want to achieve full stereo effect. For mono use just plug in OUT A.
(1)
(2)
(4)
(5)
(6)
(3)
(8)
(7)