Behringer MICROMON MA400 Manual
Behringer MICROMON MA400 Manual
 |
View all Behringer MICROMON MA400 manuals
Add to My Manuals
Save this manual to your list of manuals |
Behringer MICROMON MA400 manual content summary:
- Behringer MICROMON MA400 | Manual - Page 1
Thank you for showing your confidence in us by purchasing the BEHRINGER MICROMON MA400, a monitor headphone amplifier that is both flexible and compact. On your headphones, you can simultaneously listen to two audio signals: • one from a microphone • one from a mixer or a Hi-Fi unit You can - Behringer MICROMON MA400 | Manual - Page 2
MICROMON MA400 Specifications MIC INPUT Type Impedance Max. input level CMRR Gain Bandwidth MIC THRU Type XLR connector approx. 2 kΩ (balanced) -18 dBu typically 40 dB, >50 dB @ 1 kHz 40 dB 15 Hz to 25 kHz XLR connector MONITOR INPUT Type Gain Bandwidth ¼" TRS or ¼" TS connector 10 dB 10 Hz to
-
 1
1 -
 2
2
 |
 |
MICROMON MA400
Welcome to BEHRINGER
Thank you for showing your confidence in us by purchasing the BEHRINGER MICROMON
MA400, a monitor headphone amplifier that is both flexible and compact. On your
headphones, you can simultaneously listen to two audio signals:
•
one from a microphone
•
one from a mixer or a Hi-Fi unit
You can even emphasize one signal over the other. Hear yourself sing, or concentrate on the
main audio program. Both are possible.
◊
Please read the safety instructions that appear at the end of this document.
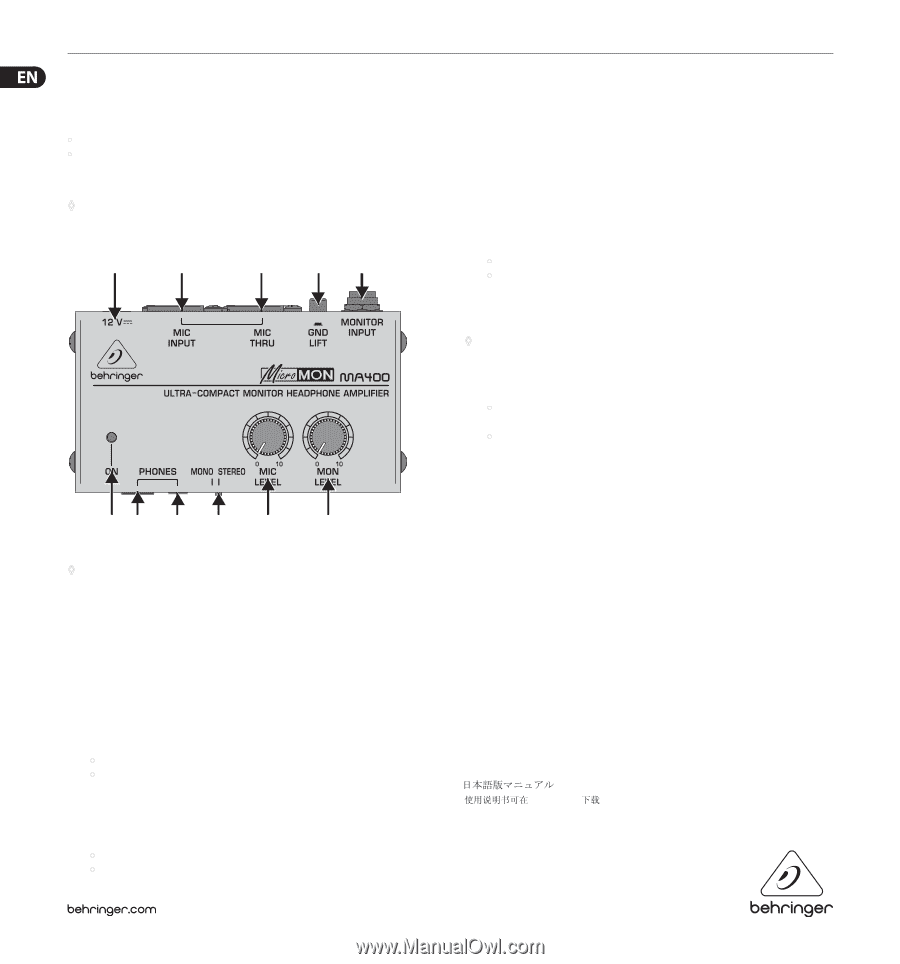
Connectors and Control Elements
(2) (7)
(9)
(10)
(11)
(8)
(1)
(3)
(4)
(5)
(6)
Fig. 1: MA400 connectors and control elements
◊
High volumes can damage your hearing and your headphones. Before you
use the MA400, turn the MIC LEVEL and MON LEVEL controls to 0 (zero).
(1)
12 V
±
connector:
To connect the power supply unit to the MA400, use the 12 V connector. Connecting
the power supply unit to the mains automatically switches the MA400 on. To
disconnect the unit from the mains, pull out the main cord plug.
(2)
ON
LED:
As soon as the unit is connected to the mains, the ON LED is illuminated.
(3)
MIC INPUT
connector:
To send a microphone signal to the MA400, you need an audio cable that includes XLR
connectors.
Plug:
•
one XLR connector into the MIC INPUT connector
•
the other XLR connector into the microphone
(4)
MIC THRU
connector:
If you want to route the microphone signal from the MA400 to a mixer, you need an
audio cable that includes XLR connectors.
Plug:
•
one XLR connector into the MIC THRU connector
•
the other XLR connector into a mic input on the mixer
(5)
GND LIFT
button:
When you connect a mixer to the MA400, keep this button pushed out to maintain a
ground connection to the mixer.
This connection prevents electrostatic charges from interfering with your
audio signals.
However, if ground-loop hum interferes with your audio signals, you can break
the ground connection between the MA400 and the mixer. To do this, push in the
GND LIFT button.
(6)
MONITOR INPUT
connector:
To send a signal from a mixer or Hi-Fi unit to the MA400, you need an audio cable that
includes ¼" connectors (unbalanced/stereo TRS or unbalanced/mono TS).
Plug:
•
one ¼" connector into the MONITOR INPUT connector
•
the other ¼" connector into the AUX SEND of a mixer or, alternatively the output
of a Hi-Fi unit
(7)
¼"
PHONES
connector,
(8)
±²8"
PHONES
connector: To connect headphones to the
MA400, use the ¼" or, alternatively the ±²8" PHONES connector.
◊
Do not simultaneously use both PHONES connectors.
(9)
MONO / STEREO
switch:
To specify the type of mixer or Hi-Fi signal the MA400 receives, use this switch.
If you plugged:
•
a TS connector into the MONITOR INPUT, the MA400 receives a mono signal. Push
this switch to MONO.
•
a TRS connector into the MONITOR INPUT, the MA400 receives a stereo signal.
Push this switch to STEREO.
(10)
MIC LEVEL
control:
To adjust the volume of the microphone signal, slowly turn this control toward 0
(minimum volume) or, alternatively 10 (maximum volume).
(11)
MON LEVEL
control:
To adjust the volume of the mixer or Hi-Fi signal, slowly turn this control toward 0
(minimum volume) or, alternatively 10 (maximum volume).
SERIAL NUMBER: To register your unit, use the serial number that is located on the bottom
of the MA400.
Warranty
For our current warranty terms, please refer to our website at http://behringer.com.
Die deutsche Anleitung ist erhältlich @ behringer.com
Manuel francophone en téléchargement sur behringer.com
Manual en español disponible en behringer.com
Manuali italiani disponibili @ behringer.com
Русскоязычное руководство @ behringer.com
Polska instrukcja dostêpna jest pod adresem @ behringer.com
Nederlandse handleiding beschikbaar @ behringer.com
Suomenkielinen käyttöohje saatavilla osoitteesta behringer.com
Svensk manual finns tillgänglig på behringer.com
Dansk vejledning findes på @ behringer.com
Manual português disponível @ behringer.com
Ελληνικό εγχειρίδιο υπάρχει διαθέσιμο στη διεύθυνση behringer.com
@ behringer.com
@ behringer.com