Behringer MONITOR2USB Quick Start Guide
Behringer MONITOR2USB Manual
 |
View all Behringer MONITOR2USB manuals
Add to My Manuals
Save this manual to your list of manuals |
Behringer MONITOR2USB manual content summary:
- Behringer MONITOR2USB | Quick Start Guide - Page 1
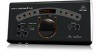
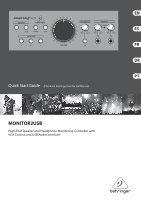
Quick Start Guide (Check out behringer.com for Full Manual) MONITOR2USB High-End Speaker and Headphone Monitoring Controller with VCA Control and USB Audio Interface - Behringer MONITOR2USB | Quick Start Guide - Page 2
MONITOR2USB Important Safety Instructions instructions in the accompanying literature. Please read the manual. Caution To reduce the risk of electric shock, do not remove the top cover (or the rear section). No user serviceable parts inside. Refer servicing , TC-HELICON, BEHRINGER, BUGERA, DDA Guide - Behringer MONITOR2USB | Quick Start Guide - Page 3
MONITOR2USB TANNOY, TURBOSOUND, TC ELECTRONIC, TC-HELICON, BEHRINGER, BUGERA, DDA y TC APPLIED TECHNOLOGIES ée d'une protection par mise à la terre. Quick Start Guide 5 16. La prise électrique ou la prise IEC de , auf das Gerät. Achtung Die Service-Hinweise sind nur durch qualifiziertes Personal zu - Behringer MONITOR2USB | Quick Start Guide - Page 4
MONITOR2USB alle Wartungsarbeiten nur von qualifiziertem Service-Personal ausführen. Eine manuseamento que acompanham o equipamento. Por favor leia o manual de instruções. Atenção De forma a diminuir , TURBOSOUND, TC ELECTRONIC, TC-HELICON, BEHRINGER, BUGERA, DDA e TC APPLIED TECHNOLOGIES Guide 7 - Behringer MONITOR2USB | Quick Start Guide - Page 5
8 MONITOR2USB MONITOR2USB Hook-up (EN) Step 1: Hook-Up (ES) Paso 1: Conexión (FR) Étape 1 : Connexions (DE) Schritt 1: Verkabelung (PT) Passo 1: Conexões 9 Quick Start Guide Studio setup with stereo monitors, stereo monitors with subwoofer, mono fullrange monitor and DAW audio via USB. Configuraci - Behringer MONITOR2USB | Quick Start Guide - Page 6
the mixes you produce on monitors, and you will experience less ear fatigue from long sessions wearing headphones. (6) PHONES knobs control the volume level NOTE! The USB audio interface is class-compliant, so no special software drivers are required, and low latency ASIO* drivers can also be used - Behringer MONITOR2USB | Quick Start Guide - Page 7
(5) El control CROSSFEED le permite mezclar de impedancia. USB del panel USB cumple con las especificaciones de este standard, por lo que no es necesario ningún driver o software especial y también puede usar drivers ASIO* de baja latencia (como el ASIO4ALL). No obstante, (17) La sección MONITOR - Behringer MONITOR2USB | Quick Start Guide - Page 8
Start Guide (PT) Passo 2: Controles (7) Os botões MONITOR ativam e desativam os grupos de alto-falantes A, B e C (12) O botão +4 dBu / -10 dBV possibilita a mudança do nível de sensibilidade conectados aos jacks MONITOR OUT do grupo INPUT 2 de jacks XLR. (1) Os botões SOURCE 1 e SOURCE 2/USB - Behringer MONITOR2USB | Quick Start Guide - Page 9
16 MONITOR2USB MONITOR2USB Getting started (EN) Step 3: Getting started Make all necessary connections. DO NOT turn on the power yet. Make sure your monitor speakers are switched off. Turn on your audio sources (mixers, computers, recording interfaces). Set the VOLUME, CROSSFEED and PHONES knobs - Behringer MONITOR2USB | Quick Start Guide - Page 10
MONITOR2USB Puesta en marcha (ES) Paso 3: Puesta en marcha Realice todas las conexiones adecuadas. NO encienda la unidad todavía. Asegúrese de que sus monitores estén apagados. Encienda sus fuentes de sonido (mezcladores, ordenadores, interfaces de grabación). Ajuste los mandos VOLUME, CROSSFEED - Behringer MONITOR2USB | Quick Start Guide - Page 11
MONITOR2USB MONITOR2USB d'enceintes d'écoute avec les boutons MONITOR A ou B. Montez lentement le USB. Réglez le niveau de chaque source jusqu'à obtenir un niveau similaire pour les 2 sources sans modifier la position du potentiomètre VOLUME. 21 Quick Start Guide Utilisation de la fonction CROSSFEED - Behringer MONITOR2USB | Quick Start Guide - Page 12
MONITOR2USB MONITOR2USB USB-Tasten hin und her. Lassen Sie den VOLUME-Regler an der gleichen Position und stellen Sie den Ausgangspegel an jedem Gerät so lange ein, bis die Pegel bei beiden Quellen annähernd gleich sind. 23 Quick Start Guide CROSSFEED der über die Monitore wahrgenommenen Lautstärke - Behringer MONITOR2USB | Quick Start Guide - Page 13
para o outro usando os botões SOURCE 1 e SOURCE 2/USB. Ajuste o nível de saída proveniente de cada dispositivo até chegar a níveis similares entre as fontes enquanto mantém o botão VOLUME na mesma posição. 25 Quick Start Guide Usando a função CROSSFEED Certifique-se de que os botões PHONES estejam - Behringer MONITOR2USB | Quick Start Guide - Page 14
Group Authorized Fulfiller for your country listed under "Support" at behringer.com. Should your country not be listed, please check if your problem can be dealt with by our "Online Support" which may also be found under "Support" at behringer.com. Alternatively, please submit an online warranty - Behringer MONITOR2USB | Quick Start Guide - Page 15
aufgelistet sein, prüfen Sie bitte, ob Ihr Problem von unserem „Online Support" gelöst werden kann, den Sie ebenfalls auf behringer.com unter „Support" finden. Alternativ reichen Sie bitte Ihren Garantieanspruch online auf behringer.com ein, BEVOR Sie das Produkt zurücksenden. 3. Stromanschluss - Behringer MONITOR2USB | Quick Start Guide - Page 16
We Hear You
-
 1
1 -
 2
2 -
 3
3 -
 4
4 -
 5
5 -
 6
6 -
 7
7 -
8
-
9
-
10
-
11
-
12
-
13
-
14
-
15
-
16
 |
 |

Quick Start Guide
(Check out behringer.com for Full Manual)
MONITOR2USB
High-End Speaker and Headphone Monitoring Controller with
VCA Control and USB Audio Interface