Behringer SF400 Manual
Behringer SF400 Manual
 |
View all Behringer SF400 manuals
Add to My Manuals
Save this manual to your list of manuals |
Behringer SF400 manual content summary:
- Behringer SF400 | Manual - Page 1
SUPER FLANGER SF400 Ultimate Flanger Effects Pedal Thank you for showing your confidence in us by purchasing the BEHRINGER SUPER FLANGER SF400. This ultimate Flanger delivers the whole range of effects from vintage to modern flanging effects- at the touch of a footswitch. Experience any sounds from - Behringer SF400 | Manual - Page 2
SUPER FLANGER SF400 The BATTERY COMPARTMENT is located underneath the pedal cover. To install or replace the 9 V battery (not included), press the hinges with a ballpoint pen and remove the pedal cover. Be careful not to scratch the unit. ◊ The SF400 has no On/Off switch. It is operable as soon as - Behringer SF400 | Manual - Page 3
SUPER FLANGER SF400 Responsible Party Name: Address: Phone Number: MUSIC Group Services US Inc. 18912 North Creek Parkway, Suite 200 Bothell, WA 98011, USA Phone: +1 425 672 0816 SUPER FLANGER SF400 installed and used in accordance with the instructions, may cause harmful interference to radio
-
 1
1 -
 2
2 -
 3
3
 |
 |

SUPER FLANGER SF400
Ultimate Flanger Effects Pedal
Thank you for showing your confidence in us by purchasing the BEHRINGER SUPER FLANGER SF400.
This ultimate Flanger delivers the whole range of effects from vintage to modern flanging effects—
at the touch of a footswitch. Experience any sounds from classic analog flangers to super-thick and
swirling flanging effects plus a new Gate/Pan mode.
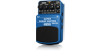
1.
Controls
(1)
The
MODE
knob switches between
different flanger-type effects
Standard:
Classic flanger
Ultra:
Strong flanger with
more depth
Gate/Pan:
Mono slicer effect or
swirling stereo flanger, depending on
mono or stereo output use
Momentary:
Momentary flanger
e.g. for single notes. Hold the pedal
depressed for effect activation
(2)
With the
MANUAL
control, you can
adjust the center frequency to
which the effect is applied.
(3)
Turn up the
DEPTH
control to
achieve a fuller and deeper
effect sound.
(4)
The
RATE
control determines the
speed of the flanger effect.
(5)
The
RES(onance)
control determines the amount of output signal fed back to the flanger input to
increase the resonance frequency. Consequently the flanger effect gets more intensive.
(6)
The
ON/BATT
LED illuminates when the effect is activated. It also serves as a
battery level indicator.
(7)
Use the footswitch to activate/deactivate the effect. If you depress the pedal for more than two
seconds, you are able to enter a tempo by tapping the pedal several times in time with the music
(not in MOMENTARY mode). Depressing the pedal once again for more than two seconds quits the
tempo input mode.
(8)
The ¼" TS connector (
GTR IN
) is optimized for guitars. Use connector BASS IN
(10)
for optimized
bass guitar performance.
(9)
The ¼" TS connector (
OUT A
) sends out a mono signal to your amp/combo. For stereo applications,
use connector OUT B additionally.
(10)
The ¼" TS connector (
BASS IN
) is optimized for bass guitars. Use connector GTR IN
(8)
for
optimized guitar performance.
(11)
The ¼" TS connector (
OUT B
) sends out a signal, which together with OUT A, forms a stereo signal
that can be used e.g. to feed a mixer.
Use the
DC IN
connection at the front of the unit to plug in a 9 V power supply (not included).
(5)
(2)
(1)
(6)
(8)
(10)
(7)
(3)
(4)
(9)
(11)