Behringer U-CONTROL UMX490 Manual - Page 11
°ch°1°, °ch°16°, °global°, °°1°°, °°4°°, °°0°°, °°7°°, °ch°14°, °°2°°, °°5°°, °°9 - 49 key
 |
View all Behringer U-CONTROL UMX490 manuals
Add to My Manuals
Save this manual to your list of manuals |
Page 11 highlights
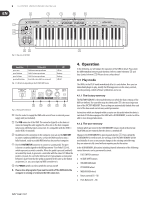
11 U-CONTROL UMX610/UMX490 User Manual The enormous value range of a total of 128 x 128 = 16,384 different values is therefore available to you via the BANK SELECT command. This theoretically means that you could use external devices which support the same amount of different banks. If you consider that each of these banks again contains another 128 individual programs, you will receive the unbelievably large number of 2,097,152 different options to organize these programs. 1) Press the ASSIGN push-button and hold it down. 2) Press one of the 16 channel keys ( CH 1 ) through ( CH 16 ), or press the ( GLOBAL ) key. 3) Release the ASSIGN push-button. 4) Press the BANK MSB key. Then press the number keys in sequence until you have completely entered the desired BANK MSB number. Only value entries between 0 and 127 are possible. Greater values are ignored by the device. The BANK MSB has now been defined. Examples: • Press ( 1 ) and ( 4 ) if you have decided on MSB 14, for example. • Press ( 1 ), ( 0 ) and ( 7 ) if you would like to select MSB 107. 5) Now define the BANK LSB by pressing the key. Then enter the number value of the BANK LSB with the already familiar procedure (see step 4). The same entry rules apply as for the BANK MSB. You have defined the bank in which the desired program will be called up in steps 4 and 5. Now all you have to define is the program itself: 6) Press the PROGRAM key and then press the number keys in sequence until you have completely entered the desired program number. Only entries between 0 and 127 are possible, greater values are ignored by the device. Ready! 7) Finally, press the ENTER key. In order to discard your assignments, please press the CANCEL key or press the ASSIGN push-button again. The ASSIGN LED will go off in all 3 cases. Example: You want to select preset No. 49 in bank 25 of an external device on channel 14 via the UMX. Only the LSB will be used to describe the bank, since the bank number remains less than 128. The MSB in this case equals 0. 1) Press and hold the ASSIGN push-button. 2) Press the channel key ( CH 14 ). 3) Release the ASSIGN push-button. 4) Then, press the BANK MSB key or the ( 0 ) key 5) Press BANK LSB key and then describe bank 25 with push-buttons ( 2 ) and ( 5 ). 6) Define the program: Press the PROGRAM key and then the ( 4 ) and ( 9 ) keys for program 49. 7) Press the ENTER key. c) Direct program selection through the two OCTAVE SHIFT push-buttons. 1) Press the ASSIGN push-button and hold it down. 2) Select the OCTAVE SHIFT push-button which you want to assign to the program change function. 3) Release the ASSIGN push-button again. 4) Defined the channel by which the program change will be transmitted. Press one of the 16 channel keys ( CH 1 ) through ( CH 16 ) on the keyboard. 5) Press the PROG DIR key. Then press the number keys on the keyboard in sequence until you have completely entered the desired preset number. Only value entries between 0 and 127 are possible. Greater values are ignored by the device. 6) Finally, press the ENTER key. In order to discard your assignments, please select the CANCEL key or press the ASSIGN push-button again. The ASSIGN LED will go off in all 3 cases. ◊ As soon as you have assigned the direct program selection to one or both OCTAVE SHIFT push-buttons simultaneously, pressing both push-buttons will not activate ANYTHING! 4.2.9 Other functions of the octave shift buttons The OCTAVE SHIFT push-buttons of the device are in their initial state every time the UMX is switched on (see Table 3.1). Further special functions can be assigned to both push-buttons in the ASSIGN mode in addition to the already covered functions regarding direct program change and octave transposition: a) Transposition in individual semitone steps b) Sequential scrolling in program libraries c) Optional controller functions ◊ As soon as you assign a function to one of the two push-buttons, the second push-button will automatically assume the same function, however, it is still restricted in its functionality. It is not capable of sending data until you assign a function to this push-button with the ASSIGN procedure. a) Transposition in individual semitone steps 1) Press the ASSIGN push-button and hold it down. 2) Press the TRANSP +/- key. 3) Release the ASSIGN push-button. 4) Finally, press the ENTER key. In order to discard your assignments, please press the CANCEL key or press the ASSIGN push-button again. The ASSIGN LED will go off in all 3 cases. Pressing the right hand one of the two push-buttons causes a shift by one semitone upward pressing the left hand one leads to a shift by one semitone downward. Pressing both push-buttons cancels all transpositions. ◊ A keyboard can consist of a maximum of 128 semitones according to the MIDI standard. If you have reached the lower or upper end of this tone range with the transposition function, you cannot exceed the highest or lowest tone despite continued pressing of the transposition push-button. This also applies to the transposition in octave steps.
-
 1
1 -
2
-
3
-
4
-
5
-
 6
6 -
 7
7 -
 8
8 -
 9
9 -
 10
10 -
 11
11 -
 12
12 -
 13
13 -
 14
14 -
 15
15 -
 16
16
 |
 |