Behringer ULTRA VIBRATO UV300 Manual
Behringer ULTRA VIBRATO UV300 Manual
 |
View all Behringer ULTRA VIBRATO UV300 manuals
Add to My Manuals
Save this manual to your list of manuals |
Behringer ULTRA VIBRATO UV300 manual content summary:
- Behringer ULTRA VIBRATO UV300 | Manual - Page 1
ULTRA VIBRATO UV300 Classic Vibrato Effects Pedal Thank you for showing your confidence in us by purchasing the BEHRINGER ULTRA VIBRATO UV300. This high-quality effects pedal delivers the classic pitch modulation and dimensional vibrato effects of the '60s and '70s. Its comprehensive controls allow - Behringer ULTRA VIBRATO UV300 | Manual - Page 2
ULTRA VIBRATO UV300 ◊ The UV300 has no on/off switch. As soon as you insert the plug into the in connector, the UV300 is on. When not in use, remove the plug from the in connector. This extends the life of the battery. The SERIAL NUMBER is located at the underside. 2. Safety Instructions Do not use
-
 1
1 -
 2
2
 |
 |

ULTRA VIBRATO UV300
Classic Vibrato Effects Pedal
Thank you for showing your confidence in us by purchasing the BEHRINGER ULTRA VIBRATO UV300.
This high-quality effects pedal delivers the classic pitch modulation and dimensional vibrato effects
of the ‘60s and ‘70s. Its comprehensive controls allow you to tailor the UV300 performance right for
your needs.
1.
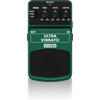
Controls
(1)
The
MODE
switch changes the functionality of the effects pedal footswitch. When set to
LATCH
,
the effect will be activated/deactivated by pressing the pedal once. When set to
UNLATCH
,
the effect will only be active if you depress the pedal. The
BYPASS
mode can be selected when
no vibrato effect is required. The input signal remains uneffected even if the pedal is depressed.
(2)
The
RISE
control adjusts the time needed for the effect to reach its maximum detuning.
Modulation sets in more slowly when it is turned clockwise.
(3)
The
RATE
control determines the speed of the vibrato effect.
(4)
The
DEPTH
control adjusts the intensity of the pitch modulation effect.
(5)
The
ON/BATT
LED illuminates when the effect is activated. It also serves as a battery level indicator.
(6)
Use the footswitch to activate/deactivate the effect.
(7)
Use this °" TS
IN
connector to plug in the instrument cable.
(8)
The °" TS
OUT
connector sends the signal to your amp.
Use the
DC IN
connection to plug in a 9 V power supply (not included).
The
BATTERY COMPARTMENT
is located underneath the pedal cover. To install or replace the 9 V battery
(not included), press the hinges with a ballpoint pen and remove the pedal cover. Be careful not to
scratch the unit.
(1)
(8)
(5)
(4)
(7)
(6)
(2)
(3)