Behringer VT999 Manual
Behringer VT999 Manual
 |
View all Behringer VT999 manuals
Add to My Manuals
Save this manual to your list of manuals |
Behringer VT999 manual content summary:
- Behringer VT999 | Manual - Page 1
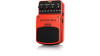
BEHRINGER VINTAGE TUBE MONSTER VT999. This high-quality classic tube overdrive pedal is based on a hand-selected BUGERA 12AX7B vacuum tube. Get a whole tube connection to plug in a 9 V power supply. (2) Use the POWER switch to activate/deactivate the unit. (3) The POWER LED lights up when the unit is - Behringer VT999 | Manual - Page 2
VINTAGE TUBE MONSTER VT999 2. Safety Instructions Do not use near water, or install near heat sources. Use only authorized attachments/accessories. Do not service product yourself. Contact our qualified servicing personnel for servicing or repairs, especially when power supply cord or plug is
-
 1
1 -
 2
2
 |
 |

VINTAGE TUBE MONSTER VT999
Classic Vacuum Tube Overdrive
Thank you for showing your confidence in us by purchasing the BEHRINGER VINTAGE TUBE MONSTER VT999.
This high-quality classic tube overdrive pedal is based on a hand-selected BUGERA 12AX7B vacuum tube.
Get a whole tube amp in a pedal and take off with anything from warm blues overdrive to heavy distortion.
1.
Controls
(1)
Use the
9 V
°
connection to plug in a 9 V power supply.
(2)
Use the
POWER
switch to activate/deactivate the unit.
(3)
The
POWER
LED lights up when the unit is activated.
(4)
The ¼" TS
OUT
connector sends the signal to your amp.
(5)
Use this ¼" TS
IN
connector to plug in the instrument cable.
(6)
The
THRESHOLD
control adjusts the input signal level at which the integrated noise gate starts
noise reduction.
(7)
The
NOISE GATE
switch activates/deactivates the integrated noise gate for noise reduction during
quiet passages.
(8)
The
GAIN
control adjusts the amount of distortion.
(9)
The
TREBLE
control allows you to boost/cut the high-frequency range.
(10)
The
MID
control allows you to boost/cut the mid-frequency range.
(11)
The
BASS
control allows you to boost/cut the low-frequency range.
(12)
The
MASTER
control adjusts the output level.
(13)
The BUGERA 12AX7B vacuum tube is placed here.
(14)
Use the footswitch to activate/deactivate the effect.
(15)
The
DRIVE
LED illuminates when the effect is activated.
The
SERIAL NUMBER
is located at the bottom.
(1)
(7)
(14)
(11)
(10)
(9)
(2)
(6)
(4)
(5)
(8)
(3)
(12)
(13)
(15)