BenQ FP71G User Manual
BenQ FP71G - 17" LCD Monitor Manual
 |
UPC - 840046010713
View all BenQ FP71G manuals
Add to My Manuals
Save this manual to your list of manuals |
BenQ FP71G manual content summary:
- BenQ FP71G | User Manual - Page 1
FP71G/FP71G+/FP71G+u LCD Color Monitor 17.0" LCD Panel Size User's Manual Welcome - BenQ FP71G | User Manual - Page 2
changes from time to time in the contents hereof without obligation of BenQ Corporation to notify any person of such revision or changes. Please follow these safety instructions for best performance, and long life for your monitor iii Power Safety • The AC plug isolates this equipment from the AC - BenQ FP71G | User Manual - Page 3
10 How to install the monitor on a new computer 11 How to upgrade the monitor on an existing computer 12 How to install on Windows XP systems 13 How to install on Windows 2000, ME, & 98 systems 15 How to complete the Windows Upgrade Device Driver Wizard 16 How to adjust the screen resolution - BenQ FP71G | User Manual - Page 4
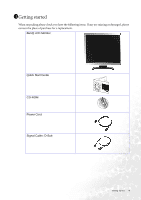
1111Getting started When unpacking please check you have the following items. If any are missing or damaged, please contact the place of purchase for a replacement. BenQ LCD Monitor Quick Start Guide CD-ROM P/N:53.L900 3 .0 Power Cord Signal Cable: D-Sub Getting started 4 02 - BenQ FP71G | User Manual - Page 5
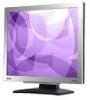
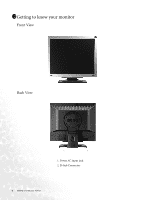
1211Getting to know your monitor Front View Back View 1. Power AC input jack 2. D-Sub Connector 5 Getting to know your monitor - BenQ FP71G | User Manual - Page 6
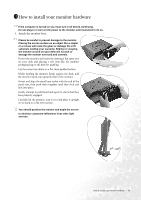
until instructed to do so. 1. Attach the monitor base. Please be careful to prevent damage to the monitor. Placing the screen surface on an object like a stapler or a mouse will crack the glass or damage the LCD substrate voiding your warranty. Sliding or scraping the monitor around on your desk - BenQ FP71G | User Manual - Page 7
2. Connect the video cable. Connect the plug of the D-Sub cable (at the end without the ferrite filter) to the monitor D-Sub socket. Connect the other plug of the D-Sub cable (at the end with the ferrite filter) to the computer video D-Sub socket. Tighten all - BenQ FP71G | User Manual - Page 8
end of the power cord into a power point and turn it on. Turn on the monitor by pressing the power button on the front of the monitor. Turn on the computer too, and follow the instructions in Section 4: Getting the most from your BenQ monitor to install the monitor software. How to install your - BenQ FP71G | User Manual - Page 9
object like a stapler or a mouse will crack the glass or damage the LCD substrate voiding your warranty. Sliding or scraping the monitor around on your desk will scratch or damage the monitor surround and controls. Protect the monitor and screen by clearing a flat open area on your desk and placing - BenQ FP71G | User Manual - Page 10
The circumstances under which you connect and install your BenQ LCD Monitor will determine which process you need to follow to successfully install the BenQ LCD Monitor driver software. These circumstances relate to which version of Microsoft Windows you are using, and whether you are connecting the - BenQ FP71G | User Manual - Page 11
the instructions in How to install your monitor hardware. When Windows (2000 or later) starts, it will automatically detect the new monitor and launch the Found New Hardware Wizard. Follow the prompts until it displays the option to Install Hardware Device drivers. 2. Insert the BenQ LCD Monitor CD - BenQ FP71G | User Manual - Page 12
instruction details the procedure for manually updating the existing monitor driver software on your Microsoft Windows computer. It is currently tested as compatible (and recommended only) for Windows 98, Windows ME, Windows 2000, and Windows XP Operating System (OS). The BenQ LCD Monitor driver - BenQ FP71G | User Manual - Page 13
and the Update Driver button. The Hardware Update Wizard will display. Follow the wizard instructions noting the steps below: 6. Insert the BenQ LCD Monitor CD-ROM into a CD drive on the computer you attached the monitor to. 7. Check the option 'Install from a list or specific location' and click - BenQ FP71G | User Manual - Page 14
11. Click Close, OK, and OK. This will close the Display Properties windows. You do not need to restart Windows XP, as the BenQ LCD monitor drivers will operate immediately with no further action required by you. Getting the most from your BenQ monitor 14 - BenQ FP71G | User Manual - Page 15
you directly to the Upgrade Device Driver Wizard, skipping the next step. 4. In Windows 2000, click the Driver tab and the Update Driver button. The Upgrade Device Driver Wizard will display. See How to complete the Windows Upgrade Device Driver Wizard. 15 Getting the most from your BenQ monitor - BenQ FP71G | User Manual - Page 16
Next. For instructions, see How to install on Windows 2000, ME, & 98 systems. 3. Check the option 'Display a list of known drivers ...' and click Next. 4. Click the Have Disk button. The Install From Disk window will display. 5. Click the Browse button and navigate to the BenQ LCD Monitor CD-ROM - BenQ FP71G | User Manual - Page 17
accept the changes. Click OK and Yes respectively. Alternatively, Windows ME or 98 will ask you if want to make the changes and reboot or not reboot. You should select the reboot option as this causes Windows to load the new drivers when it next restarts. 17 Getting the most from your BenQ monitor - BenQ FP71G | User Manual - Page 18
to adjust the screen resolution Due to the nature of liquid crystal display (LCD) technology, the picture resolution is always fixed. The best possible picture for your FP71G/FP71G+/FP71G+u is achieved with a resolution of 1280x1024. This is called "Native Resolution" or maximal resolution - that - BenQ FP71G | User Manual - Page 19
table with the factory modes in the specification section of this User's Manual. You can choose 60, 70 and 75 Hertz, (but not 72Hz) for the native resolution of 1280x1024. 1. Double click the Display icon in Control Panel. 2. From the Display Properties window, select the Settings tab and click the - BenQ FP71G | User Manual - Page 20
to, you can always adjust the screen settings manually using the buttons on the monitor panel. To assist you in this endeavour, BenQ has provided a screen test image utility which you can use to check for screen color, grayscale and line gradient display. 1. Run the test program auto.exe from CD-ROM - BenQ FP71G | User Manual - Page 21
adjust your monitor A Look at the Control Panel There are 6 keys for user's control including "i key", "Exit", "Enter", "" key and a power with. The following descriptions are the introduction of these keys & switch. 1. "i key" : Adjust W or X keys to adjust the degree of screen brightness - BenQ FP71G | User Manual - Page 22
Main Menu Mode Control Functions Available in Main Menu Main Menu Luminance sub menu Press the W or X keys to adjust the degree of Brightness. Press the Exit key to return to previous menu. Press the W or X keys to adjust the degree of Contrast. Press the Exit to return to previous menu. How to - BenQ FP71G | User Manual - Page 23
Position. Press the Exit key to return to previous menu. Press the W or X keys to adjust the display Vertical Position. Press the Exit key to return to previous menu. . Press the W or X key to adjust the monitor Pixel Clock. Press the Exit key to return to previous menu. Press the W or X keys - BenQ FP71G | User Manual - Page 24
on a yellowish tint. If you reduce Green, the image will become a magenta tint. To reset the defaults, see Recall sub menu for details. How to adjust your monitor 24 - BenQ FP71G | User Manual - Page 25
OSD. Press the Exit key to return to previous menu. Press theW or Xkeys to adjust the Vertical Position of the OSD. Press the Exit key to return to previous menu. Press theW or X keys to adjust the display time of the OSD. Press the Exit key to return to previous menu. 25 - BenQ FP71G | User Manual - Page 26
Languages Sub menu Press the W or X keys to select a language to have the OSD display menus in that language. Press the Exit key to return to previous menu. How to adjust your monitor 26 - BenQ FP71G | User Manual - Page 27
Recall All. Press the Enter key to recall position and color settings, or press the Exit key to return to previous menu. 27 How to adjust your monitor - BenQ FP71G | User Manual - Page 28
sub menu Sharpness: Press the W or X keys to adjust the degree of Sharpness. Press the Exit key to return to previous menu. Display Information: Select Display Information to display the current monitor property settings. Press the Exit key to return to previous menu. How to adjust your monitor 28 - BenQ FP71G | User Manual - Page 29
and there is a message "Out of Range" on the screen, this means you are using a display mode that this monitor does not support, please change the setting to one of the supported mode. Please read "Supported operating modes" section. Is the prompt on the display illuminated in orange? If the LED is - BenQ FP71G | User Manual - Page 30
to adjust the screen resolution section and then select the correct resolution, refresh rate and make adjustments based on these instructions. Need More Help? If your problems remain after checking this manual, please contact your place of purchase or e-mail us at: [email protected] Troubleshooting - BenQ FP71G | User Manual - Page 31
display mode (Input timing) Horizontal Vertical Pixel Frequency (KHz) Frequency (Hz) Frequency (MHz) 31.47(P) 70.08(N) 25.17 (N) 70.10(N) 75. supported. For Windows manually changing the phase setting and the pixel frequency from the "Geometry" menu. • If you switch off the monitor - BenQ FP71G | User Manual - Page 32
BenQ FP71G Model Display type Viewable diagonal Native (maximum) resolution Colors Contrast / Brightness Response time Viewing angle (left/right, up/down) Line frequency Image frequency Image checks Controls Functions Power Management Max. power consumption Power saving mode FP71G 17 - BenQ FP71G | User Manual - Page 33
BenQ FP71G+ Model Display type Viewable diagonal Native (maximum) resolution Colors Contrast / Brightness Response time Viewing angle (left/right, up/down) Line frequency Image frequency Image checks Controls Functions Power Management Max. power consumption Power saving mode FP71G+ 17.0" , active - BenQ FP71G | User Manual - Page 34
BenQ FP71G+u Model Display type Viewable diagonal Native (maximum) resolution Colors Contrast / Brightness Response time Viewing angle (left/right, up/down) Line frequency Image frequency Image checks Controls Functions Power Management Max. power consumption Power saving mode FP71G+u 17.0" ,
-
 1
1 -
 2
2 -
 3
3 -
 4
4 -
 5
5 -
 6
6 -
 7
7 -
8
-
9
-
10
-
11
-
12
-
13
-
14
-
15
-
16
-
17
-
18
-
19
-
20
-
21
-
22
-
23
-
24
-
25
-
26
-
27
-
28
-
29
-
30
-
31
-
32
-
33
-
34
 |
 |

Welcome
FP71G/FP71G
+
/FP71G
+u
LCD Color Monitor
17.0" LCD Panel Size
User’s Manual