BenQ MX501 MS500 User Manual
BenQ MX501 Manual
 |
View all BenQ MX501 manuals
Add to My Manuals
Save this manual to your list of manuals |
BenQ MX501 manual content summary:
- BenQ MX501 | MS500 User Manual - Page 1
MX501/MS500/MX501-V/MS500-V Digital Projector User Manual Welcome - BenQ MX501 | MS500 User Manual - Page 2
own startup screen (only for MX501/MX501-V 32 Adjusting the sound 33 Shutting down the projector 33 Direct power off 34 Menu operation 35 Maintenance 44 Care of the projector 44 Lamp information 45 Troubleshooting 51 Specifications 52 Projector specifications 52 Dimensions 53 Ceiling - BenQ MX501 | MS500 User Manual - Page 3
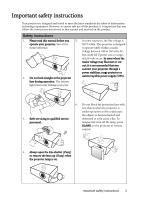
is important that you follow the instructions mentioned in this manual and marked on the product. Safety Instructions 1. Please read this manual before you 5. In some countries, the line voltage is operate your projector. Save it for NOT stable. This projector is designed future reference. to - BenQ MX501 | MS500 User Manual - Page 4
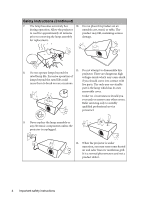
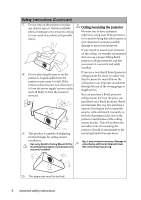
should you ever undo or remove any other covers. Refer servicing only to suitably qualified professional service personnel. 9. Never replace the lamp assembly or any electronic components unless the projector is unplugged. 12. When the projector is under operation, you may sense some heated air - BenQ MX501 | MS500 User Manual - Page 5
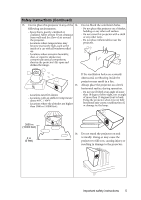
it is not fully horizontal may cause a malfunction of, or damage to, the lamp. 3000 m (10000 feet) 0 m (0 feet) 16. Do not stand the projector on end vertically. Doing so may cause the projector to fall over, causing injury or resulting in damage to the projector. Important safety instructions 5 - BenQ MX501 | MS500 User Manual - Page 6
. 18. Do not place liquids near or on the projector. Liquids spilled into the projector may cause it to fail. If the projector does become wet, disconnect it from the power supply's power outlet and call BenQ to have the projector serviced. 19. This product is capable of displaying inverted images - BenQ MX501 | MS500 User Manual - Page 7
high-performance optical engine projection and a user-friendly design to deliver high reliability and ease of use. The projector offers the following features. • 3D function to enjoy the 3D movies, videos, and sporting events in a more realistic way by presenting the depth of the images • Filter - BenQ MX501 | MS500 User Manual - Page 8
. *The warranty card is only supplied in some specific regions. Please consult your dealer for detailed information. Projector Power cord VGA cable Quick start guide User manual CD Warranty card* Remote control with battery Pull the tab before using the remote control. Optional accessories - BenQ MX501 | MS500 User Manual - Page 9
Projector exterior view Front/upper side 1 2 5 3 4 Rear/lower side 11 12 13 14 15 16 10 1. 2. 3. 4. 5. 6 6. 7. 7 8. 8 9. 9 10. 11. 12. 13. 14. 15. 16. 17. 18. 19. - BenQ MX501 | MS500 User Manual - Page 10
of the lamp. Lights up or flashes when the lamp has developed a problem. 4. MENU/EXIT Turns on the On-Screen Display (OSD) menu. Goes Manually corrects distorted images resulting from an angled projection. POWER Toggles the projector between standby mode and on. Right/ Increases the projector - BenQ MX501 | MS500 User Manual - Page 11
8. Keystone/Arrow keys ( / Up, / Down) 7 1 Manually corrects distorted images 8 resulting from an angled projection. 2 9 9. 1. POWER Displays the source selection bar. 12. MODE/ENTER Toggles the projector between standby mode Selects an available picture setup mode. and on. 2. - BenQ MX501 | MS500 User Manual - Page 12
remote control and the IR sensor on the projector that might obstruct the infra-red beam. • Operating the projector from the front Approx. +15º Replacing the remote control battery 1. Pull out the battery holder. Please follow the illustrated instructions. Push and hold the locking arm while pulling - BenQ MX501 | MS500 User Manual - Page 13
is the suspended upside-down from the ceiling most common way to position the projector behind the screen. for quick setup and portability. Note that a special rear projection screen and the BenQ Projector Ceiling Mount Kit are required for this installation location. Set Rear Ceiling in the - BenQ MX501 | MS500 User Manual - Page 14
MS500-V MX501-V 23 46 30 61 38 76 46 91 61 122 76 152 91 183 114 229 152 305 168 335 191 381 229 457 There is 3% tolerance among these numbers due to optical component variations. BenQ recommends that if you intend to permanently install the projector, you should physically - BenQ MX501 | MS500 User Manual - Page 15
cable 7. Audio cable 4. Component Video to VGA (D-Sub) adapter cable • Many notebooks do not turn on their external video ports when connected to a projector. Usually a key combo like FN + F3 or CRT/LCD key turns the external display on/off. Locate a function key labeled CRT/LCD or a function - BenQ MX501 | MS500 User Manual - Page 16
1 jack. • If you wish to use this connection method when the projector is in standby mode, make sure the Monitor Out function is turned on in the for details. • If the selected video image is not displayed after the projector is turned on and the correct video source has been selected, check that - BenQ MX501 | MS500 User Manual - Page 17
, it will run the cooling fan for approximately 90 seconds before energizing the lamp. 3. If the projector is activated for the first time, select your OSD language following the onscreen instructions. 4. If you are prompted for a password, press the arrow keys to enter a six-digit password. See - BenQ MX501 | MS500 User Manual - Page 18
air comes from. Auto-adjusting the image In some cases, you may need to optimize the picture quality. To do this, press AUTO on the projector or remote control. Within 3 seconds, the built-in Intelligent Auto Adjustment function will re-adjust the values of Frequency and Clock to provide the best - BenQ MX501 | MS500 User Manual - Page 19
refers to the situation where the projected image is noticeably wider at either the top or bottom. It occurs when the projector is not perpendicular to the screen. To correct this, you will need to manually correct it following ONE of these steps. • Using the remote control Press / on the - BenQ MX501 | MS500 User Manual - Page 20
Sync 3D Sync Invert Teaching Template Analog RGB Off Auto 0 0 On Disable MENU Exit SYSTEM SETUP: Basic Presentation Timer Language Projector Position Menu Settings Operation Settings Remote Receiver Panel Key Lock Background Color Splash Screen MyScreen English Front Table Front+Top Off BenQ BenQ - BenQ MX501 | MS500 User Manual - Page 21
forget the password. Print out this manual (if necessary) and write the password you used in this manual, and keep the manual in a safe place for later recall. Setting a password Once a password has been set and the power on lock is activated, the projector cannot be used unless the correct - BenQ MX501 | MS500 User Manual - Page 22
digit password, or if you did not record the password in this manual, and you absolutely do not remember it, you can use the password the number and turn off your projector. 3. Seek help from the local BenQ service Please write down the recall code, and contact BenQ Customer Center. Recall Code: - BenQ MX501 | MS500 User Manual - Page 23
you should you ever forget it. Password Keep this manual in a safe place. 5. Confirm the new password by re-entering the new password. 6. You have successfully assigned a new password to the projector. Remember to enter the new password next time the projector is started. 7. To leave the OSD menu - BenQ MX501 | MS500 User Manual - Page 24
the center of the picture. Press the key repeatedly until the picture size is suitable for your need. 2. Use the directional arrows ( , , , ) on the projector or remote control to navigate the picture. 3. To restore the picture to its original size, press AUTO. You can also press Digital Zoom-. When - BenQ MX501 | MS500 User Manual - Page 25
can be displayed on those unused black areas. 1. Auto: Scales an image proportionally to fit 4. 16:9: Scales an image so that it is the projector's native resolution in its displayed in the center of the horizontal or vertical width. This is suitable screen with a 16:9 aspect ratio. for the - BenQ MX501 | MS500 User Manual - Page 26
3. 4:3: Scales an image so that it is displayed in the center of the screen with a 4:3 aspect ratio. This is most suitable for 4:3 images like some computer monitors, standard definition TV and 4:3 aspect DVD movies, as it displays them without aspect alteration. 4:3 picture 26 Operation - BenQ MX501 | MS500 User Manual - Page 27
picture type. To select an operation mode that suits your need, you can follow one of the following steps. • Press MODE/ENTER on the projector or remote control repeatedly until your desired mode is selected. • Go to the PICTURE > Picture Mode menu and press / to select a desired mode. 1. Dynamic - BenQ MX501 | MS500 User Manual - Page 28
when User 1 or User 2 is selected. Based on your needs, you can make adjustments to these functions by highlighting them and pressing / on the projector or remote control. Adjusting Brightness The higher the value, the brighter the image. And the lower the setting, the darker the image. Adjust this - BenQ MX501 | MS500 User Manual - Page 29
Management menu to make adjustments. To adjust the settings: 1. Go to the PICTURE menu and highlight 3D Color Management. 2. Press MODE/ENTER on the projector or remote control and the 3D Color Management page displays. 3. Highlight Primary Color and press / to select a color from among Red, Yellow - BenQ MX501 | MS500 User Manual - Page 30
presentation timer, press and press / to highlight On and press MODE/ENTER. 8. A confirmation message displays. Highlight Yes and press MODE/ENTER on the projector or remote control to confirm. You will see the message "Timer is On" displaying on the screen. The timer starts counting when the timer - BenQ MX501 | MS500 User Manual - Page 31
freeze the image. The word "FREEZE" will display in the upper left corner of the screen. To release the function, press any key on the projector or remote control. If your remote control has the following keys, please note that they cannot be pressed to release the function: LASER, #1, #4, PAGE UP - BenQ MX501 | MS500 User Manual - Page 32
can operate under any and all harsh or extreme conditions. Creating your own startup screen (only for MX501/ MX501-V) In addition to selecting the projector preset startup screen from among BenQ logo, Black or Blue screen, you can make your own startup screen that is a picture projected from - BenQ MX501 | MS500 User Manual - Page 33
On or Off here. Setting the sound mute or changing the sound level will not affect the Power On/Off Ring Tone. Shutting down the projector 1. Press POWER and a confirmation message will display prompting you. If you don't respond in a few seconds, the message will disappear. 2. Press POWER a second - BenQ MX501 | MS500 User Manual - Page 34
. Direct power off The AC power cord can be pulled out right after the projector is turned off. To protect the lamp, wait about 10 minutes before re-starting the projector. (When you attempt to re-start the projector, the fans may run for a few minutes to cool down. In such cases, press - BenQ MX501 | MS500 User Manual - Page 35
(OSD) menus vary according to the signal type selected and the projector model you are using. Main menu Sub-menu Options 1. DISPLAY 3D Sync Frame Sequential/Off 3D Sync Invert Disable/Invert Teaching Template (only Blackboard Off/Letter Formation/Worksheet/ Coordinate Chart for MX501/ MX501 - BenQ MX501 | MS500 User Manual - Page 36
MX501/MX501-V: Language MS500/MS500-V: or 4. SYSTEM SETUP: Basic The supplied languages in MS500/MS500-V may differ by region. Please contact your dealer for further information. Projector Black/Blue/Purple/BenQ Splash Screen Black/Blue/BenQ/MyScreen MyScreen (only for MX501) 36 Operation - BenQ MX501 | MS500 User Manual - Page 37
Settings • Source • Picture Mode 6. INFORMATION Current System Status • Resolution • Color System • Equivalent Lamp Hour • Firmware Version Note that the menu items are available when the projector detects at least one valid signal. If there is no equipment connected to the - BenQ MX501 | MS500 User Manual - Page 38
selected. Magnifies or reduces the projected image. See "Magnifying and searching for details" on page 24 for details. This projector features a 3D function which enables you to enjoy the 3D movies, videos, and sporting events in a more realistic way by presenting the depth of the images. You need - BenQ MX501 | MS500 User Manual - Page 39
Template (only for MX501/ MX501-V) Provides several preset picture modes are provided so you can optimize your projector image set-up to suit your program type. See Selecting a color temperature" on page 28 for details. 3D Color Management See "3D Color Management" on page 29 for details. Save - BenQ MX501 | MS500 User Manual - Page 40
Display (OSD) menus. See "Using the menus" on page 20 for details. The projector can be installed on a ceiling or behind a screen, or with one or more disables the Quick Cooling function. Selecting On enables the function and projector cooling time will be shortened from a normal 90-second duration - BenQ MX501 | MS500 User Manual - Page 41
page 31 for details. Sets the background color for the projector. Splash Screen MyScreen (only for MX501/ MX501-V) High Altitude Mode Allows you to select which logo screen will display during projector start-up. The following options are available: BenQ logo, My Screen, Black screen, Blue screen - BenQ MX501 | MS500 User Manual - Page 42
with your computer's so that you can connect the projector using a suitable RS-232 cable and update or download the projector's firmware. This function is intended for qualified service personnel. Selecting On enables the function and the projector displays the grid test pattern. It helps you adjust - BenQ MX501 | MS500 User Manual - Page 43
, SECAM, YUV, or RGB. Equivalent Lamp Hour Displays the number of hours the lamp has been used. Firmware Version Shows the firmware version of your projector. Operation 43 - BenQ MX501 | MS500 User Manual - Page 44
wax, alcohol, benzene, thinner or other chemical detergents. These can damage the case. Storing the projector If you need to store the projector for an extended time, please follow the instructions below: • Make sure the temperature and humidity of the storage area are within the recommended range - BenQ MX501 | MS500 User Manual - Page 45
power consumption by 20%. If the Economic mode is selected, the light output will be reduced and result in darker projected pictures. Setting the projector in Economic mode also extends the lamp operation life. To set Economic mode, go into the SYSTEM SETUP: Advanced > Lamp Settings > Lamp Mode menu - BenQ MX501 | MS500 User Manual - Page 46
.com OK The lamp MUST be replaced before the projector will operate normally. Press MODE/ENTER to dismiss the message. WARNING Out of Lamp Usage Time Replace lamp (refer to User Manual) Then reset lamp timer Order a new lamp at lamp.benq.com OK "XXXX" shown in the above messages are numbers that - BenQ MX501 | MS500 User Manual - Page 47
the lamp socket to avoid any possible injury or damage to the human eyes caused by fractured lamp. 1. Turn the power off and disconnect the projector from the power outlet. If the lamp is hot, avoid burns by waiting for approximately 45 minutes until the lamp has cooled. 2. Loosen the screw - BenQ MX501 | MS500 User Manual - Page 48
cause color unevenness and distortion of the projected images. 9. As shown in the figure, lower the new lamp. 10. Reconnect the lamp connector to the projector. 11. Tighten the screw that secures the lamp. 12. Ensure the handle is fully laid flat and locked in place. • Loose screw may cause a bad - BenQ MX501 | MS500 User Manual - Page 49
16. Connect the power and restart the projector. Do not turn the power on with the lamp cover removed. Resetting the lamp timer 17. After the startup logo, open the On-Screen Display ( - BenQ MX501 | MS500 User Manual - Page 50
Red Green Orange Red Green Orange Red Green Power events Off Orange Stand-by mode. Off Green Flashing Powering up. Off Green Normal operation. • The projector needs 90 seconds to cool down as it was abnormally shut down without the normal cooling down process. Off Orange • The - BenQ MX501 | MS500 User Manual - Page 51
Troubleshooting The projector does not turn on. Cause There is no power from the power cord. Attempting to turn the projector on again during the cooling process. No picture Cause The video source is not turned on or connected correctly. The projector is not correctly connected to the input signal - BenQ MX501 | MS500 User Manual - Page 52
Specifications Projector specifications All specifications are subject to change without notice. Optical Resolution (MX501/MX501-V) 1024 x 768 XGA (MS500/MS500-V) 800 x 600 SVGA Display system 1-CHIP DMD Lens F/Number F = 2.56-2.8 Lamp 220 W lamp Electrical Power supply AC100-240V, 3.2 A, 50-60 - BenQ MX501 | MS500 User Manual - Page 53
Dimensions 287.3 mm (W) x 100.4 mm (H) x 232.6 mm (D) 232.6 100.4 Ceiling mount installation 207.6 Ceiling Mount screw: M4 x 8 (Max L = 8 mm) 287.3 62 62 77 76.5 34.5 Unit: mm 199.6 78 445.95 397.90 364.40 83.38 141.88 287.3 123.0 232.6 Specifications 53 - BenQ MX501 | MS500 User Manual - Page 54
x 864 1152 x 864_75 75 67.5 1024 x 576 BenQ Notebook_timing 60.0 35.820 1024 x 600 BenQ Notebook_timing 64.995 41.467 1280 x 768 1280 x 768_60 60.241 1152 x 870@75Hz MAC21 75.060 68.680 *Supported timing for 3D signal with frame sequential format. Pixel Frequency (MHz) 25.175 - BenQ MX501 | MS500 User Manual - Page 55
56.25 148.5 1080/60P 1920 x 1080 60 67.5 148.5 Displaying a 1080i(1125i)@60Hz or 1080i(1125i)@50Hz signal may result in slight image vibration. Supported timing for Video and S-Video inputs Video mode NTSC PAL SECAM PAL-M PAL-N PAL-60 NTSC4.43 Horizontal Frequency (kHz) 15.73 15.63 15 - BenQ MX501 | MS500 User Manual - Page 56
BenQ's written instructions, especially the ambient humidity must be inbetween 10% and 90%, temperature in-between 0°C and 35°C, altitude lower than 4920 feet, and avoiding to operate the projector manual or otherwise, without the prior written permission of BenQ Corporation. Disclaimer BenQ
-
 1
1 -
 2
2 -
 3
3 -
 4
4 -
 5
5 -
 6
6 -
 7
7 -
8
-
9
-
10
-
11
-
12
-
13
-
14
-
15
-
16
-
17
-
18
-
19
-
20
-
21
-
22
-
23
-
24
-
25
-
26
-
27
-
28
-
29
-
30
-
31
-
32
-
33
-
34
-
35
-
36
-
37
-
38
-
39
-
40
-
41
-
42
-
43
-
44
-
45
-
46
-
47
-
48
-
49
-
50
-
51
-
52
-
53
-
54
-
55
-
56
 |
 |

Welcome
MX501/MS500/MX501-V/MS500-V
Digital Projector
User Manual