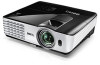
BenQ MX613ST MX613ST User Manual
BenQ MX613ST Manual
 |
View all BenQ MX613ST manuals
Add to My Manuals
Save this manual to your list of manuals |
BenQ MX613ST manual content summary:
- BenQ MX613ST | MX613ST User Manual - Page 1
MS612ST/MX613ST Digital Projector User Manual Welcome - BenQ MX613ST | MX613ST User Manual - Page 2
USB Reader............42 Shutting down the projector 43 Direct power off 43 Menu operation 44 Maintenance 53 Care of the projector 53 Lamp information 54 Troubleshooting 60 Specifications 61 Projector specifications 61 Dimensions 62 Ceiling mount installation 62 Timing chart 63 Warranty - BenQ MX613ST | MX613ST User Manual - Page 3
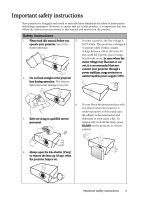
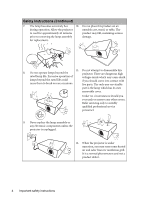
that you connect your projector through a power stabilizer, surge protector or 2. Do not look straight at the projector uninterruptible power supply (UPS). lens during operation. The intense light beam may damage your eyes. 3. Refer servicing to qualified service personnel. 6. Do not block - BenQ MX613ST | MX613ST User Manual - Page 4
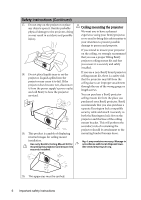
should you ever undo or remove any other covers. Refer servicing only to suitably qualified professional service personnel. 9. Never replace the lamp assembly or any electronic components unless the projector is unplugged. 12. When the projector is under operation, you may sense some heated air - BenQ MX613ST | MX613ST User Manual - Page 5
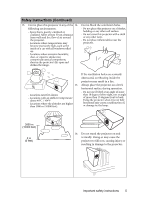
it is not fully horizontal may cause a malfunction of, or damage to, the lamp. 3000 m (10000 feet) 0 m (0 feet) 16. Do not stand the projector on end vertically. Doing so may cause the projector to fall over, causing injury or resulting in damage to the projector. Important safety instructions 5 - BenQ MX613ST | MX613ST User Manual - Page 6
the power supply's power outlet and call BenQ to have the projector serviced. 19. This product is capable of displaying inverted images for ceiling mount installation. Use only BenQ's Ceiling Mount Kit for mounting the projector and ensure it is securely installed. Ceiling mounting the projector We - BenQ MX613ST | MX613ST User Manual - Page 7
cooling function making the projector cool in a shorter time • FAQ to troubleshoot operational problems with one quick key press • Presentation timer for better control of time during presentations • One-key auto-adjustment to display the best picture quality • Digital keystone correction to correct - BenQ MX613ST | MX613ST User Manual - Page 8
your dealer for detailed information. Projector Power cord VGA cable Quick start guide Capture User manual CD Warranty card* Remote control with battery Pull the tab before using the remote control. Capture Optional accessories 1. Spare lamp kit 2. Ceiling mount kit 8 Introduction 3. RS232 - BenQ MX613ST | MX613ST User Manual - Page 9
Lamp cover External control panel (See "Controls and functions" on page 10 for details.) Vent (heated air exhaust) Quick-release button Top IR remote sensor Focus and Zoom ring Vent (cool air intake) Speaker grill Front IR remote sensor Projection lens AC power jack Rear adjuster foot Ceiling mount - BenQ MX613ST | MX613ST User Manual - Page 10
projector's temperature becomes too high. LAMP indicator light Indicates the status of the lamp. Lights up or flashes when the lamp has developed a problem to make adjustments. MODE/ENTER Selects an available picture setup mode. Activates the selected On-Screen Display (OSD) menu item. SOURCE - BenQ MX613ST | MX613ST User Manual - Page 11
Remote control 1 2 3 Capture 4 5 6 9. Keystone/Arrow keys ( / Up, / Down) 8 Manually 12. SOURCE 1. POWER Displays the source selection bar. Toggles the projector between standby mode 13 DOWN Used to hide the screen picture. 6. Digital Zoom (+, -) Magnifies or reduces the projected picture - BenQ MX613ST | MX613ST User Manual - Page 12
the infra-red beam. • Operating the projector from the front • Operating the projector from the top Capture Capture Approx. +15º Approx. +15º Replacing the remote control battery 1. Pull out the battery holder. Please follow the illustrated instructions. Push and hold the locking arm while - BenQ MX613ST | MX613ST User Manual - Page 13
suspended upside-down from the ceiling in front of the screen. Purchase the BenQ Projector Ceiling Mount Kit from your dealer to mount your projector on the ceiling. Set Front Ceiling in the SYSTEM SETUP: Basic > Projector Position menu after you turn the projector on. 4. Rear Table Select this - BenQ MX613ST | MX613ST User Manual - Page 14
229 There is 3% tolerance among these numbers due to optical component variations. BenQ recommends that if you intend to permanently install the projector, you should physically test the projection size and distance using the actual projector in situ before you permanently install it, so as to make - BenQ MX613ST | MX613ST User Manual - Page 15
each projector model. Notebook or desktop computer A/V device Monitor (VGA) 1 (DVI) 2 3 18 10 4 8567 Speakers 8 9 or or 1. VGA cable 6. Video cable 2. VGA to DVI-A cable 7. Audio L/R cable 3. USB cable 8. Audio cable 4. Component Video to VGA (D-Sub) 9. USB flash drive/USB wireless - BenQ MX613ST | MX613ST User Manual - Page 16
input is made to the COMPUTER 1 jack. • If you wish to use this connection method when the projector is in standby mode, make sure the Monitor Out function is turned on in the SYSTEM SETUP: Advanced menu. See "Standby Settings" on page 51 for details. Connecting video source devices You need only - BenQ MX613ST | MX613ST User Manual - Page 17
such as electric shock and fire. 2. Press POWER on the projector or POWER on the remote control to start the projector. As soon as the lamp lights up, a "Power On Tone" will be heard. The POWER indicator light flashes green and stays green when the projector is on. The start up procedure takes about - BenQ MX613ST | MX613ST User Manual - Page 18
projector are not perpendicular to each other, the projected image becomes trapezoidal. To correct this situation, see "Switching input signal" on page 24 for details. 1 2 Do not look into the lens while the lamp is on. The strong light from the lamp Auto on the projector or remote control. Within - BenQ MX613ST | MX613ST User Manual - Page 19
is not perpendicular to the screen. To correct this, you will need to manually correct it following ONE of these steps. • Using the remote control Press / on the projector or remote control to display the Keystone correction page. Press to correct keystoning at the top of the image. Press - BenQ MX613ST | MX613ST User Manual - Page 20
Aspect Ratio Keystone Position Phase H. Size Digital Zoom 3D Sync 3D Sync Invert Teaching Template Analog RGB Off Auto 0 0 On Disable MENU Exit SYSTEM SETUP: Basic Presentation Timer Language Projector Position Menu Settings Operation Settings Remote Receiver Panel Key Lock Background Color Splash - BenQ MX613ST | MX613ST User Manual - Page 21
manual, and keep the manual in a safe place for later recall. Setting a password Once a password has been set and the power on lock is activated, the projector cannot be used unless the correct password is entered every time the projector is started. 1. Open the OSD menu and go to the SYSTEM SETUP - BenQ MX613ST | MX613ST User Manual - Page 22
six- digit password, or if you did not record the password in this manual, and projector or remote control for 3 seconds. The projector RECALL PASSWORD will display a coded number on the screen. 2. Write down the number and turn off your projector. 3. Seek help from the local BenQ service - BenQ MX613ST | MX613ST User Manual - Page 23
digits being input will display as asterisks on-screen. Write your selected password down here in this manual Power On Lock and press / to select Off. You will not have to enter the password next time when turning on the projector on the projector. The Splash Screen function in the SYSTEM SETUP: Basic - BenQ MX613ST | MX613ST User Manual - Page 24
YPbPr HDMI • Using the OSD menu 1. Press SOURCE on the projector or remote control. A source selection bar displays. 2. Press / until your "Video" using mostly moving images (movies). • The native display resolution of this projector is in a 4:3 aspect ratio. For best display picture results, - BenQ MX613ST | MX613ST User Manual - Page 25
size is suitable for your need. 2. Use the directional arrows ( , , , ) on the projector or remote control to navigate the picture. 3. To restore the picture to its original size, press Auto. You can also press Digital Zoom-. When the key is pressed again, the picture is further reduced until it is - BenQ MX613ST | MX613ST User Manual - Page 26
displayed on those unused black areas. 1. Auto: Scales an image proportionally to fit 4. 16:9: Scales an image so that it is the projector's native resolution in its displayed in the center of the horizontal or vertical width. This is suitable screen with a 16:9 aspect ratio. for the incoming - BenQ MX613ST | MX613ST User Manual - Page 27
can follow one of the following steps. • Press MODE/ENTER on the projector or remote control repeatedly until your desired mode is selected. • Go to the PICTURE clips from digital cameras or DVs through the PC input for best viewing in a blackened (little light) environment. 5. User 1/User 2 mode - BenQ MX613ST | MX613ST User Manual - Page 28
to the detected signal type, there are some user-definable functions available when User 1 or User 2 is selected. Based on your needs, you can make adjustments to these functions by highlighting them and pressing / on the projector or remote control. Adjusting Brightness The higher the value, the - BenQ MX613ST | MX613ST User Manual - Page 29
purchased a test disc which contains various color test patterns and can be used to test the color presentation on monitors, TVs, projectors, etc, the PICTURE menu and highlight 3D Color Management. 2. Press MODE/ENTER on the projector or remote control and the 3D Color Management page displays. 3. - BenQ MX613ST | MX613ST User Manual - Page 30
these steps to utilize this function: 1. Go to the SYSTEM SETUP: Basic > Presentation Timer menu and press MODE/ ENTER to display 8. A confirmation message displays. Highlight Yes and press MODE/ENTER on the projector or remote control to confirm. You will see the message "Timer is On" displaying - BenQ MX613ST | MX613ST User Manual - Page 31
correctly made and the mouse driver on your computer is updated to the latest version. The remote paging function cannot work with problems regarding image quality, installation, special feature operation and service information. To get the FAQ information: 1. Press / on the projector or remote - BenQ MX613ST | MX613ST User Manual - Page 32
projector will operate except POWER. 1. Press / on the projector or remote control or go to the SYSTEM SETUP: Basic > Panel Key Lock menu, and select On by pressing / on the projector or remote In addition to selecting the projector preset startup screen from among BenQ logo, Black or Blue screen - BenQ MX613ST | MX613ST User Manual - Page 33
projector. • Using the OSD menu 1. Press MENU/EXIT and then press / until the SYSTEM SETUP: Basic menu is highlighted. 2. Press to highlight MyScreen and press MODE/ENTER. 3. Repeat steps 2-5 in the "Using the remote Power On/Off Ring Tone and press / to select Off. The only way to change Power On - BenQ MX613ST | MX613ST User Manual - Page 34
through a LAN environment You can manage and control the projector from a remote computer when they are properly connected to the same local area network. Wireless connection To connect to the projector wirelessly, you have to plug a BenQ wireless dongle (optional) to the USB Type A connector on the - BenQ MX613ST | MX613ST User Manual - Page 35
2. The main page of the Projector Network Display System appears. This web page provides access to a variety Keypad page displays a virtual keypad with which you can control the projector as if using the physical keypad on the projector. See "Projector" on page 10 for how to operate it. Operation 35 - BenQ MX613ST | MX613ST User Manual - Page 36
5. The Display Setting page provides some selective OSD menu items necessary for controlling the projector or adjusting the projected pictures. See the chapter "Menu operation" for how to use them. 6. The Picture Setting page provides all the OSD menu items - BenQ MX613ST | MX613ST User Manual - Page 37
7. The Information page displays the information about the projector status, network status. 8. To have access to the Admin page, you need to enter a password. The page provides more network settings. The default password is " - BenQ MX613ST | MX613ST User Manual - Page 38
computer may affect the network display performance. The Wireless LAN page allows you to adjust the Wireless LAN settings. The maximum length for SSID is 16 bytes. Please use different SSID when more than two projectors are connecting through wireless LAN. 9. These quick buttons are always provided - BenQ MX613ST | MX613ST User Manual - Page 39
the exe file. Follow the on-screen instructions to complete the installation. 4. Launch Q Presenter. Using Q Presenter 1 3 &4 2 5 1. The Search page allows you to search and connect to a projector. • To connect to a projector, type the projector IP address and click Connect. • To search - BenQ MX613ST | MX613ST User Manual - Page 40
2. The Special Feature page provides some advanced functions to manage the projected images. • To display a full screen, click Full Screen. • To display a partial screen, click Selectable. A square appears on your screen. You can adjust its size and place it where you want to project. • To pause - BenQ MX613ST | MX613ST User Manual - Page 41
disconnect from the projector(s), click the Disconnect icon. • Be sure to turn off other virtual network control programs before using Q Presenter. • Firewall in the PC must be switched off to allow Q Presenter and USB Display to work. • Wireless keyboard mouse combo is not supported by Pixelworks - BenQ MX613ST | MX613ST User Manual - Page 42
square box will display on the filename for unidentified characters. • Thai filename is not supported. • Files in GIF, TIFF, PNG and BMP formats can be displayed for the TYPE-A jack of the projector. 2. The projector automatically displays the thumbnails. Or you can manually select USB Reader from - BenQ MX613ST | MX613ST User Manual - Page 43
fans will run for a few minutes to cool down. Press POWER again to start the projector after the fans stop and the POWER indicator light turns orange. • Lamp life results will vary depending on environmental conditions and usage. Direct power off The AC power cord can be pulled out right after the - BenQ MX613ST | MX613ST User Manual - Page 44
projector model you are using. Main menu Sub-menu Options Wall Color Off/Light Yellow/Pink/Light Green/Blue/Blackboard Aspect Ratio Auto/Real/4:3/16:9/16:10 Keystone Position Phase 1. DISPLAY H. Size Digital Zoom • On/Off (MX613ST) 3D Sync • DLP Link/NVIDIA 3D Vision/Off (MS612ST) 3D - BenQ MX613ST | MX613ST User Manual - Page 45
SETUP: Basic Projector Position Menu Display Time Menu Settings Menu Position Reminder Message Direct Power On Operation Settings Auto Power Off Blank Timer Sleep Timer Remote Receiver Panel Key Lock Background Color Splash Screen My Screen Front Table/Rear Table/Rear Ceiling/Front Ceiling - BenQ MX613ST | MX613ST User Manual - Page 46
All Settings FAQ-Image and Installation FAQ-Features and Service • Source 6. INFORMATION Current System Status • Picture Mode • Resolution • Color System • Equivalent Lamp Hour • Firmware Version Note that the menu items are available when the projector detects at least one valid signal. If - BenQ MX613ST | MX613ST User Manual - Page 47
clock phase to reduce image distortion. H. Size Digital Zoom 3D Sync (More on the next page...) This function 3D games or 3D movies with corresponding SW player. Please visit NVIDIA website to check detailed system configuration. • DLP Link (MS612ST only) Select this item while using DLP 3D glasses - BenQ MX613ST | MX613ST User Manual - Page 48
3D Sync function is On: • The brightness level of the projected image will decrease. • The Picture Mode cannot be adjusted. • The Keystone can only be adjusted within limited degrees. When you discover the inversion of the image depth, enable this function to correct the problem projector User 1/User - BenQ MX613ST | MX613ST User Manual - Page 49
20 for details. The projector can be installed on a ceiling or behind a screen, Power On Allows the projector to turn on automatically once the power is fed through the power cord. Auto Power Off Allows the projector remote receivers or one specific remote receiver on the projector. Operation 49 - BenQ MX613ST | MX613ST User Manual - Page 50
except POWER on the projector and keys on the remote control. See "Locking control keys" on page 32 for details. Sets the background color for the projector. Splash Screen Allows you to select which logo screen will display during projector start-up. The following options are available: BenQ logo - BenQ MX613ST | MX613ST User Manual - Page 51
computer's so that you can connect the projector using a suitable RS-232 cable and update or download the projector's firmware. This function is intended for qualified service personnel. Selecting On enables the function and the projector displays the grid test pattern. It helps you adjust the image - BenQ MX613ST | MX613ST User Manual - Page 52
System Status Resolution Shows the native resolution of the input signal. Color System Shows input system format: NTSC, PAL, SECAM, YUV, or RGB. Equivalent Lamp Hour Displays the number of hours the lamp has been used. Firmware Version Shows the firmware version of your projector. 52 Operation - BenQ MX613ST | MX613ST User Manual - Page 53
the instructions below: • Make sure the temperature and humidity of the storage area are within the recommended range for the projector. Please refer to "Specifications" on page 61 or consult your dealer about the range. • Retract the adjuster feet. • Remove the battery from the remote control - BenQ MX613ST | MX613ST User Manual - Page 54
darker projected pictures. Setting the projector in Economic mode also extends the lamp operation life. To set Economic mode, go into the SYSTEM SETUP: Advanced > Lamp Settings > Lamp Mode menu and press / . • Setting Auto Power Off This function allows the projector to turn off automatically if no - BenQ MX613ST | MX613ST User Manual - Page 55
before the projector will operate normally. Press MODE/ENTER to dismiss the message. WARNING Out of Lamp Usage Time Replace lamp (refer to User Manual) Then reset lamp timer Order a new lamp at lamp.benq.com OK "XXXX" shown in the above messages are numbers that vary depending on different models - BenQ MX613ST | MX613ST User Manual - Page 56
projector lamp for lamp replacement. • If lamp replacement is performed while the projector is suspended upside-down from the ceiling, make sure that no one is underneath the lamp socket to avoid any possible injury or damage to the human eyes caused by fractured lamp. 1. Turn the power off - BenQ MX613ST | MX613ST User Manual - Page 57
with the new lamp. 12. Replace the lamp cover on the projector. 2 2 1 13. Tighten the screw that secures the lamp cover. • Loose screw may cause a bad connection, which could result in malfunction. • Do not over tighten the screw. 14. Connect the power and restart the projector. Maintenance 57 - BenQ MX613ST | MX613ST User Manual - Page 58
Do not turn the power on with the lamp cover removed. Resetting the lamp timer 15. After the startup logo, open the On-Screen Display (OSD) menu. Go to the SYSTEM SETUP: Advanced > Lamp Settings menu. Press MODE/ENTER. The Lamp Settings page displays. Highlight Reset Lamp Timer. A warning message is - BenQ MX613ST | MX613ST User Manual - Page 59
needs to cool for 90 seconds after the power is turned off. • The projector has shut down automatically. If you try to re- start the projector, it will shut down again. Please contact your dealer for assistance. Lamp events The projector has shut down automatically. If you try to reRed start - BenQ MX613ST | MX613ST User Manual - Page 60
Troubleshooting The projector does not turn on. Cause There is no power from the power cord. Attempting to turn the projector on again during the cooling process. No picture Cause The video source is not turned on or connected correctly. The projector is not correctly connected to the input signal - BenQ MX613ST | MX613ST User Manual - Page 61
Specifications Projector specifications All specifications are subject to change without notice. Optical Resolution (MS612ST) 800 x 600 SVGA (MX613ST) 1024 x 768 XGA Display system 1-CHIP DMD Lens F/Number F = 2.6-2.78 Lamp (MS612ST) 190 W lamp (MX613ST) 210 W lamp Electrical Power supply Digital - BenQ MX613ST | MX613ST User Manual - Page 62
Dimensions 311.81 mm (W) x 104.07 mm (H) x 244.11 mm (D) 244.11 104.07 311.81 Ceiling mount installation Ceiling Mount screw: M4 x 8 (Max L = 8 mm) 51.1 58.25 160 80 46.21 115 Unit: mm 137 74.19 446.15 397.90 364.40 95.33 156.33 311.81 119.21 244.12 62 Specifications - BenQ MX613ST | MX613ST User Manual - Page 63
Supported timing for PC input Resolution Mode Vertical Horizontal Frequency (Hz) Frequency (kHz) VGA_60* 640 x 480 VGA_72 VGA_75 VGA_85 SVGA_60* 800 x 600 SVGA_72 SVGA_75 SVGA_85 720 x 400 720 x 400_70 XGA_60* 1024 x 768 XGA_70 XGA_75 XGA_85 1024 x 576 BenQ 1024 x 600 BenQ - BenQ MX613ST | MX613ST User Manual - Page 64
Supported timing for HDMI (HDCP) input Resolution Mode Vertical Horizontal Frequency (Hz) Frequency (kHz) 640 x 480 720 x 870@75Hz MAC21 1024 x 576@60Hz Notebook Timing* 1024 x 600@65Hz Notebook Timing *Supported timing for 3D function. 59.940 72.809 75.000 85.008 119.518 70.087 56.250 60 - BenQ MX613ST | MX613ST User Manual - Page 65
Displaying a 1080i(1125i)@60Hz or 1080i(1125i)@50Hz signal may result in slight image vibration. *Supported timing for 3D function. Supported timing for Component-YPbPr input Timing Resolution Vertical Horizontal Pixel Frequency Frequency (Hz) Frequency (kHz) (MHz) 480i 720 x 480* 59.94 - BenQ MX613ST | MX613ST User Manual - Page 66
obligation to notify any person of such revision or changes. *DLP, Digital Micromirror Device and DMD are trademarks of Texas Instruments. Others are copyrights of their respective companies or organizations. Patents This BenQ projector is covered by the following patents: U.S. patents 6,837,608 - BenQ MX613ST | MX613ST User Manual - Page 67
users) CLASS B: This equipment generates, uses and can radiate radio frequency energy and, if not installed and used in accordance with the instructions standby and off mode electric power consumption of electrical and electronic or your household waste disposal service. The recycling of materials - BenQ MX613ST | MX613ST User Manual - Page 68
to computer systems correctly. • Some models of BenQ's monitors and projectors contain additional USB and DVI ports for connection to more devices such as a special headphone to assist the hearing impaired. • All BenQ monitors and projectors come with user manuals on compact discs which could be
-
 1
1 -
 2
2 -
 3
3 -
 4
4 -
 5
5 -
 6
6 -
 7
7 -
8
-
9
-
10
-
11
-
12
-
13
-
14
-
15
-
16
-
17
-
18
-
19
-
20
-
21
-
22
-
23
-
24
-
25
-
26
-
27
-
28
-
29
-
30
-
31
-
32
-
33
-
34
-
35
-
36
-
37
-
38
-
39
-
40
-
41
-
42
-
43
-
44
-
45
-
46
-
47
-
48
-
49
-
50
-
51
-
52
-
53
-
54
-
55
-
56
-
57
-
58
-
59
-
60
-
61
-
62
-
63
-
64
-
65
-
66
-
67
-
68
 |
 |

Welcome
MS612ST/MX613ST Digital Projector
User Manual