BenQ PB7110 User Manual
BenQ PB7110 Manual
 |
View all BenQ PB7110 manuals
Add to My Manuals
Save this manual to your list of manuals |
BenQ PB7110 manual content summary:
- BenQ PB7110 | User Manual - Page 1
PB7210/ PB7230/ PB7110 Digital Projector User's Manual Welcome - BenQ PB7110 | User Manual - Page 2
manual or otherwise, without the prior written permission of this company. Disclaimer BenQ Corporation makes no representations or warranties, either expressed or implied, with respect to the contents hereof and specifically trademarks of Microsoft Corporation. DLP, Digital Micromirror Device and DMD - BenQ PB7110 | User Manual - Page 3
Instructions 1 Introduction 4 Projector Features 4 Shipping Contents 5 Optional Accessories 5 Projector Description 6 You Projector Equipment 13 Connecting to Various Equipment 14 Operation 16 Start Up 16 Digital Keystone Correction 17 Source Selection 17 Auto Adjustment 18 Blank 18 - BenQ PB7110 | User Manual - Page 4
Parts or Getting Information 32 Troubleshooting 33 Common Problems & Solutions 33 Status Messages 34 Specifications 35 Projector Specifications 35 Technical Specifications 35 Timing Chart 36 Supported timing for PC input 36 Supported timing for YPbPr input 36 Supported timing for Video and - BenQ PB7110 | User Manual - Page 5
. There are no user-serviceable parts inside. Refer servicing to qualified service personnel. • Always open the lens shutter or • Please read this user's manual before you operate your projector. Save this remove the lens cap when the projector lamp is on. user's manual for future reference - BenQ PB7110 | User Manual - Page 6
lamp assembly or any electronic components unless the projector is unplugged. 6. This product is capable of displaying inverted images for ceiling mount installation. Please use BenQ's Ceiling Mounting Kit for mounting the unit and ensure it is securely installed. 2 Important Safety Instructions - BenQ PB7110 | User Manual - Page 7
Safety Instructions (Continued) 7. Do not block the ventilation holes. 9. Always place the unit on a level, hori- - Do not place this unit on a blanket, bedding or any other soft surface. - Do not cover this unit with a cloth or any other item. - Do not place inflammables near the projector. - BenQ PB7110 | User Manual - Page 8
ease of use. The projector offers the following features: • Small and light for portability • Full-function remote control with laser pointer/ remote mouse function • High quality manual zoom lens • One-key auto-adjustment to display the best picture quality • Digital keystone correction to correct - BenQ PB7110 | User Manual - Page 9
these items are missing, please contact your place of purchase. Projector Soft Carry Case PDUBisge7ir2t'a0sl0MP/PraoBuj7ne2cat2lo0r/PB7100 User's Manual Batteries 3-2 Power Converter User's Manual CD Quick Start Guide Warranty Booklet Remote Control S-Video Cable Video Cable VGA Cable Audio - BenQ PB7110 | User Manual - Page 10
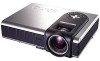
You Projector at a Glance Ventilation grill Front adjuster External control panel (see next page) Speaker Projection lens adjuster IR remote sensor Projection lens Lamp door Rear adjuster Audio jack Video connector RGB signal input - 1 (PC/ Mac) RGB signal input - 2 (PC/ YPbPr/ YCbCr) AC power - BenQ PB7110 | User Manual - Page 11
back. 9 Power indicator light It will light up or flash when the projector is under projector is operated improperly. See "Temp Information" on page 29 for more detailed information. 11 Lamp indicator light The Lamp Indicator will light up when the lamp needs service or replacement. See "Lamp - BenQ PB7110 | User Manual - Page 12
Adjuster The projector is equipped with 1 quick-release adjuster foot. Push the button to adjust its tilt angle. 1. Lift the projector up and press the adjuster button to release the adjuster. 2. The adjuster will drop into position and be locked. 8 Introduction - BenQ PB7110 | User Manual - Page 13
Remote Control Description Power LED Menu 3 Left/ Keystone 4 Right/ Keystone + Auto L-Click/ R-click and choose the position and size of the PIP image. Ratio By pressing the Ratio hotkey, you can select the screen aspect ratio you prefer: 4:3,16:9 or 1:1 (native picture size). Introduction 9 - BenQ PB7110 | User Manual - Page 14
Infra Red (IR) remote control sensors are located on the front and the back of the projector. It can function in a range of 30 degrees horizontally and 30 degrees vertically relative to a the manufacturer. Dispose of the used batteries according to the manufacturer's instructions. 10 Introduction - BenQ PB7110 | User Manual - Page 15
Installation Screen Size Place the projector at the required distance from the screen according to the desired picture size (see the table below). PB7210/ PB7230 (XGA) screen size chart (4:3 aspect ratio) Distance Diagonal measurement from screen Minimum Maximum zoom zoom feet inches feet - BenQ PB7110 | User Manual - Page 16
PB7210/ PB7230 (XGA) screen size chart (16:9 aspect ratio) Distance Diagonal measurement from screen 30 430.2 5.25 524.8 8 800 4.59 458.9 5.60 559.8 PB7110 (SVGA) screen size chart (4:3 aspect ratio) Distance Diagonal measurement from screen Minimum Maximum zoom zoom feet inches feet inches - BenQ PB7110 | User Manual - Page 17
PB7110 (SVGA) screen size chart (16:9 aspect ratio) Distance Diagonal measurement from screen Minimum Maximum to Various Equipment HDTV Equipment The projector is capable of displaying various High Definition TV display modes. Some of these sources are: • Digital-VHS (D-VHS) player • Satellite - BenQ PB7110 | User Manual - Page 18
Connecting to Various Equipment It only takes a few seconds to connect your projector to your desktop or notebook computer, VCR, or other systems. However . 1. Notebook/ Computer (Macintosh computer or SOG signal is only supported with RGB IN-1.) USB PC audio USB cable Audio cable PC audio - BenQ PB7110 | User Manual - Page 19
4. Video device or VCR Video cable Audio cable Installation 15 - BenQ PB7110 | User Manual - Page 20
Operation Start Up 1. Plug the power cord into the projector and into a wall socket. 2. Turn the main power switch on. 3. Press and hold POWER to start the unit. The back-lit POWER key flashes green and stays green when the power is turned on. (When the power is turned off, there is a 90-second - BenQ PB7110 | User Manual - Page 21
Digital Keystone Correction Keystoning refers to the situation where the projected image is noticeably wider at either the top or bottom. To correct this, press 3 Left/ Right 4 (hot key) on the control panel of the projector or KEYSTONE 3/4 on the remote control, and then adjust the sliding bar - BenQ PB7110 | User Manual - Page 22
Adjustment In some cases, you may need to optimize the picture quality. To do this, press the AUTO key on the control panel of the projector or on the remote control. Within 3 seconds, the built-in Intelligent Auto Adjustment function will re-adjust settings to provide the best picture quality. - BenQ PB7110 | User Manual - Page 23
Phase H Size Keystone Brightness Contrast Color Tint Auto Resize H Position V Position Color Temp Information Ratio Color Tint Color Temp Ratio System Sharpness Color Temp Information Source Control Mirror Source Volume Mute Language OSD Setup Preset Mode Reset Lamp Hour PIP Main page: PIP - BenQ PB7110 | User Manual - Page 24
1. Display Menu FUNCTION DESCRIPTION Corrects any keystoning of the image. Keystone + - Adjusts the brightness of the image. Brightness Contrast Adjusts the degree of difference between dark and light in the image. Adjusts to avoid the occurrence of flicker. Phase H Size Color Tint This - BenQ PB7110 | User Manual - Page 25
the best fit of the image to the screen, 1. On 2. Off 3. 16:9 This function is available only when a PC input is selected . Users have 2 options for the image ratio. 1. 4 : 3 2. 16 : 9 This function is available when the input source is YPbPr, Video or SVideo. Adjusts the horizontal position of the - BenQ PB7110 | User Manual - Page 26
3. Source Menu FUNCTION DESCRIPTION 1. Default 2. Ceiling mounted projection Mirror 3. Rear screen projection 4. Ceiling mounted and rearscreen projection Source Volume Mute Shows the input source from among RGB-1, RGB-2, YPbPr, S-Video and Video when several sources are available. Adjusts - BenQ PB7110 | User Manual - Page 27
. Blank Time Determines the length of time before the projector will automatically shutdown when Blank is activated. Auto Off Sets the length of time before the system is shut off when no input is detected. User Logo Enables the user to select which logo screen will appear during the startup - BenQ PB7110 | User Manual - Page 28
Preset Mode Reset Lamp Hour Preset modes are provided so you can optimize your projector image setup to suit your program type 4. Economic Mode: Use this mode to reduce system noice and reduce power consumption by 20%. The lamp life is also extended with lower light output. Returns all settings to - BenQ PB7110 | User Manual - Page 29
position of the PIP image. Adjusts the vertical position of the PIP image. Press the 3 / 4 keys to select more PIP functions including Brightness, Contrast, Color, Tint, Sharpness and System. Adjusts the brightness of the PIP image. Adjusts the degree of difference between dark and light for the PIP - BenQ PB7110 | User Manual - Page 30
the wall socket. Do not unplug the power cord before the projector shutdown sequence is complete or during the 90-second cooling down process. If the projector is not properly shut down, to protect the lamp, the system will detect this and cool the lamp for 90 seconds automatically before turning on - BenQ PB7110 | User Manual - Page 31
and Temp indicators will light up if the lamp becomes too hot. Turn the power off and let the projector cool for 45 minutes. If the Lamp or Temp indicator still lights up when turning the power on, please contact your dealer. Lamp Replacement To reduce the risk of electrical shock, always turn the - BenQ PB7110 | User Manual - Page 32
off. Disconnect the power cord from the outlet and the projector. Step 2. Loosen the screw and remove the lamp cover. If the lamp is hot, avoid burns by waiting 45 minutes until the lamp has cooled. Step 4. Replace the lamp with the new one. Insert it into the projector, and tighten the screws - BenQ PB7110 | User Manual - Page 33
hours of operation, please follow the instructions below within 10 minutes of powering on. OSD FUNCTION Press and hold the Exit button on the projector for 3 seconds to display the total used lamp time. • Press the MENU button on the projector during the lamp hour message. An adjustment message - BenQ PB7110 | User Manual - Page 34
& Description Power Temp Lamp Power events Power switch on O O O O O - Power-up cooling. The projector needs 90 seconds to cool down - as it was abnormally shutdown without the normal cooling dowm sequence. Stand-by mode. - G - Lamp LED is blinking during powering up. - O G - Power-down - BenQ PB7110 | User Manual - Page 35
, it will shut- down again. Please contact your dealer for assistance. Thermal sensor 2 doesn't work.The projector will shutdown - R G automatically. If you try to restart the projector, it will shut- down again. Please contact your dealer for assistance. Thermal sensor 3 doesn't work. The - BenQ PB7110 | User Manual - Page 36
Service Information Accessories (included in the standard package) Description Part Number Power cord (US 27.01818.000 Power cord (EU 27.82718.281 Power lamp module (UHP 60.J7693.CG1 250W lamp service information, or to order accessories, please visit the BenQ Corporation website at http://www - BenQ PB7110 | User Manual - Page 37
Troubleshooting Common Problems & Solutions NO POWER Try these solutions: • Make sure the power cord is inserted snugged into the AC adapter socket. • Make sure the power cord is inserted snugged into the power outlet. • Toggle the power switch to the position "|". • Wait 90 seconds after the - BenQ PB7110 | User Manual - Page 38
in operation for 1980 hours, and the power will turn off after 20 hours. The lamp has been in operation for over 2000 hours. The warning message will display for 30 seconds every 5 minutes after you turn on the projector and the power will turn off automatically after 10 minutes. 34 Troubleshooting - BenQ PB7110 | User Manual - Page 39
VIDEO HDTV signal input Audio signal input Audio 1 Output USB mouse connector Speaker Control RS-232C Digital Projector PB7210 1024 x 768 XGA PB7230 1024 x 768 XGA PB7110 800 x 600 SVGA 1-CHIP DMD F/2.6 250W lamp AC100 ~ 240V, 4.0A, 50/60 Hz (Automatic) 330W (Max) 258 mm (W) x 80 mm (H) x 211.5 mm - BenQ PB7110 | User Manual - Page 40
VGA_85 SVGA_56 SVGA_60 SVGA_72 SVGA_75 SVGA_85 MAC16" XGA_43i XGA_60 XGA_70 XGA_75 XGA_85 MAC19" SXGA1_75 QuadVGA_60 SXGA3_60 Supported timing for YPbPr input Signal Format 480i(525i)@60Hz 480p(525p)@60Hz 576i(625i)@50Hz 576p(625p)@ 59.94 50.00 50.00 60.00 50.00 60.00 50.00 36 Specifications - BenQ PB7110 | User Manual - Page 41
Supported timing for Video and S-Video inputs Video mode NTSC PAL SECAM PAL-M PAL-N PAL-60 NTSC4.43 Horizontal Frequency (kHz) 15.73 15.63 15. .73 15.73 Vertical Frequency (Hz) 60 50 50 60 50 60 60 Pixel Frequency (MHz) 3.58 4.43 4.25 or 4.41 3.58 3.58 4.43 4.43 Specifications 37 - BenQ PB7110 | User Manual - Page 42
Dimensions 38 Dimensions Unit: mm - BenQ PB7110 | User Manual - Page 43
To obtain warranty service, immediately notify the dealer from which you purchased the product of any defects. Important: The above warranty shall be void if the customer fails to operate the product in accordance with BenQ's written instructions. This warranty gives you specific legal rights, and - BenQ PB7110 | User Manual - Page 44
frequency energy, and if not installed and used in accordance with the instruction manual, may cause interference to radio communications. It has been tested and , which can be determined by turning the equipment off and on, the user is encouraged to try to correct the interference by one or more of
-
 1
1 -
 2
2 -
 3
3 -
 4
4 -
 5
5 -
 6
6 -
 7
7 -
8
-
9
-
10
-
11
-
12
-
13
-
14
-
15
-
16
-
17
-
18
-
19
-
20
-
21
-
22
-
23
-
24
-
25
-
26
-
27
-
28
-
29
-
30
-
31
-
32
-
33
-
34
-
35
-
36
-
37
-
38
-
39
-
40
-
41
-
42
-
43
-
44
 |
 |

Welcome
PB7210/ PB7230/ PB7110
Digital Projector
User’s Manual