BenQ VW2235H User Manual: VW2235H
BenQ VW2235H Manual
 |
View all BenQ VW2235H manuals
Add to My Manuals
Save this manual to your list of manuals |
BenQ VW2235H manual content summary:
- BenQ VW2235H | User Manual: VW2235H - Page 1
VW Series LCD Monitor User Manual - BenQ VW2235H | User Manual: VW2235H - Page 2
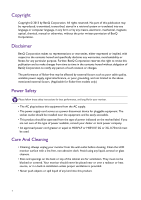
optical, chemical, manual or otherwise, without the prior written permission of BenQ Corporation. Disclaimer BenQ Corporation makes no only.) Power Safety Please follow these safety instructions for best performance, and long life for your monitor. • The AC plug isolates this equipment - BenQ VW2235H | User Manual: VW2235H - Page 3
or other risks. If any of the above mentioned misuse or other accident such as dropping or mishandling occurs, contact qualified service personnel for servicing. BenQ ecoFACTS BenQ has been dedicated to the design and development of greener product as part of its aspiration to realize the ideal of - BenQ VW2235H | User Manual: VW2235H - Page 4
your BenQ monitor 15 How to install the monitor on a new computer 16 How to upgrade the monitor on an existing computer 17 How to install on Windows 8 system 18 How to install on Windows 7 system 19 How to install on Windows Vista systems (selected models only 20 How to adjust your monitor 21 - BenQ VW2235H | User Manual: VW2235H - Page 5
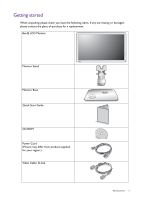
you have the following items. If any are missing or damaged, please contact the place of purchase for a replacement. BenQ LCD Monitor Monitor Stand Monitor Base Quick Start Guide CD-ROM Power Cord (Picture may differ from product supplied for your region.) Video Cable: D-Sub Getting started 5 - BenQ VW2235H | User Manual: VW2235H - Page 6
separately. • Consider keeping the box and packaging in storage for use in the future when you may need to transport the monitor. The fitted foam packing is ideal for protecting the monitor during transport. Always keep the product and accessories out of reach of small children. 6 Getting started - BenQ VW2235H | User Manual: VW2235H - Page 7
Getting to know your monitor Front view 1. Control buttons 2. Power button 1 2 Back view 3. Cable clip 4. Release button 5. Input and output ports (vary by • Above diagram may vary depending on the model. • Picture may differ from product supplied for your region. Getting to know your monitor 7 - BenQ VW2235H | User Manual: VW2235H - Page 8
Input and output ports Available input and output ports may vary depending on your purchased model. Models with HDMI inputs 1. AC power input jack 2. Headphone jack HDMI 1 23 4 5 Models with dual inputs 3. HDMI socket 4. DVI-D socket 5. D-Sub socket 1 45 8 Getting to know your monitor - BenQ VW2235H | User Manual: VW2235H - Page 9
• If the computer is turned on you must turn it off before continuing. Do not plug-in or turn-on the power to the monitor until instructed to do so. • The following illustrations are for your reference only. Available input and output jacks may vary depending on the purchased model. 1. Attach - BenQ VW2235H | User Manual: VW2235H - Page 10
plug of the D-Sub cable (at the end without the ferrite filter) to the monitor video socket. Connect the other end of the cable (at the end with the plug of the DVI-D cable (at the end without the ferrite filter) to the monitor video socket. Connect the other end of the cable (at the end with the - BenQ VW2235H | User Manual: VW2235H - Page 11
product supplied for your region. Turn on the monitor by pressing the power button on the monitor. Turn on the computer too, and follow the instructions in Getting the most from your BenQ monitor on page 15 to install the monitor software. To extend the service life of the product, we recommend that - BenQ VW2235H | User Manual: VW2235H - Page 12
1. Attach the docking accessory. Attach the docking accessory to the monitor base. 2. Place a card (e.g. a business card) or your mobile phone to the docking accessory as illustrated. Or 3. Once the docking accessory is removed from the monitor base, you can use the clip holder to store paper clips - BenQ VW2235H | User Manual: VW2235H - Page 13
a towel on the desk for padding, before laying the screen face down on a flat clean padded surface. Please be careful to prevent damage to the monitor. Placing the screen surface on an object like a stapler or a mouse will crack the glass or damage the LCD substrate voiding your warranty. Sliding or - BenQ VW2235H | User Manual: VW2235H - Page 14
stable to support the weight of the monitor. • Turn off the monitor and the power before disconnecting the cables from the LCD monitor. 1. Remove the monitor stand. the hole. Then pull the monitor stand backward away from the monitor. 2. Follow the instruction manuals of the wall mount bracket you - BenQ VW2235H | User Manual: VW2235H - Page 15
the most from your BenQ monitor To gain the most benefit from your new BenQ LCD monitor, you should install the custom BenQ LCD Monitor driver software as provided on the BenQ LCD Monitor CD-ROM. The circumstances under which you connect and install your BenQ LCD Monitor will determine which process - BenQ VW2235H | User Manual: VW2235H - Page 16
your monitor and click Next. 6. Click Finish. 7. Restart the computer. To find the suitable driver files for the purchased model, refer to the following table. Driver files VW2230 VW2235 VW2430 Suitable models VW2230 / VW2230H VW2235 / VW2235H VW2430 / VW2430H 16 Getting the most from your BenQ - BenQ VW2235H | User Manual: VW2235H - Page 17
existing computer This instruction details the procedure for manually updating the existing monitor driver software on your Microsoft Windows computer. It is currently tested as compatible for Windows 8, Windows 7, and Windows Vista Operating System (OS). The BenQ LCD Monitor driver for your model - BenQ VW2235H | User Manual: VW2235H - Page 18
menu. 3. Click the Hardware tab. 4. Click Generic PnP Monitor, and then the Properties button. 5. Click the Driver tab and the Update Driver button. 6. Insert the BenQ LCD Monitor CD-ROM into a CD drive on the computer. 7. In the Update Driver Software window, select the option Browse my computer - BenQ VW2235H | User Manual: VW2235H - Page 19
menu. 3. Click the Hardware tab. 4. Click Generic PnP Monitor, and then the Properties button. 5. Click the Driver tab and the Update Driver button. 6. Insert the BenQ LCD Monitor CD-ROM into a CD drive on the computer. 7. In the Update Driver Software window, select the option Browse my computer - BenQ VW2235H | User Manual: VW2235H - Page 20
prompted User Account Control window. 5. Click the Driver tab and the Update Driver button. 6. Insert the BenQ LCD Monitor CD-ROM into a CD drive on the computer. 7. In the Update Driver Software window, select the option Browse my computer for driver software. 8. Click Browse and navigate to the - BenQ VW2235H | User Manual: VW2235H - Page 21
How to adjust your monitor The control panel 1 2 No. Name 1. Control keys 2. Power key Description Accesses the functions or menu items displayed on the touchpad and are indicated by the dots. Touch of a dot represents pressing the corresponding control key. How to adjust your monitor 21 - BenQ VW2235H | User Manual: VW2235H - Page 22
OSD (On Screen Display) menus can be accessed by the control keys. You can use the OSD menu to adjust all the settings on your monitor. 1 2 Picture Mode Input Brightness Menu Exit 4 3 Picture Mode Input Brightness Menu Exit 1. Press any of the control keys. 2. The hot key menu is displayed - BenQ VW2235H | User Manual: VW2235H - Page 23
disappear after a few seconds of no key activity. • To unlock the OSD controls, press and hold any key for 10 seconds. How to adjust your monitor 23 - BenQ VW2235H | User Manual: VW2235H - Page 24
is set to the native resolution of the monitor when you use the Auto Adjustment function. If you wish, you can always adjust the screen geometric settings manually using geometry menu items. To assist you in this endeavour, BenQ has provided a screen test image utility which you can use to check - BenQ VW2235H | User Manual: VW2235H - Page 25
is connected to your MacBook series product, switch to M-book mode which represents MacBook's color matching and visual representation on your monitor. 1. Connect your monitor to the MacBook series product. 2. Go to Picture Advanced and Picture Mode. 3. Select M-book. The setting will take effect - BenQ VW2235H | User Manual: VW2235H - Page 26
Navigating the main menu You can use the OSD (On Screen Display) menu to adjust all the settings on your monitor. Press any of the control keys to bring up the hot key menu, and press Menu to access the main menu. See Basic menu operation - BenQ VW2235H | User Manual: VW2235H - Page 27
Display menu Available menu options may vary depending on the input sources, functions and settings. Menu options that are not available will become grayed out. And keys that are not available will be disabled and the corresponding OSD icons will disappear. Mode: Standard Display Auto Adjustment - BenQ VW2235H | User Manual: VW2235H - Page 28
Item Pixel Clock Phase Function Adjusts the pixel clock frequency timing to synchronize with the analog input video signal. See also: Picture optimization on page 24. Range 0 to 100 Not applicable to a digital input signal. Adjusts the pixel clock phase timing to synchronize with the analog input - BenQ VW2235H | User Manual: VW2235H - Page 29
Picture menu Available menu options may vary depending on the input sources, functions and settings. Menu options that are not available will become grayed out. And keys that are not available will be disabled and the corresponding OSD icons will disappear. Mode: Standard Display Picture Picture - BenQ VW2235H | User Manual: VW2235H - Page 30
Item Function Range Color Normal Temperature Allows video and still photographs to be viewed with natural coloring. This is the factory default color. Bluish Applies a cool tint to the image and is factory pre-set to the PC industry standard white color. Reddish Applies a warm tint to the - BenQ VW2235H | User Manual: VW2235H - Page 31
Picture Advanced menu Available menu options may vary depending on the input sources, functions and settings. Menu options that are not available will become grayed out. And keys that are not available will be disabled and the corresponding OSD icons will disappear. Mode: Standard Display Picture - BenQ VW2235H | User Manual: VW2235H - Page 32
the display as possible. Determines the color space (RGB or YUV) based on the detected video signal. You might need to manually set the Color Format if colors shown on the monitor screen do not display properly. If the input source is HDMI, color format is not selectable. In other words, Color - BenQ VW2235H | User Manual: VW2235H - Page 33
Item HDMI RGB PC Range (for models with HDMI inputs) Function Determines the range of color scales. Select an option that matches the RGB range setting on the connected HDMI device. Range • RGB (0 ~ 255) • RGB (16 ~ 235) Navigating the main menu 33 - BenQ VW2235H | User Manual: VW2235H - Page 34
System menu Available menu options may vary depending on the input sources, functions and settings. Menu options that are not available will become grayed out. And keys that are not available will be disabled and the corresponding OSD icons will disappear. Mode: Standard Display Picture Picture - BenQ VW2235H | User Manual: VW2235H - Page 35
SiCG/BiH/CRO • Română • Nederlands Svenska • Português Display Adjusts the display time of the OSD menu. Time OSD Lock Prevents all the monitor settings from being accidentally changed. When this function is activated, the OSD controls and hotkey operations will be disabled. • 5 Sec. • 10 Sec - BenQ VW2235H | User Manual: VW2235H - Page 36
developed by Video Electronics Standards Association (VESA). DDC/CI capability allows monitor controls to be sent via the software for remote diagnostics. HDMI key. • ON • OFF Auto Power Sets the time to power off the monitor automatically in Off power saving mode. • OFF • 10min. • 20min. • - BenQ VW2235H | User Manual: VW2235H - Page 37
Troubleshooting Frequently asked questions (FAQ) The image is blurred. Read the instructions on the link "Adjusting the Screen Resolution" on the CD, and then select the correct resolution, refresh rate and make adjustments based on these instructions. How do you use a VGA extension cable? Remove - BenQ VW2235H | User Manual: VW2235H - Page 38
display illuminated in orange? If the LED is illuminated in orange, the refresh rate and make adjustments based on these instructions. You are running the monitor problems remain after checking this manual, please contact your place of purchase or e-mail us at: [email protected]. 38 Troubleshooting
-
 1
1 -
 2
2 -
 3
3 -
 4
4 -
 5
5 -
 6
6 -
 7
7 -
8
-
9
-
10
-
11
-
12
-
13
-
14
-
15
-
16
-
17
-
18
-
19
-
20
-
21
-
22
-
23
-
24
-
25
-
26
-
27
-
28
-
29
-
30
-
31
-
32
-
33
-
34
-
35
-
36
-
37
-
38
 |
 |

VW Series
LCD Monitor
User Manual