BenQ W7000 User Manual
BenQ W7000 Manual
 |
View all BenQ W7000 manuals
Add to My Manuals
Save this manual to your list of manuals |
BenQ W7000 manual content summary:
- BenQ W7000 | User Manual - Page 1
W7000/W7000+ Digital Projector Home Cinema Series User Manual - BenQ W7000 | User Manual - Page 2
OSD) menus ...... 38 Additional information 44 Care of the projector 44 Lamp information 45 Getting to know the lamp hour 45 Extending lamp life 45 Timing of replacing the lamp 46 Replacing the lamp 46 Indicators 49 Troubleshooting 50 Specifications 51 Warranty and Copyright information 58 - BenQ W7000 | User Manual - Page 3
of this quality BenQ video projector! It has been designed to provide you with an enjoyable home theater viewing experience. For the best results, please read this manual through carefully as it is your guide through the control menus and operation. Important safety instructions Your projector is - BenQ W7000 | User Manual - Page 4
Liquids spilled into the projector will void your images for ceiling mount installation. Use only warranty. If the projector does become wet, BenQ's Ceiling Mount Kit for mounting. disconnect it from the power point and call BenQ to have the projector repaired. 4 Important safety instructions - BenQ W7000 | User Manual - Page 5
follow the cleaning product's safety instructions. Disposal 15. Do not attempt to disassemble this projector. There are dangerous high voltages inside which may cause death if you should come into contact with live parts. The only user serviceable part is the lamp which has its own removable cover - BenQ W7000 | User Manual - Page 6
may vary from region to region. The warranty card is only supplied in some specific regions. Please consult your dealer for detailed information. Projector Remote control Batteries Component Video cable Warranty card User manual CD Quick start guide Power cable VGA cable 6 Overview - BenQ W7000 | User Manual - Page 7
the battery manufacturer's instructions and local environment mount your projector on the ceiling, we strongly recommend that you use a proper fitting BenQ projector ceiling mount kit and that you ensure it is securely and safely installed. If you use a non-BenQ brand projector ceiling mount - BenQ W7000 | User Manual - Page 8
screen and environment lighting systems. • ISF certified calibration control To reach a higher standard of performance, the projector incorporates ISF NIGHT and ISF DAY mode settings in its OSD menus, which requires professional calibration service from authorized ISF installers. • Panamorph lenses - BenQ W7000 | User Manual - Page 9
" on page 10 for details.) 2. Lamp cover 3 3. Front IR sensor 4. Vent (heated air exhaust) 5. Projection lens 6. Lens shift lever 4 5 6 Rear view See "Connecting with video equipment" on page 17 for connection details. 7 8 9 1011 12 13 14 15 16 17 Under view 18 7. AC Power cable inlet 8. Rear - BenQ W7000 | User Manual - Page 10
the image size and clarity" on page 21 3. POWER indicator light Lights up or flashes when the projector is operating. "Indicators" on page 49 4. TEMPerature warning light Lights up or flashes if the projector's temperature becomes too high. "Indicators" on page 49 5. LAMP indicator light Lights up - BenQ W7000 | User Manual - Page 11
page 22 10. Picture quality adjustment keys 1. POWER ON/OFF Toggles the projector between standby and on. "Turning the projector on" on page 20, "Turning the projector off" on page 37 (BRIGHTNESS, CONTRAST, COLOR, TINT) Displays the setting bars for adjustment of the appropriate picture quality - BenQ W7000 | User Manual - Page 12
the from your dealer to mount your projector on the BenQ Projector Ceiling Mount Kit are required for ceiling. this installation location. *Set Front Ceiling after you turn the projector *Set Rear Ceiling after you turn the projector on. on. *To set the projector position: 1. Press MENU on - BenQ W7000 | User Manual - Page 13
, you will need to account for both the projected image size and the vertical offset dimension, which are directly proportional to the projection distance. This projector is equipped with a movable lens. See "Shifting the projection lens" on page 16 for details. You can see the diagrams on pages 14 - BenQ W7000 | User Manual - Page 14
image on the screen. In these situations, some image distortion will occur. Use the Keystone function to correct the distortion. See "Correcting picture distortion" on page 25 for details. Projection dimensions Installation for a 16:9 ratio screen Floor Installation Ceiling lens - BenQ W7000 | User Manual - Page 15
ratio projected images. Floor Installation Ceiling Installation : Screen : Center of lens : Screen : Center of lens The screen table above, please contact your dealer for assistance. Positioning your projector 15 - BenQ W7000 | User Manual - Page 16
projection lens The lens shift control provides flexibility for installing your projector. It allows the projector to be positioned off the center of the screen. The lens shift is expressed as a percentage of the projected image height or width. It is measured as an offset from the projected image - BenQ W7000 | User Manual - Page 17
component-video devices" on page 18 Picture quality Best Better S-Video "Connecting S-Video or video devices projector and HDMI devices. HDMI device: DVD player, digital tuner, etc. To make sure you select a correct input source type for the HDMI signal, see "HDMI Settings" on page 42 for details - BenQ W7000 | User Manual - Page 18
also connect the separate audio cable to a suitable audio amplifier. AV equipment From audio output To audio input terminals terminals S-Video cable some analog video cameras). • If the selected video image is not displayed after the projector is turned on and the correct video source has been - BenQ W7000 | User Manual - Page 19
computer To audio input terminals From audio output terminal VGA cable Many laptops do not turn on their external video ports when connected to a projector. Usually a key combination like Fn + F3 or CRT/LCD key turns the external display on/off. Locate a function key labeled CRT/LCD or a function - BenQ W7000 | User Manual - Page 20
-up image displays on the screen for a few seconds while it warms up. The projector will not respond to further commands while it is warming up. 4. If you are prompted for a password, press the arrow keys to enter a six-digit password. See "Utilizing the password function" on page 23 for details - BenQ W7000 | User Manual - Page 21
" on page 35 for details. System Setup Language Splash Screen Projector Position Auto Off Sleep Timer Menu Settings Input Source Auto Source Search S-Video HDMI 1 HDMI 2 Video S-Video Component 1 Component 2 PC Fine-tuning the image size and clarity English BenQ Front Table Disable Disable ENTER - BenQ W7000 | User Manual - Page 22
or remote control to leave and save the settings. *The first press leads you back to the main menu and the second press closes the OSD menu. S-Video Back Securing the projector Using a security cable lock The projector has to be installed in a safe place to prevent theft. Otherwise, purchase - BenQ W7000 | User Manual - Page 23
this manual in advance or right after the password is entered so that it is available to you should you ever forget it. Password Advanced Setup Lamp Settings HDMI Settings Baud Rate Test Pattern High Altitude Mode Password Key Lock Reset All Settings ISF S-Video Password Change Password Power On - BenQ W7000 | User Manual - Page 24
Write down the number and turn off your projector. 3. Seek help from the local BenQ service center to decode the number. You may be required to provide proof of purchase documentation to verify that you are an authorized user of the projector. RECALL PASSWORD Please write down the recall code, and - BenQ W7000 | User Manual - Page 25
are not perpendicular to each other, the projected image becomes vertical trapezoidal. To correct this problem, see "Correcting picture distortion" on page 25 for details. Correcting picture distortion Keystoning occurs when the projector is not perpendicular to the screen and is where the projected - BenQ W7000 | User Manual - Page 26
the projector in well lit rooms. • Standard: It is slightly brighter than Cinema mode, and suitable for use in rooms where there is a small amount of ambient light. • User 1/User 2/User 3: Recalls the customized settings. See "Setting the User 1/User 2/User 3 mode" on page 27 for details. Fine - BenQ W7000 | User Manual - Page 27
28 and "Advanced picture quality controls" on page 29 for details. S-Video Load Settings From ISF Night ISF Day Cinema Dynamic Standard User 1 User 2 User 3 6. When all settings have been done, press MENU to save and leave the settings. User 1 ENTER Back ENTER Back Resetting the picture mode - BenQ W7000 | User Manual - Page 28
by pressing / or remote control. on the projector Lower setting produces less saturated colors; setting to the minimum value makes the image black and white. If the setting is too high, colors on the image will be overpowering, which makes the image unrealistic. Adjusting Tint Highlight Tint and - BenQ W7000 | User Manual - Page 29
the setting, the less the noise. • Detail Enhancement: Sharpens the image. The higher the setting, the more details the image reveals. Picture -- Advanced Black Level Clarity Control Color Temperature Color Temperature Fine Tuning Gamma Selection Brilliant Color Color Management Film Mode 3D Comb - BenQ W7000 | User Manual - Page 30
to be reddish white. A white color with a high color temperature appears to have more blue in it. Setting a preferred color temperature To set a preferred color temperature: 1. Highlight Color Temperature and select Lamp Native, Warm, Normal or Cool by pressing / on the projector or remote control - BenQ W7000 | User Manual - Page 31
(color light meter), and provide a set of suitable source images to measure color reproduction. These tools are not provided with the projector, however, your projector supplier should be able to provide you with suitable guidance, or even an experienced professional installer. The Color - BenQ W7000 | User Manual - Page 32
helps improve picture quality when projecting video image from a film-sourced DVD or Blu-ray Disc. Setting 3D Comb Filter This feature separates composite signal to Y (brightness) signal and C (color) signal, and can help produce clearer and sharper images with correct colors in place. This function - BenQ W7000 | User Manual - Page 33
16:9 projectors to the full 2.35:1 aspect ratio of most motion pictures, showing the best movies without letterbox bars at top and bottom of images while increasing resolution by 33% and brightness by 20%. Pressing LB on the remote control Using Panamorph lens 2.35:1 aspect ratio image 2.35 - BenQ W7000 | User Manual - Page 34
. However, this is not to state that this projector can operate under any and all harsh or extreme conditions. Advanced Setup Lamp Settings HDMI Settings Baud Rate Test Pattern High Altitude Mode Password Key Lock Reset All Settings ISF 115200 Off Off S-Video Back WARNING We recommend you - BenQ W7000 | User Manual - Page 35
image source simultaneously Your projector is capable of displaying pictures simultaneously from two input sources, which can be used to enhance your presentation in an interesting way. Ensure the signals you want to display are correctly connected to the projector 3D . The settings made on - BenQ W7000 | User Manual - Page 36
On in the Display > 3D > 3D Mode menu, and then go to the Display > 3D > 3D Format menu and select the supported format. After you have connected the 3D video devices to the projector using the HDMI cable, make sure the power of BenQ 3D glasses is on. Wear the BenQ 3D glasses, and then enjoy your - BenQ W7000 | User Manual - Page 37
Settings ISF S-Video 115200 Off Off Back Turning the projector off To turn the projector off, press POWER OFF on the remote control to turn the projector off directly. Or you can press II on the projector and a warning message appears. Press II again. • The Power indicator light flashes orange - BenQ W7000 | User Manual - Page 38
Settings Black Level 0 IRE/7.5 IRE Clarity Control Noise Reduction Detail Enhancement 0-31 0-15 Color Temperature Normal/Cool/Lamp BenQ Brilliant Color On/Off Primary Color Red/Green/Blue/Cyan/Magenta/Yellow Color Management Hue Gain 0-100 0-100 Saturation 0-100 Film Mode On/Off 3D - BenQ W7000 | User Manual - Page 39
Information Baud Rate Test Pattern High Altitude Mode Password Key Lock Reset All Settings ISF Source Preset Mode Resolution Equivalent Lamp Hour Firmware Version Change Password Power On Lock BenQ/Black/Blue Front Table/Front Ceiling/Rear Table/Rear Ceiling Disable/5 min/10 min/15 min/20 min - BenQ W7000 | User Manual - Page 40
See "Color Management" on page 31 for details. Film Mode See "Setting Film Mode" on page 32 for details. 3D Comb Filter Dynamic Black See "Setting 3D Comb Filter" on page 32 for details. Automatically changes the black level of the projected pictures to enhance the effect of contrast ratio. 40 - BenQ W7000 | User Manual - Page 41
can also manually press / to decide its degree. 3D Mode This projector features a 3D function which enables you to enjoy the 3D movies, videos, and sporting events in a more realistic way by presenting the depth of the images. You need to wear a pair of 3D glasses to view the 3D images. When the - BenQ W7000 | User Manual - Page 42
Description Sets the language for the On-Screen Display (OSD) menus. See "Using the menus" on page 22 for details. Allows you to select which logo screen will display during projector start-up. You can choose BenQ logo screen, Blue screen or Black screen. The projector can be installed on a ceiling - BenQ W7000 | User Manual - Page 43
Key Lock Reset All Settings ISF Change Password You will be asked to enter the current password before changing to a new one. See "Utilizing the password function" on page 23 for details. Power On Lock Limits use of the projector to only those who know the correct password. See "Utilizing the - BenQ W7000 | User Manual - Page 44
of the projector except the lamp. Contact your dealer or local customer service center if the projector fails to operate as expected. Cleaning the lens Clean the lens whenever you notice dirt or dust on the surface. Before you attempt to clean the lens, turn the projector off, unplug the power cable - BenQ W7000 | User Manual - Page 45
Hour. 4. To leave the menu, press MENU. Extending lamp life Advanced Setup Lamp Settings HDMI Settings Baud Rate Test Pattern High Altitude Mode Password Key Lock Reset All Settings ISF S-Video Lamp Settings Lamp Power Reset Lamp Timer Equivalent Lamp Hour ENTER 115200 Off Off Back Economic 50 - BenQ W7000 | User Manual - Page 46
let the projector cool for 45 minutes. If the Lamp or Temp indicator still lights up after turning the power back on, please contact your dealer. See "Indicators" on page 49 for details. The following Lamp warning displays will remind you to change the lamp. Status Install a new lamp for optimal - BenQ W7000 | User Manual - Page 47
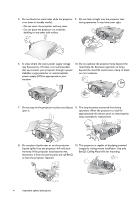
and disconnect the Notes projector from the power outlet. Turn off all connected equipment and disconnect all other • cables. See "Turning the projector off" on page 37 for details. Pulling it too quickly may cause the lamp to break and scatter broken glass in the projector. To reduce the risk - BenQ W7000 | User Manual - Page 48
to "0". Advanced Setup Lamp Settings HDMI Settings Baud Rate Test Pattern High Altitude Mode Password Key Lock Reset All Settings ISF S-Video Lamp Settings Lamp Power Reset Lamp Timer ENTER 115200 Off Off Back Normal ENTER Equivalent Lamp Hour Reset Lamp Timer 50 Back Reset Lamp Timer? Reset - BenQ W7000 | User Manual - Page 49
. Check the following for information about the indicator lights. If there is anything wrong, turn the projector off and contact your dealer. When the projector is in a normal state Power Orange Green Flashing Green Orange Flashing Temp Off Off Off Off Lamp Off Stand-by mode Status & Description - BenQ W7000 | User Manual - Page 50
Troubleshooting Problem The projector does not turn on. No picture. Image is unstable. Picture is blurred. Remote control does not work correctly. 3D content does not not display correctly Cause Remedy There is no power from the power cable. Plug the power cable into the AC inlet on the rear of - BenQ W7000 | User Manual - Page 51
without notice. Optical Projection system DMD chip Lens Projection screen size Lamp Electrical Compatibility Single-chip DLPTM system 0.65" DLP (1920 x 1080) F = 2. Serial Connector: RS232 9 pin (male) Mini B type USB x 1 General characteristics Projector weight Power Power consumption Operating - BenQ W7000 | User Manual - Page 52
Dimensions 428 mm x 317 mm x 145 mm (W x D x H) 317 145 Ceiling mount installation Ceiling mount screws: M6 x 8 (Max. L = 8 mm) 240 104 175 428 83.2 92.2 222.2 282.2 106 88 128 364.4 397.9 124.5 Unit: mm 211.7 424.4 151.2 173 324.1 52 Connecting with video equipment - BenQ W7000 | User Manual - Page 53
Timing chart Supported timing for PC input Format Resolution 720 x 400 640 x 480 800 x 600 1024 x 768 1024 x VGA_75 VGA_85 SVGA_56 SVGA_60 SVGA_72 SVGA_75 SVGA_85 XGA_60 XGA_70 XGA_75 XGA_85 BenQ Notebook Timing BenQ Notebook Timing 1280 x 768_60 WXGA_60 WXGA_75 WXGA_85 SXGA_60 SXGA_75 SXGA_85 - BenQ W7000 | User Manual - Page 54
1600 x 1200 1680 x 1050 1920 x 1080 640 x 480@67Hz 832 x 624@75Hz 1024 x 768@75Hz 1152 x 870@75Hz UXGA 1680x1050_60 1920x1080_60 MAC13 MAC16 MAC19 MAC21 60.000 59.954 59.939 / 60 66.667 74.546 74.93 75.06 75.000 65.290 67.432/ 67.5 35.000 49.722 60.241 68.68 162.000 146.250 148.35/ 148.5 30.240 - BenQ W7000 | User Manual - Page 55
Supported timing for HDMI (HDCP) input Format Resolution Refresh rate (Hz) 640 x 480 720 x 400 800 x 600 1024 x 768 SVGA_60 SVGA_72 SVGA_75 SVGA_85 XGA_60* XGA_70 XGA_75 XGA_85 XGA_120* (Reduce Blanking) BenQ Notebook Timing BenQ Notebook Timing 1280 x 720_60* 1280 x 720_120* 1280 x 768_60 - BenQ W7000 | User Manual - Page 56
60.241 1152x870@75Hz MAC21 75.06 68.68 *Supported timing for non-3D and 3D signal with Frame Sequential format. 106.500 121.750 162.000 146.250 148.35 / 148.5 30.240 57.280 80.000 100.00 Format Resolution Refresh rate - BenQ W7000 | User Manual - Page 57
.175/74.25 74.175/74.25 74.25 74.175/74.25 148.5 148.35/148.5 Supported timing for Video and S-Video inputs Format NTSC 3.58 NTSC 4.43 PAL-B/G PAL M PAL N PAL 60 SECAM Resolution - Refresh rate (Hz) 59.94/60 59.94/60 50 59.94/60 50 59.94 - BenQ W7000 | User Manual - Page 58
replacement of any defective parts (labor included). To obtain warranty service, immediately notify the dealer from which you purchased the product of any defects. Important: The above warranty shall be void if the customer fails to operate the product in accordance with BenQ's written instructions
-
 1
1 -
 2
2 -
 3
3 -
 4
4 -
 5
5 -
 6
6 -
 7
7 -
8
-
9
-
10
-
11
-
12
-
13
-
14
-
15
-
16
-
17
-
18
-
19
-
20
-
21
-
22
-
23
-
24
-
25
-
26
-
27
-
28
-
29
-
30
-
31
-
32
-
33
-
34
-
35
-
36
-
37
-
38
-
39
-
40
-
41
-
42
-
43
-
44
-
45
-
46
-
47
-
48
-
49
-
50
-
51
-
52
-
53
-
54
-
55
-
56
-
57
-
58
 |
 |

W7000/W7000+
Digital Projector
Home Cinema Series
User Manual