Beretta A400 XPLOR UNICO Beretta A400 Xplor User Manual
Beretta A400 XPLOR UNICO Manual
 |
View all Beretta A400 XPLOR UNICO manuals
Add to My Manuals
Save this manual to your list of manuals |
Beretta A400 XPLOR UNICO manual content summary:
- Beretta A400 XPLOR UNICO | Beretta A400 Xplor User Manual - Page 1
IITT Italiano EN English FR Français ES Español DE Deutsch RU Pусский SV Svenska GR 2 - Beretta A400 XPLOR UNICO | Beretta A400 Xplor User Manual - Page 2
the interchangeable barrel of this shotgun has a serial number different from that stamped on the receiver, it may be necessary, when referring to the gun, to specify also the serial number of the barrel/s. ! ! ! EN ! ! WE RECOMMEND THE USE OF ORIGINAL BERETTA SPARE PARTS AND ACCESSORIES. THE USE - Beretta A400 XPLOR UNICO | Beretta A400 Xplor User Manual - Page 3
MANUAL CAREFULLY BEFORE USING THE SHOTGUN Never let the muzzle of a firearm point at any part of your body or at another person. This is especially Removing or unloading the magazine will not guarantee that a firearm is unloaded or cannot fire. Shotguns and rifles can be checked by cycling or removing - Beretta A400 XPLOR UNICO | Beretta A400 Xplor User Manual - Page 4
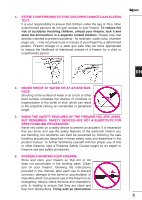
note that devices intended to prevent accidents - for example, cable locks, chamber plugs, etc., - may not prevent use or misuse of your firearm by working parts. Clean and oil your firearm, following the instructions provided in this manual, after each use to prevent corrosion, damage to the barrel or - Beretta A400 XPLOR UNICO | Beretta A400 Xplor User Manual - Page 5
gauge and type for the particular firearm. The calibre or gauge of the firearm is clearly marked on the barrels of shotguns and on the slide or barrel EARPLUGS WHEN SHOOTING. The chance that gas, gunpowder or metal fragments will blow magazine, loading mechanism and chamber are unloaded, and action - Beretta A400 XPLOR UNICO | Beretta A400 Xplor User Manual - Page 6
rearm before putting it in a vehicle (chamber empty, magazine empty). Hunters and target shooters should load their fi . 12. LEAD WARNING. Discharging firearms in poorly ventilated areas, cleaning fi by Federal, State and Local laws governing the sale, transportation and use of firearms in your area - Beretta A400 XPLOR UNICO | Beretta A400 Xplor User Manual - Page 7
Operating rods with sleeve C Barrel C1 Barrel breech C2 Indexing lugs C3 Locking shoulders C4 Gas cylinder C5 Piston with elastic seal C6 Exhaust valve assembly C7 Optimachoke® HP choke tube C8 Choke tube spanner C9 Front sight C10 Top rib C11 Muzzle D Stock D1 Recoil pad D2 Kick Off device E Fore - Beretta A400 XPLOR UNICO | Beretta A400 Xplor User Manual - Page 8
HOW TO LOAD THE FIREARM HOW TO USE THE CUT-OFF DEVICE HOW TO UNLOAD THE SHOTGUN DISASSEMBLY BERETTA OPTIMACHOKE® HP CHOKE TUBES ROUTINE MAINTENANCE SPECIAL MAINTENANCE REASSEMBLY STOCK DROP AND CAST MODIFICATION STORAGE 4 8 10 15 16 16 19 20 21 23 EN 24 25 26 29 31 31 33 35 9 - Beretta A400 XPLOR UNICO | Beretta A400 Xplor User Manual - Page 9
Beretta gas operated, self-cleaning system, the advanced design of the new A400 Xplor uses an exclusive exhaust valve that allows the shotgun to "fire" a broad range of ammunition. In combination with the rotating head of the breech bolt, the new system further reduces the already low recoil - Beretta A400 XPLOR UNICO | Beretta A400 Xplor User Manual - Page 10
ensure reduced recoil felt, the ultra-light recoil pad offers an ideal support surface made of technopolymer foam, for enhanced recoil absorption. REDUCED NUMBER OF COMPONENTS The Beretta semi-automatic A400 Xplor is characterised by a particularly small number of assemblies. The shotgun is composed - Beretta A400 XPLOR UNICO | Beretta A400 Xplor User Manual - Page 11
EN ! 12 ROTATING BOLT HEAD LOCK The Beretta semi-automatic A400 Xplor has a breech bolt with a rotating head with two lugs that operate the lock of the barrel breech. The long breech has two indexing lugs and a large support surface that make it possible to eliminate the movement of the barrel when - Beretta A400 XPLOR UNICO | Beretta A400 Xplor User Manual - Page 12
steel, the Beretta Optimachoke® HP choke tubes ensure the highest protection against rust and resistance to use of steel shot. The attention that Beretta pays systematically to reduce the recoil reached new heights with the A400 Xplor. The A400 Xplor is the only semi-automatic shotgun in the world - Beretta A400 XPLOR UNICO | Beretta A400 Xplor User Manual - Page 13
capacity must be limited to a single shot with the provided reducer plug (operation to be performed by a competent gunsmith). * see "Ammunition". ACCESSORIES The Beretta A400 Xplor shotgun comes in a case that contains the firearm and a complete range of accessories for personalising and cleaning - Beretta A400 XPLOR UNICO | Beretta A400 Xplor User Manual - Page 14
Light alloy Alloy steel, fully chromed bore Ventilated Metal bead Button-operated, on trigger guard Limited to two rounds Walnut, with ambidextrous finger rest. Beretta Microcore Recoil pad. Adjustable drop. Cast-on, cast-off. Available with Kick off and Kick off³. Kick off³ is standard on the "UNICO - Beretta A400 XPLOR UNICO | Beretta A400 Xplor User Manual - Page 15
be fired. • Remount the barrel, following the instructions set out in the "Reassembly" section. CHECKING THE CONDITION OF THE CHOKE TUBES ! ! 16 • Always check the appearance and cleaning of the choke tubes before using the shotgun. • Check correct tightness in the barrel with the spanner provided - Beretta A400 XPLOR UNICO | Beretta A400 Xplor User Manual - Page 16
WARNING: During assembly, disassembly and maintenance procedures, never point a firearm at someone or at hard or flat surfaces. Always treat the firearm as if it were loaded (See points 1, 2 and 4 of the BASIC SAFETY RULES). The Beretta semi-automatic A400 Xplor comes with barrel and stock-receiverfore - Beretta A400 XPLOR UNICO | Beretta A400 Xplor User Manual - Page 17
Slide the fore-end into place over the gas cylinder / the valve assembly and magazine tube (Fig. 13). checking for the correct your fingers away from the ejection port, press the breech bolt release button and gently guide the breech bolt to lock (Fig. 16). CAUTION: When pressing the release button - Beretta A400 XPLOR UNICO | Beretta A400 Xplor User Manual - Page 18
manual, you will be requested to inspect the ejection port, the loading gate, and the cartridge chamber of your Beretta semi-automatic A400 Xplor portion of the barrel into which the cartridge shotgun to another person. • Never take from or give the shotgun in the magazine tube. If there are, - Beretta A400 XPLOR UNICO | Beretta A400 Xplor User Manual - Page 19
steel shot ammunition. Follow the instructions for use of choke tubes appropriate for the use of steel shot, as set out in the "Steel shot" section. You will find the markings for the gauge and chamber length for your shotgun on the side of the barrel (Fig. 20). Every A400 Xplor has been tested with - Beretta A400 XPLOR UNICO | Beretta A400 Xplor User Manual - Page 20
loading the firearm to make sure that it is clean and free of possible obstructions (see: "Checking for obstructions"). WARNING: Check the conditions and correct tightness of the choke tubes in the barrel. Never use the shotgun without the choke tube inserted (see. "Checking the condition of the - Beretta A400 XPLOR UNICO | Beretta A400 Xplor User Manual - Page 21
release button and guide the breech bolt to lock. WARNING: The firearm is now loaded and ready to fire after the manual safety is shotgun for the next round. • The shotgun will fire the cartridge in the chamber first, and then it will automatically introduce the cartridge from the magazine tube - Beretta A400 XPLOR UNICO | Beretta A400 Xplor User Manual - Page 22
into an obstructed barrel, damage and magazine is empty (Fig. 24). • Engage the safety (Fig. 8) (red ring not visible) and if necessary, reload the shotgun according to the instructions side of the receiver (round part) (Fig. 25). • ready to fire after the manual safety is disengaged. Check that the - Beretta A400 XPLOR UNICO | Beretta A400 Xplor User Manual - Page 23
). • Raise the carrier, push the cartridge lightly into the magazine tube and at the same time press down the release button, guiding the cartridges out of the magazine tube. • After checking the magazine tube and the receiver are empty, keeping the shotgun pointed in a safe direction, disengage the - Beretta A400 XPLOR UNICO | Beretta A400 Xplor User Manual - Page 24
or at hard, flat surfaces. Always treat the shotgun as if it were loaded. (See points 1, 2 and 4 of the BASIC SAFETY RULES.) NOTICE: It is advisable to carry out the disassembly operations over a table to catch components should they drop. BARREL • Check that the carrier stop push button is pressed - Beretta A400 XPLOR UNICO | Beretta A400 Xplor User Manual - Page 25
shoot High Performance steel ammunitions. NOTICE: The Optima-Bore® HP barrel of the A400 Xplor can only mount Optimachoke® HP tubes. Other types of interchangeable Beretta choke tubes are not appropriate for use with Optima-Bore® HP barrels and these will alter the shot pattern distribution. 26 - Beretta A400 XPLOR UNICO | Beretta A400 Xplor User Manual - Page 26
trademark of Fabbrica d'Armi Pietro Beretta S.p.A. CHECKING THE CONDITION OF THE CHOKE TUBES • Always check the appearance and cleaning of the choke tubes before using the shotgun. • Check correct tightness in the barrel with the spanner provided. • Never use choke tubes that show signs of defects - Beretta A400 XPLOR UNICO | Beretta A400 Xplor User Manual - Page 27
choke tube are perfectly clean and lightly oiled. • Install the desired choke tube. • Manually screw the choke tube clockwise into the barrel. Use the Beretta spanner provided to tighten the choke tube until it is fully lowered into its seat in the barrel. Forcefully tighten it manually. • Remove - Beretta A400 XPLOR UNICO | Beretta A400 Xplor User Manual - Page 28
not alter or modify an existing fixed choke Beretta barrel for the use of interchangeable choke tubes. The barrel wall thickness would be too thin to safely contain the pressure levels generated by shooting. ROUTINE MAINTENANCE Clean and lubricate your shotgun any time combustion residue, grease or - Beretta A400 XPLOR UNICO | Beretta A400 Xplor User Manual - Page 29
the shotgun where this problem is most likely to arise are the gas cylinder, the piston and elastic piston seal and the magazine tube. • Spray the piston, elastic piston seal and magazine tube and clean with Beretta Gun Oil. • Ensure that the piston glides freely on the magazine tube. • To clean the - Beretta A400 XPLOR UNICO | Beretta A400 Xplor User Manual - Page 30
to keep the shotgun in perfect working order. BREECH BOLT ASSEMBLY (Breech bolt, operating rods with sleeve, recoil spring, and piston stop). • Spray the parts and clean with Beretta Gun Oil. • Thoroughly dry with a soft cloth and lightly lubricate. TRIGGER PLATE • Thoroughly clean the parts with - Beretta A400 XPLOR UNICO | Beretta A400 Xplor User Manual - Page 31
port by the cocking handle, with the likelihood of damage to both parts. • Insert the barrel into the receiver, ensuring that the magazine tube enters the piston hole as well as that of the gas cylinder and the valve assembly (Fig. 10,11,12). • Push it all the way into the receiver until it stops - Beretta A400 XPLOR UNICO | Beretta A400 Xplor User Manual - Page 32
is not empty, unload it as instructed in the relevant section. WARNING: Never point the firearm at someone or at hard, flat surfaces. Always treat the shotgun as if it were loaded. (See points 1, 2 and 4 of the BASIC SAFETY RULES). The Beretta semi-automatic A400 Xplor has a pre-set factory stock cast - Beretta A400 XPLOR UNICO | Beretta A400 Xplor User Manual - Page 33
into the stock. • Remove the Beretta Microcore recoil pad from the stock or Kick Off (Only for Kick Off versions). • (Only for Kick Off versions) Remove the Kick Off recoil absorption device by unscrewing the special screws using a Torx T15 screwdriver. • Use the 13-mm tube spanner to completely - Beretta A400 XPLOR UNICO | Beretta A400 Xplor User Manual - Page 34
the stock and tighten with the special screws using a Torx T15 screwdriver. • (Only for the Kick Off versions) Mount the Beretta Microcore recoil pad into the Kick Off holes (Only for the Kick Off versions) or onto the stock. Tighten the screws using the Phillips screwdriver. STORAGE WARNING: To - Beretta A400 XPLOR UNICO | Beretta A400 Xplor User Manual - Page 35
NOTES IITT EN FR ES DE RU SV GR 36 - Beretta A400 XPLOR UNICO | Beretta A400 Xplor User Manual - Page 36
NOTES IITT EN FR ES DE RU SV GR 37 - Beretta A400 XPLOR UNICO | Beretta A400 Xplor User Manual - Page 37
NOTES IITT EN FR ES DE RU SV GR 38 - Beretta A400 XPLOR UNICO | Beretta A400 Xplor User Manual - Page 38
NOTES IITT EN FR ES DE RU SV GR 39
-
 1
1 -
 2
2 -
 3
3 -
 4
4 -
 5
5 -
 6
6 -
 7
7 -
8
-
9
-
10
-
11
-
12
-
13
-
14
-
15
-
16
-
17
-
18
-
19
-
20
-
21
-
22
-
23
-
24
-
25
-
26
-
27
-
28
-
29
-
30
-
31
-
32
-
33
-
34
-
35
-
36
-
37
-
38
 |
 |

IT
FR
ES
DE
RU
SV
GR
2
EN
Italiano
English
Français
Español
Deutsch
P
усский
Svenska
Ελληνικά