Bernina 330 Manual
Bernina 330 Manual
 |
View all Bernina 330 manuals
Add to My Manuals
Save this manual to your list of manuals |
Bernina 330 manual content summary:
- Bernina 330 | Manual - Page 1
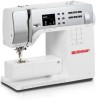
I EMMA I i Agiiimitmonnadl INSTRUCTION BOOK - Bernina 330 | Manual - Page 2
design techniques toachieve on operating efficiency and many years of dependable service Before attempting to sew. however, and to obtain the maximum benefits, please study IhiS bookie; carefully following each step on your machine Repeal the process until you are familiar with the controls and - Bernina 330 | Manual - Page 3
INSTRUCTION BOOK MODELS 320.330 Page Title 1. INTRODUCTION 2. CONTENTS PART NAMES 4. ACCESSORIES 5. CONNECTING MACHINE TO POWER SUPPLY FOOT CONTROL NEEDLE LIGHT 6. SAFETY REGULATIONS 7. WINDING BOBBIN 8. INSERTING BOBBIN AND BOBBIN CASE. BOBBIN THREAD TENSION. 9. UPPER THREADING 10. THREAD - Bernina 330 | Manual - Page 4
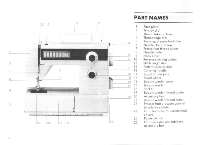
PART NAMES 1 Fete plate 2 Tension dial 3 Throodtoko.up lover Thread regulator 5 Twooep presser fool lifter 6 Needle clomp screw 7 Presser bar thread 16 Bobbin winder cover 17 Bobbin winder 18 Socket 19 Bobbin winder thread guide 20 Accessory box 71 Bobbin winder thread cutter 22 Presser loot - Bernina 330 | Manual - Page 5
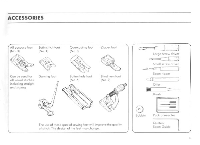
el Zipper fool Can be used lot all usual >filches including straight and oafag Darning loot Button hole fool (No.5) Blind hem foot (No 91 The use of these speciol sewing feel will improve roe quality al stitch The design of the feet may change Large screwdriver Small screw dove, Seam ripper - Bernina 330 | Manual - Page 6
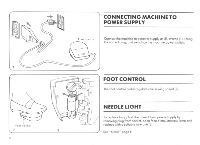
too power supply as illustroted (1). Using the correct plug, and switch on the machine power switch. FOOT - Bernina 330 | Manual - Page 7
during interruptions in sewing or offer completion of work, the machine must bodisconnedeclfrom thepowor supply by pulling out the mains plug. Repairs la the electric section, especially the changing of the lead wire to the foot control unil,may only be carriedout by one of our service agencies. 6 - Bernina 330 | Manual - Page 8
be disengaged. (4 WINDING THREAD AROUND BOBBIN Wind the thread by hand sevenor eight timesround the bobbin in the direction of the arrow on the machine end holding the end of the thread between your forefinger and thumb, gently press down on the foot control podol. The thread cutter will automat - Bernina 330 | Manual - Page 9
ensure that the needle's raised to its highest position when removing or inserting the bobbin. BOBBIN THREAD TENSION Measure the bobbin threod tension by suspending the wound bobbinin as case by the end of the thread.If the bobbin does not move when it is gently swung, the tension is tooTight, if it - Bernina 330 | Manual - Page 10
Follow the numbered sequence exactly Pass thethread through the guide(I) down inbetween the tension discs 12) under and into the thread tegulaior hom right to left up and through the lake-up lever hom right to left (4) and down through the guides (5. 6) and through the eye of the needle from front - Bernina 330 | Manual - Page 11
to decreosethe tension turn too lower number. Thenormol setting is 4. Normal thread tension is achieved when the upper and lower threods ore equally set (cross ) on both sides of the fabric IA). If too much of the upper thread shows underneath the fabric (8) or too much of the lower *treed shows on - Bernina 330 | Manual - Page 12
fabrics, tne presser foot can be raised further nv Idling the presser lever o second stage. (2) DROP FEED CONTROL For normal sewing the feed dogs should be in the raised position (31 Push -- When the fabric is not required to be fed through the mochine. o for free hand embroidery or darning etc - Bernina 330 | Manual - Page 13
. Usually the heavier the fabric, the thicker the thread and lorger the needle Make sure the needle is straight and not damaged. II) Env of ^mole !Achy Chonge the needle regularly and at the first sign of sowing problems. Insert os illustrolod. 141 Loon /VI IP Ten '.2 Neta.t Oaf^P Flaf irde - Bernina 330 | Manual - Page 14
OF SHANK AND QUILTING/SEAM GUIDE Oohs 144e. twde Raise the presser bar and hl shank c shown, ) Insert quilling/seam guide carefully zoos not to damage the holding spring 12) FITTING OF PRESSER FEET Raise the presser loot. Pull the one•touch lever towards you ond the foot will be released. ferule - Bernina 330 | Manual - Page 15
BRINGING UP THE BOBBIN THREAD Hold the upper thread in your left hand. turn the hood wheel towards you o rho the needle goes down and up again ill 1 Gently pull the upper thread and the lower thread will be looped over d. (2) Place bark threods uncle, the presser ;ow and to the rear 2 '. 13 - Bernina 330 | Manual - Page 16
COLOUR CODING Ann BUTTONHOLE 0 STRAIGHT STITCH 1.5 ZIG-ZAG STITCH Model 320 BLIND STITCH 3 STEP ZIGZAG STITCH Model 330 STRETCH OVERLOCK STITCH OVERLOCK STITCH Simply select the stitch pollens yourequire by rotating the pattern selector dial to the desired position. Then match the colour - Bernina 330 | Manual - Page 17
will sew forwards °gem 121 REMOVING FABRIC Role the thread loke'up lent to di highest position by turning the hand wheel towel& you. Slide the lob,lc nut horn under the foot to the rear of the machine. PRESSER BAR THREAD CUTTER 3 er Hold the thread in both hand; behind the presser foot Centte - Bernina 330 | Manual - Page 18
ZIG-ZAG STITCHING A The zig-zog stitch con be set at various stitch widths and lengths occording to the opplicca ton required. Set the pattern selector dialIA) os shown and the stitch length dial (81between 0.5 and 5 ,1) .01 The pattern selector dial (A) con be set between 1 and 5. (2) 2 - Bernina 330 | Manual - Page 19
seouence illustrated (21 USER TIPS Always sew o sample buttonhole on some spore fob...cos settings will change according to the fabric used. For very thin. stretchy or other cliffKull tetras. try using interfacing lvilene) or tissue, or Other pope underneath the fabric to aid machine feeding. Always - Bernina 330 | Manual - Page 20
placed over the needle clomp screw. (2A} To darn small holes ond worn ports, st.etch the fobnc under rho foot between both bonds and move ',OS ollustroied whilst sewi ng First sew round the hole (8) then from side to side (Cl. Turn the fabric through 90' ond continue to move the - Bernina 330 | Manual - Page 21
ZIPS Set the machine os illustroted fitting the Zipper foot (1) The Zipper foot con be moved to the left or right. (2) To sew on the right bond side of the zipper, move fool over to the right os illustrated and reverse the procedure to sew the left hand side of the zipper (3) Very. To move - Bernina 330 | Manual - Page 22
OVERSEWING EDGES AA Oversewing edges prevents the fabric from fraying and creates r14 a neat edge Set the machine as illustrated selecting a 'unable stitch width and length. ill When sewing, the needle should just pass over the edge of the labac. 12) I On fabrics that ate opt to pucker, use - Bernina 330 | Manual - Page 23
BLIND HEM STITCH Set the machine os illustrated fitting the Blind Horn foot, Fold the fabric os illustrated with the fabric. Once the correct position of the fobric has been set, position the "guide'of the foot (S) upagainst the fold (3.4)by turning the nut 161 Proceed tosewcarefully feeding the - Bernina 330 | Manual - Page 24
THREE STEP ZIG-ZAG Set the machine as illustrated fitting the Na 3 All Purpose foot ' I mc0. The ihr ee slepligizag stitch hose wide range of sewingoppl hoes. such as patching. doming. repairing tears, mending. sewing on elastic and lace. oversewing edges etc. on a wide range of fabrics. Fig. 2 - Bernina 330 | Manual - Page 25
STRAIGHT STRETCH STITCH (Not ler Model 320) Set the machine as illustroted fitting the All Purpose foot. (I) 1he straight stretch sews two stitches forward and one stitch back words. thereby giving "triple" strength. Use it for stretch fabricsmixt for areas of "stress" where a strong stitch is - Bernina 330 | Manual - Page 26
/". Ec; STRETCH OVERLOCKING AND OVERLOCKING fry (Not for Models 320) Set the machine as illust Toted using the Nr. 3 or Ni. 8 foot. I for finer fabrics 11 for thicker fabrics Both these stitches a e designed to seam and Overlock the edge of a labia in one operation. When the needle - Bernina 330 | Manual - Page 27
. I2/ FREEING JAMMED THREAD To release ony thread lammed in the hook, pull the end of the thread while turning bobbin case and clean every pod with o piece of orly cloth l4) Use sevnng•moehine oil, or some other high-quality refined mineral machine oil. DO NOT OWROIL. Your mochiee should be serviced - Bernina 330 | Manual - Page 28
TROUBLE-SHOOTING GUIDE NeedierlInbre Atwood .new armoar • Incorstre µnoon% 1 Foot pirate< n Vo Story 7 Handlers roc tweeIce (ober Akre r• charodor •ncor watt 4 Meetwol n bees waled by oferwrIdt• I Sew Lee new:Isar 2 kw Ond N.adue hart - Bernina 330 | Manual - Page 29
FritzGegmald. 8266 Sleckborn, Switzerland Copyright by Fritz Gegouf Form Nr. GI 09095021 021.180101
-
 1
1 -
 2
2 -
 3
3 -
 4
4 -
 5
5 -
 6
6 -
 7
7 -
8
-
9
-
10
-
11
-
12
-
13
-
14
-
15
-
16
-
17
-
18
-
19
-
20
-
21
-
22
-
23
-
24
-
25
-
26
-
27
-
28
-
29
 |
 |

I
EMMA
I
i
Agiiimitmonnadl
INSTRUCTION
BOOK