Bernina 707 Manual
Bernina 707 Manual
 |
View all Bernina 707 manuals
Add to My Manuals
Save this manual to your list of manuals |
Bernina 707 manual content summary:
- Bernina 707 | Manual - Page 1
My BERNINA Guide 707 717 - Bernina 707 | Manual - Page 2
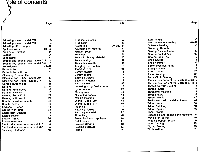
tacking 32 Terry Cloth Darning 29 The various Parts of the Machine (707) 2 The various Parts of the Machine (717) 3 Thread Correct Holding 15 Thread cutter 9 Threading machine 8 Thread table 6 Treble needle 42 Trellis work with metallic thread 44 Tricot Hems 15 Tricot Patching 16 - Bernina 707 | Manual - Page 3
Your Bernina dealer will be glad to advise you. As soon as you have mastered the sewing techniques taught to you during your instruction period you will discover that sewing with a Bernina is a pleasure. We wish you every success. Fr. Gegauf Ltd., Manufacturers of Bernina Sewing Machines Steckborri - Bernina 707 | Manual - Page 4
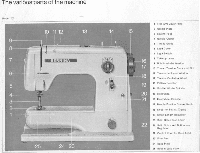
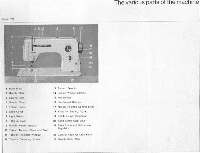
machine Model 707 9 8 7 • 10 11 12 13 BERNINA 4 I • 1 3 2 1 I I 25 24 23 14 A \ • • S 15 16 17 18 19 20 21 22 1 Free Arm Cover Plate 2 Needle Plate 3 Sowing Foot 4 Needle Clamp 5 7nread Guide 6 Light Cover 7 Light Switch 8 Take-up Lever 9 Bobbin winder tension 10 Thread Tension - Bernina 707 | Manual - Page 5
10 1112 Or OLRNINA 14 15 19 41 20 21 The various parts of the machine 1 Base Plate 2 Needle Plate 3 Sewing Foot 4 Needle Clamp S Thread Guide 6 Light Cover 7 Light Switch II Take-up Lever 9 Bobbin winder tension 10 Thread Tension Discs and Slot 11 Tension Indicator Window 12 Tension Centering - Bernina 707 | Manual - Page 6
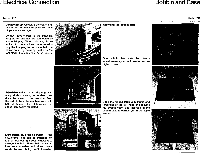
foot starter the machine is set in motion. Adjustable motor. It is an advantage with many kinds of sewing to be able to reduce the speed of the machine. Push the switch. Now the machine stitch plate slide. Turn handwheel towards you, until needle reaches highest point. Open the hinged latch with - Bernina 707 | Manual - Page 7
point. By pressing lightly on the foot starter the machine is set in motion. Model 707 When :replacing the machine after use, make aura that the hand wheel is next to the compartment for the foot starter. Adjustable motor. It is an advantage with many kinds of sewing to be able to reduce the - Bernina 707 | Manual - Page 8
case. Bobbin winder is now switched on. Correct choice of needle and thread Use only needle system 705 B for the Bernina machine class 707 and 717. Make sure that both needle and thread correspond to the sewing table given above. The usual needle numbers for sewing are 80, 90 and 100. For darning - Bernina 707 | Manual - Page 9
from the spool round tension (9) and from there - as shown in picture - guide it to the mounted bobbin case. Start the motor by pressing on the foot starter. As soon as there Is enough thread wound, stop motor, remove the bobbin case and push the bobbin winder spindle again to theleft.Re - Bernina 707 | Manual - Page 10
the machine Fixing the needle. Loosen the needle clamp screw half a turn. Push the needle upwards as far as it will go with the flat side at the back and facing away. Tighten needle clamp screw. Threading the machine. The thread is led from the spool to the needle in one movement. Presser foot and - Bernina 707 | Manual - Page 11
left. To secure the sewing table the lever must be turned to the right in the direction of the arrow. Changing the presser feet Use the correct presser foot for each type of work. Only in this way will you achieve easy and perfect work. The patented Bernina presser foot clamping lever permits qu€ck - Bernina 707 | Manual - Page 12
But its densest. When the indication mark never turn the knob when the needle Is points upwards the satin stitch is at its still In the fabric for sewing thread No.30. If a different thread is used then knob 21 may have to be adjusted. Various stitches which can be sewn on the Bernina Class 707 - Bernina 707 | Manual - Page 13
: Place your Bernina far enough from the table edge (about 6 inches) for you to lean your left elbow on the table even when using the slide-on sewing plate which makes sewing easier. Sit exactly in front of the needle bar. The mastering of your sewing depends only on how you guide the material. The - Bernina 707 | Manual - Page 14
Straight stitching O Zigzag foot • e 4 es• aA alt • 19 44' Needle: normally 80 f it at times 70-100 -19 ar w depending on the Ib material and thread Thread : O 0 20 adapted to the fabric sewn I. ea NZ left centre right Straight stitch Reverse sewing a 23 Zigzag: 0 2 - Bernina 707 | Manual - Page 15
according to work and material. Finishing Edges Zigzag: 212/ -4 Stitch length: 1 -2 Needle position: centre Automatic: zigzag VWWWV Drop feed control: sewing If you guide the work like this: From the front, close to the foot, fingers on the edge, you will easily get a neat finish. Zigzag - Bernina 707 | Manual - Page 16
up as far as stop Needle position: centre Mai Automatic: zigzag yr,Awyw Drop feed control: sewing Model 707 only : When embroidering always use the slide- The Bernina satin stitch control gives the correct stitch length (density) for a satin stitch and autoon sewing table so that the work can - Bernina 707 | Manual - Page 17
this: This way the view is clear and the work can be guided easily. Important ti Hold the thread slightly taut while sew- ing and the Jersey will not stretch so much. The thread can also be guided through the hole in the needle plate like pintuck cord. (Especially useful for a large patch.) - Bernina 707 | Manual - Page 18
Patching Jersey Zigzag foot Needle: 80-70 Thread. 30 or 50 ti \ j'i \j\jN Patching Jersey Zigzag: about 3 Stitch length: 1-112/ Needle position: centre Automatic: zigzag WNWVV Drop teed control: sewing Baste the new piece on to the right side of the work, then sew it on, first Whenever - Bernina 707 | Manual - Page 19
foot Needle: 80-70 Thread: 30 Four important points when sewing Jersey -U 1. Baste always with darning thread. 2. Use only a perfect needle. A blunt needle leaves holes. 3. Use fine mercerised thread. 4. Press each seam after sewing layer of Jersey and sew at one presser foot width along first seam - Bernina 707 | Manual - Page 20
Edgings Zigzag foot Needle: 80-70 Th read : Shell Edging Zigzag: 4 Stitch length: 1 Needle position: centre Automatic. Blindstitch Drop feed control: sewing Place folded edge to the left as for quick seam. Elastic and Zigzag: 3 Stitch length: 1-1'/2 Needle position: centre Drop - Bernina 707 | Manual - Page 21
edging Zigzag: about 112/ -2 Stitch length: about 14/ -72 Needle position: centre Automatic: zigzag 1,AAWAN Drop feed control: sewing Prepare and press turnings. Sew zigzag over this pressed edge as for oversewing. (Guide work as for oversewing.) Finally trim away turnings. Hold scissors - Bernina 707 | Manual - Page 22
Applying elastic thread Zigzag: 2 Stitch length: 2 Needle position . centre Automatic: zigzag WNWIN Drop feed control: sewing Thread the elastic through the hole in the embroidery foot and pull it while sewing. The more you pull the more it gathers. For a second row (one presser foot width - Bernina 707 | Manual - Page 23
: sewing Automatic: Blindstitch Setting for sheer fabric Zigzag: about 112/ Stitch length: about 11/2 Needle position: centre Oversew and prepare the hem as diagram, baste with machine or by hand 1/4 " from edge and press. Blind hem stitch This is how the work is placed under the foot - Bernina 707 | Manual - Page 24
Patching with running stitch Needle position: centre Drop feed control : sewing 1st run Zigzag foot Zigzag: Stitch length: Automatic: 11/ 2 -2 1-11/2 zigzag VWWVW Needle: 80-70 Thread: 50 Do not cut off damaged part but baste the new patch on right side of work, and sew it on with a small - Bernina 707 | Manual - Page 25
Presser foot Needle: 80 Thread: Mercerised sewing thread 50 or 60/3 Stretch seam for ski trousers and very elastic fabrics like Helanca ®, Crimplene, etc. Zigzag: 1-1'/2 Stitch length: 1/2 -'/3 Automatic: Stretch seam Needle position: centre Drop feed control: On sewing Sew tacked seam. ( - Bernina 707 | Manual - Page 26
the basting line at the left side of the foot. (Holding the work taut from the front and rear ensures correct guiding.) The magic needle has two eyes, one above the other. The lower eye is threaded for regular sewing. For basting, thread the upper eye. Choose stitch length according to material - Bernina 707 | Manual - Page 27
Buttonholes Buttonhole foot Needle: 80-70 Thread: 30 or 50 ffr, For sewing a buttonhole, thread bottom cotton through hole Sewing the Buttonhole Set the required buttonhole length with the guide on the buttonhole foot. Move needle downwards to foot level and check that needle comes to middle of foot - Bernina 707 | Manual - Page 28
will be in the left hand groove of the foot. Sew satin stitch for the first bead. Finish first bead with needle in work and to right of the cord and lift foot. How to sew the buttonhole with reinforcing cord Set machine. Lower needle to the raised foot and make sure that it is in the centre - Bernina 707 | Manual - Page 29
Small darning foot Needle: 80-70 Thread: 50 Darning material Zigzag: 0 Stitch length: 0 Automatic: straight stitch Drop feed control: lowered The quick mastering of this work depends on regular guiding. Therefore: - Hold the hoop correctly. - Always work from left to right (as when writing - Bernina 707 | Manual - Page 30
Darning fine socks Model 707 only Small darning foot Needle: 80-70 Thread: 50 Darning fine socks (also sleeves) Zigzag: Stitch length: 0 Automatic: straight stitch Needle position: centre Drop feed control: lowered Place the darning ring on the free arm (stud of its shank in hole on right - Bernina 707 | Manual - Page 31
machine with matching thread. Lay the wool in the slot of the presser foot. The wool will then be guided automatically. Darning with wool 1st run: Applying the wool Start the work on the left, a little above the hole. Stitch down the wool with one or two stitches, and leave the needle 0 down - Bernina 707 | Manual - Page 32
on buttons Button presser foot Needle: 80 Mercerised sewing thread: 50 or embroidery thread: 30 Sewing the button on Zigzag: 3-4 Stitch length: 0 Needle position: left Automatic: zigzag vW0M/V Drop feed control: lowered Slide piece of work under the presser The zigzag width is nearly - Bernina 707 | Manual - Page 33
Inserting zips r; Zipper foot Needle: 80 Thread: 30 Zigzag: 0 Stitch length: 11/2 -2 Automatic: straight stitch Needle position: according to side set left or right Drop feed control: sewing The zip is basted in by short stitches so that the teeth are entirely covered by the material. Open - Bernina 707 | Manual - Page 34
normal sewing thread for the bobbin. a Needle: 90 Zigzag: 2 Stitch length: 4 Draw thread to the rear under the pres- Pull both sides of the material gently ser foot. Before starting to sew always apart and cut through the threads. lay the thread sideways under the presser foot. \-\ When - Bernina 707 | Manual - Page 35
Mark the corners this way .. .. and the darts like this Tailor tacking - Bernina 707 | Manual - Page 36
Needle: 80-70 Mercerised sewing thread No. 50 Zigzag: 0 Stitch length: 11/2-2 Automatic: straight stitch Needle position: centre Drop feed control: sewing To begin sewing: Fold edge of fabric twice (not too wide). Lay work under the presser foot and sew a few stitches. 11; How to guide - Bernina 707 | Manual - Page 37
hand hold the first fold near the presser foot and draw through the spiral on the foot. Still holding the fabric taut draw it towards you and lay the end under the needle. Stick the needle in and lower foot. Shell hemmer Needle: 80-70 Mercerised sewing thread No. 50 Zigzag: 4 Stitch length: 21 - Bernina 707 | Manual - Page 38
Needle: 80-70 Mercerised sewing thread No. 50 Zigzag: 0 Stitch length: 1'/x-2 Automatic: straight stitch Needle position: centre Drop feed control: sewing the presser foot. Sew a few stitches. Leave need€e in the fabric, lift presser foot and guide fabric into the foot. When sewing make sure - Bernina 707 | Manual - Page 39
Presser foot: Gatherer Needle: 80-70 Mercerised sewing thread: 50 Zigzag: 0 Stitch length: 1112_4 Automatic: straight stitch Needle position: centre Drop feed control: sewing The flat piece of material is inclined to slip out of the slot. In order to avoid this the work should be guided - Bernina 707 | Manual - Page 40
L qt• Embroidery foot Needles: 80-70 Thread: Embroidery thread No. 50 Automatic: zigzag VWVWW Needle position: centre Drop feed control: sewing Guiding with the frame: The left hand Guiding without frame: " You can only Working sequence must hold the frame steady, because guide the work if - Bernina 707 | Manual - Page 41
needle back zigzag while sewing on 0. Raise sew out from centre, replacing the on the outer edge, turn the work and presser foot and turn the material. needle In the middle after every continue sewing part of the applique ma- stitch has been used leave 12/ cm part. terial should be tacked on. Sew - Bernina 707 | Manual - Page 42
all the corners with white crayon. Underlay with paper. 2. Closed, oversewn corner: Sew to the corner. Put needle on the outer edge, lift let run : presser foot and turn work. Lower foot Zigzag: 4 again and continue sewing (help a little Stitch length: Satin Stitch by placing finger near the - Bernina 707 | Manual - Page 43
stitches using Zigzag: 2-3 (according to the hand wheel. Leaving the needle in let run : material) the work at the inside edge, raise foot, turn work. Make a loop with the cord, Foot: Embroidery foot lower foot and sew further three stit- Zigzag: 112/ ches. Raise drop feed control and - Bernina 707 | Manual - Page 44
Double and treble needle Embroidery foot Thread: Embroidery thread No. 30 or 50 Treble needle only 50 ; Double and treble needle When threading through the thread ten- These special needles produce very sion, make sure that one of the threads beautiful effects on delicate materials, goes left - Bernina 707 | Manual - Page 45
embroidery foot. Sewing Pintucks Zigzag: 0 Stitch length: about 1'/2 Automatic: straight stitch Needle position: centre Drop feed control: sewing The gimp is threaded like this: model 707 To sew.pintucks, 2 top threads are need- ed (for double needle). When threading the machine take - Bernina 707 | Manual - Page 46
as a border (e. g. for a stole). A very attractive effect is brought about if a double metallic thread is led through the hole in the embroidery foot. Method Sew first row of stitching. Leave tip of needle in work, turn and sew second row (the needle will then pierce holes of first row on one side). - Bernina 707 | Manual - Page 47
last left stitch, then turn back the hand wheel again and raise the presser foot. Turn work.With the wide needle stitch through the previously pierced hole and continue sewing. Do not hold the sewing work back. Fancy► Hemstitching Zigzag: 13/4 Stitch length: 13/4 Automatic: Blindstitch Worked - Bernina 707 | Manual - Page 48
0 Automatic: zigzag WANWV Needle position: centre Drop feed control: Lowered Stretch the material tightly in the frame as the work is to be carried out without a foot. Important: Lower the foot lever just the same as usual, otherwise the Guiding the work top thread tension will remain open - Bernina 707 | Manual - Page 49
table); needle bar !) ; c) the machine is cleaned properly. Lift c) low quality needle, roughly polished. free arm cover plate and remove sewing lint; 5. Needle breaks. Can have the follow- d) the hook race is clean and oiled; ing causes : e) there are pieces of thread caught a) needle clamp - Bernina 707 | Manual - Page 50
:nun need no oiling. C 4 - The main Otltng ;OMs under the top cover of the machine. The main oiling points under the free arm cover. To take on the open arm corer Remove sewing foot and needle. Open hinged shuttle cover. Loosen screw with the special screw dnver. fi r-waiss.,--4ara+s-y-4-- It - Bernina 707 | Manual - Page 51
be taken out and trie hook race cleaned with a small brush and cotton duster. Never use hard tools such as screwdrivers and scissors for removing thread particles - Bernina 707 | Manual - Page 52
and material. The needle plate slide plate should be Always oil the machine Wawa use and removed from time to time so that the not afterwards. Use clear sewing ma- sewing nun can be cleaned away. chine oil only. free from resin and acid. Obtainable at all Bernina dealers Proper oiling of - Bernina 707 | Manual - Page 53
V Remarks Bernina Dealer's notes regarding instructions, home calls and possible guarantee work Date Notes Cleaning and oiling the hook. Tilt head Alter cleaning pour a lew drops of oil of machine to the . Never use hard tools such as screwdrivers and scissors tor removing thread pennies. - Bernina 707 | Manual - Page 54
lw Address of my Bernina agency: ENO N
-
 1
1 -
 2
2 -
 3
3 -
 4
4 -
 5
5 -
 6
6 -
 7
7 -
8
-
9
-
10
-
11
-
12
-
13
-
14
-
15
-
16
-
17
-
18
-
19
-
20
-
21
-
22
-
23
-
24
-
25
-
26
-
27
-
28
-
29
-
30
-
31
-
32
-
33
-
34
-
35
-
36
-
37
-
38
-
39
-
40
-
41
-
42
-
43
-
44
-
45
-
46
-
47
-
48
-
49
-
50
-
51
-
52
-
53
-
54
 |
 |
My
BERNINA
Guide
707
717