Bernina 800 Manual
Bernina 800 Manual
 |
View all Bernina 800 manuals
Add to My Manuals
Save this manual to your list of manuals |
Bernina 800 manual content summary:
- Bernina 800 | Manual - Page 1
BERNINA . Instruction-manual 800 - Bernina 800 | Manual - Page 2
- Bernina 800 | Manual - Page 3
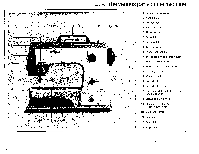
Model 800 I he various parts of the machine 14 15 16 1 Free-arm cover-plate 2 Needle-plate 3 Presser-foot 4 Needle-clamp 5 Thread guide 6 Face-plate 7 Lamp switch 8 8 Take-up lever BERNINA' 01 9 9 Winder pre-tension 10 Thread tension and thread guide 11 Tension indicator window 17 12 - Bernina 800 | Manual - Page 4
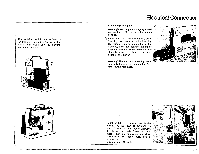
foot starter with cable and the BerninaInstruction manual. tr 0, 4 Electrical Connectior Connecting to supply Warning! First compare voltage specified • on machine special connecting cable may only be used for connecting Bernina sewing machines. If Light switch. By pressing switch the dazzle- - Bernina 800 | Manual - Page 5
Bernina . . . sewing machine 800. Please ensure that y y~ -,. the needle and thread used conform to .. ' '' the table above. The usual needles for sewing are numbers 80, 90 and 100 . while those for darning are numbers 70 Eff I and 80. a I •ti f I t, e.•. . ; •• The presser foot wiht - Bernina 800 | Manual - Page 6
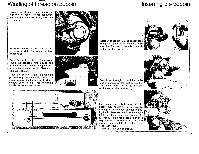
the picture - take to the mounted bobbin. Start motor with the foot starter. When the bobbin is full, the winding process stops automatically. unwinding. , 6 Insertion of the bobbin case into the hook. Raise needle to top position by turning the handwheel. As when removing the bobbin case - Bernina 800 | Manual - Page 7
thread guide (5) up to the slot of the take-up lever (8) and again down to the needle eye. Thread the needle from the front to the back leaving a loose end of approximately 10 cm (4 ins.). i o tnreaa the macrune The thread tension discs. Bernina has the unique advantage that during normal sewing - Bernina 800 | Manual - Page 8
"Just clip it on!" The work is done in no time. Raise presser foot by using lifting lever Loosen clamping lever and release presser foot rl a- Fix the required presser foot on and push lever downwards. The presser foot is secured and the machine is ready for sewing. Only Bernina has this advantage. - Bernina 800 | Manual - Page 9
satin stitch displacement becomes greater. The spacing - depending on material and higher the number, the wider the zig- thread - by turning the knob to the zag stitch. The knob may be moved left. while sewing but when the machine is stationary only if the needle is out of the material. I 9 - Bernina 800 | Manual - Page 10
required buttonhole length with the guide on the buttonhole foot. Move needle downwards to foot level and check that needle comes to middle of foot opening. If not do one stitch, turning handwheel by hand. But never change zigzag or needle position. 1. Satin Stitch: Sew first bead of button- hole - Bernina 800 | Manual - Page 11
work and to right of the cord same as for the satin stitch. and lift foot. How to sew the buttonhole with reinforcing cord Set machine. Lower needle to the raised foot and make sure that it is in the center. If not do one stitch by turning the hand wheel towards you, bringing the - Bernina 800 | Manual - Page 12
Darning Small darning foot 285 Needle: 80-70 Thread: 50 e7) Darning material Stitch width: 0 Stitch length: 0 Drop feed control: center Needle position: lowered The quick mastering of this work depends on regular guiding. Therefore: - Hold the hoop correctly. - Always work from left to - Bernina 800 | Manual - Page 13
Small darning foot 285 Needle: 80-70 Thread: 50 Darning fine socks (also sleeves) Stitch width: 0 Stitch length: 0 Needle position: center Drop feed control: lowered Darning fine socks Pull work over ring (not ring over the work) stretch it to its maximum and insert - Bernina 800 | Manual - Page 14
machine. During sewing pieces of thread and fluff collect under the needle plate and around the hook. A The cover plate of the free arm should be removed from time to time so that the sewing cover-plate from free-arm. Remove presser foot or needle, open hinged cover. Then hold the coverplate - Bernina 800 | Manual - Page 15
- bobbin case; ly (call authorized Bernina dealer); The sewing machine should be disconnected from the power supply by pulling out the plug from the socket when changing the needle, presser foot, bobbin or needle plate, when stopping work without supervision and during servicing (cleaning). 15 - Bernina 800 | Manual - Page 16
Address of my Bernina agency: Subject to changes in design from those shown in text and illustrations.
-
 1
1 -
 2
2 -
 3
3 -
 4
4 -
 5
5 -
 6
6 -
 7
7 -
8
-
9
-
10
-
11
-
12
-
13
-
14
-
15
-
16
 |
 |
BERNINA
.
Instruction
-manual
800