Bernina Artista 640 User Guide - Page 104
Trouble Shooting
 |
View all Bernina Artista 640 manuals
Add to My Manuals
Save this manual to your list of manuals |
Page 104 highlights
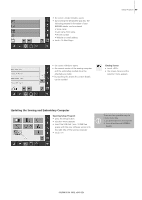
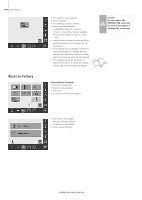
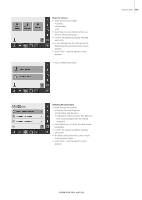
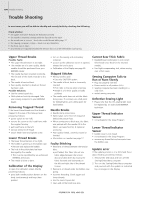
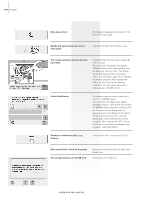
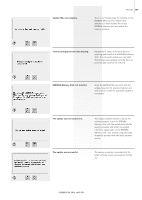
104 Trouble Shooting Trouble Shooting In most cases you will be able to identify and remedy faults by checking the following. Check whether: • the upper and lower threads are threaded correctly • the needle is inserted correctly with the flat side to the back • the needle size is correct - check the needle/thread table page 17 • the sewing computer is clean - brush out any thread lint • the hook race is clean • any threads are trapped between the tension discs or under the bobbin case spring Upper Thread Breaks Possible Faults: • The upper thread tension is too tight. • The needles are of a poor quality. Ideally needles should be purchased from your BERNINA dealer. • The needle has been inserted incorrectly. The flat side of the shank must be to the back. • The needle is bent or blunt. • Poor quality, knotted or dried out thread has been used. Possible Solutions: • Use the correct spool disc. • Stitch plate or hook tip damaged. Take your sewing computer to your BERNINA dealer. Removing Trapped Thread If the lower thread breaks and the thread is trapped in the area of the take-up lever, proceed as follows: • power switch to «0» (off) • remove the screw on the head frame with the angular Torx key • pull head frame to the left • remove remnants of thread • attach head frame and tighten screw Lower Thread Breaks • The lower thread tension is too tight. • The bobbin is jamming in the bobbin case: • Remove and replace the bobbin. • The hole in the stitch plate has been damaged by the needle: • This must be repolished by an authorized BERNINA technician. • The needle is blunt or bent. Calibration of the Display To open the calibration screen directly, proceed as follows: • press both needle position buttons on the body simultaneously and keep them pressed • turn on the sewing and embroidery computer • as soon as the calibration screen is opened, release the two buttons • Calibration of the Display see page 96 Skipped Stitches • Wrong needles used: • Use only 130/705H system. • The needle is blunt, bent or incorrectly inserted: • Push right to the top when inserting. • Needle is of inferior quality or badly polished. • The needle point does not suit the fabric being sewn. If necessary use a ball point for knitted fabrics and cutting point for hard leather. Needle Breaks • Needle clamp screw loose. • Fabric taken out in front of instead of behind the presser foot. • When sewing over a thick area, the fabric was pushed with the needle still in the fabric; use Jeans foot No. 8 (optional accessory). • Poor quality thread, unevenly wound or knotted. • Information on needles see page 17 Faulty Stitching • Remnants of thread between the tension discs: • pull folded, thin fabric (do not use fabric edge) between the tension discs and clean them by moving the fabric forwards and backwards on the left and right side of the thread tension • Remnants of thread under the bobbin case spring. • Incorrect threading. Check upper and lower threads. • Use the correct spool disc. • clean and oil the hook race area Cannot Sew Thick Fabric • Needle/thread combination is not correct (the thread is too thick for the inserted needle). • Use hight compensating tool, when sewing over a thick seam. Sewing Computer Fails to Run or Runs Slowly • Plug not properly inserted. • Power switch in off position («0»). • Sewing computer has been standing in a cold room. • restart sewing computer Defective Sewing Light • Please note that the CFL-sewing light must be replaced by an authorized BERNINA technician. Upper Thread Indicator Sensor • not activated in the Setup Program Lower Thread Indicator Sensor • bobbin cover is not closed • not activated in the Setup Program • remove any thread lint and remnants from the bobbin case Update error If the update process is at a still stand (hour glass remains) proceed as follows: 1. Remove the USB stick and turn off the Sewing/Embroidery computer 2. Turn on the Sewing/Embroidery computer and proceed with the update as indicated by a message on the display
-
 1
1 -
2
-
3
-
4
-
5
-
6
-
7
-
8
-
9
-
10
-
11
-
12
-
13
-
14
-
15
-
16
-
17
-
18
-
19
-
20
-
21
-
22
-
23
-
24
-
25
-
26
-
27
-
28
-
29
-
30
-
31
-
32
-
33
-
34
-
35
-
36
-
37
-
38
-
39
-
40
-
41
-
42
-
43
-
44
-
45
-
46
-
47
-
48
-
49
-
50
-
51
-
52
-
53
-
54
-
55
-
56
-
57
-
58
-
59
-
60
-
61
-
62
-
63
-
64
-
65
-
66
-
67
-
68
-
69
-
70
-
71
-
72
-
73
-
74
-
75
-
76
-
77
-
78
-
79
-
80
-
81
-
82
-
83
-
84
-
85
-
86
-
87
-
88
-
89
-
90
-
91
-
92
-
93
-
94
-
95
-
96
-
97
-
98
-
 99
99 -
 100
100 -
 101
101 -
 102
102 -
 103
103 -
 104
104 -
 105
105 -
 106
106 -
 107
107 -
 108
108 -
 109
109 -
110
-
111
-
112
-
113
-
114
-
115
-
116
-
117
-
118
-
119
-
120
-
121
-
122
-
123
-
124
-
125
-
126
-
127
-
128
-
129
-
130
-
131
-
132
-
133
-
134
-
135
-
136
-
137
-
138
-
139
-
140
-
141
-
142
-
143
-
144
-
145
-
146
-
147
-
148
-
149
-
150
-
151
-
152
-
153
-
154
-
155
-
156
-
157
-
158
-
159
-
160
-
161
-
162
-
163
-
164
-
165
-
166
-
167
-
168
 |
 |