Bernina Artista 640 User Guide - Page 114
Preparing the Embroidery Computer for Embroidery, Threading Upper and Bobbin Thread
 |
View all Bernina Artista 640 manuals
Add to My Manuals
Save this manual to your list of manuals |
Page 114 highlights
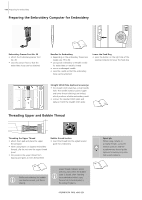
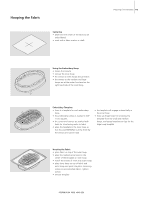
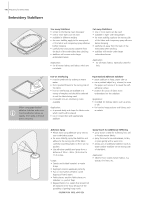
114 Preparing for Embroidery Preparing the Embroidery Computer for Embroidery Embroidery Presser Foot No. 26 • attach the Embroidery presser foot No. 26 • raise the presser foot so that the embroidery hoop can be attached 16 17 Needles for Embroidery • depending on the embroidery thread use needle size 75 to 90 • use special embroidery or Metafil needle for embroidery or metallic thread • use an undamaged needle • raise the needle so that the embroidery hoop can be attached Lower the Feed Dog • press the button on the right side of the sewing computer to lower the feed dog Straight Stitch Plate (optional accessory) • the straight stitch plate has a small needle hole. The needle insertion points (upper and lower thread stitching) are limited, which produces a better embroidery result • remove the standard stitch plate and replace it with the straight stitch plate 19 Threading Upper and Bobbin Thread Threading the Upper Thread • attach foam pad and place the upper thread spool • when using Rayon or slippery embroidery threads, slip the net over the upper thread spool • this prevents the upper thread from slipping and gives an even thread feed Bobbin thread tension • insert the thread into the pigtail tension guide for embroidery. 10 While embroidering the bobbin can also be wound, just like in sewing. Lower thread indicator sensor will only work when the bobbin cover is closed, after inserting the embroidery bobbin case. (Sensor has to be activated in the Setup Program.) Spool pin When using metallic or specialty threads, using the vertical spool pin and the supplementary thread guide (optional accessory) may also help avoid problems. 13
-
 1
1 -
2
-
3
-
4
-
5
-
6
-
7
-
8
-
9
-
10
-
11
-
12
-
13
-
14
-
15
-
16
-
17
-
18
-
19
-
20
-
21
-
22
-
23
-
24
-
25
-
26
-
27
-
28
-
29
-
30
-
31
-
32
-
33
-
34
-
35
-
36
-
37
-
38
-
39
-
40
-
41
-
42
-
43
-
44
-
45
-
46
-
47
-
48
-
49
-
50
-
51
-
52
-
53
-
54
-
55
-
56
-
57
-
58
-
59
-
60
-
61
-
62
-
63
-
64
-
65
-
66
-
67
-
68
-
69
-
70
-
71
-
72
-
73
-
74
-
75
-
76
-
77
-
78
-
79
-
80
-
81
-
82
-
83
-
84
-
85
-
86
-
87
-
88
-
89
-
90
-
91
-
92
-
93
-
94
-
95
-
96
-
97
-
98
-
99
-
100
-
101
-
102
-
103
-
104
-
105
-
106
-
107
-
108
-
 109
109 -
 110
110 -
 111
111 -
 112
112 -
 113
113 -
 114
114 -
 115
115 -
 116
116 -
 117
117 -
 118
118 -
 119
119 -
120
-
121
-
122
-
123
-
124
-
125
-
126
-
127
-
128
-
129
-
130
-
131
-
132
-
133
-
134
-
135
-
136
-
137
-
138
-
139
-
140
-
141
-
142
-
143
-
144
-
145
-
146
-
147
-
148
-
149
-
150
-
151
-
152
-
153
-
154
-
155
-
156
-
157
-
158
-
159
-
160
-
161
-
162
-
163
-
164
-
165
-
166
-
167
-
168
 |
 |