Bernina Artista 640 User Guide - Page 149
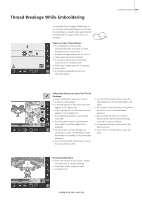
Thread Breakage While Embroidering
 |
View all Bernina Artista 640 manuals
Add to My Manuals
Save this manual to your list of manuals |
Page 149 highlights
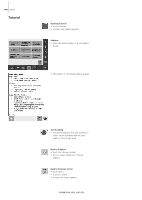
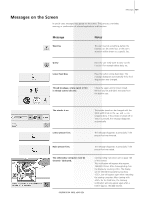
Thread Breakage While Embroidering It is possible that the upper thread may run out or break while embroidering. In this case the embroidery computer stops automatically provided that the upper thread sensors is 98 activated. 98 Upper or Lower Thread Breaks • the embroidery computer stops automatically when the upper or lower thread runs out or has broken • a display message appears on the screen • check upper thread and rethread • if necessary remove all lint and fabric remnants from the bobbin case • check lower thread and refill if necessary • touch «ESC» • to continue embroidering press the Start-Stop button Embroidery Support 149 Embroidery Sequence Control for Thread Breakage • touch «Embroidery Sequence Control» • a special screen appears • in the left portion of the screen the motif appears in its original size • in the right portion of the screen the motif appears in its enlarged size • the embroidery sequence can be better controlled • the Information Area for operating the stitch width and stitch length knob is displayed • turn the knobs counter clockwise (or clockwise) to move the embroidery hoop backwards (or forwards) in the embroidery sequence • turn the stitch width knob slowly to move the hoop stitch by stitch • turn the stitch length knob to move the embroidery hoop in big steps (approx. 50 steps) • the number in the Information Area shows the stitch count of the embroidery sequence • go back stitch by stitch to a position several stitches before thread breakage occurred to resume stitching • to reactivate the basic setting touch the blue knob icon • touch «ESC» and the special screen will close Resuming Embroidery • press foot control or Start / Stop - button on head frame to resume stitching • Embroidery screen reappears again • complete motif
-
 1
1 -
2
-
3
-
4
-
5
-
6
-
7
-
8
-
9
-
10
-
11
-
12
-
13
-
14
-
15
-
16
-
17
-
18
-
19
-
20
-
21
-
22
-
23
-
24
-
25
-
26
-
27
-
28
-
29
-
30
-
31
-
32
-
33
-
34
-
35
-
36
-
37
-
38
-
39
-
40
-
41
-
42
-
43
-
44
-
45
-
46
-
47
-
48
-
49
-
50
-
51
-
52
-
53
-
54
-
55
-
56
-
57
-
58
-
59
-
60
-
61
-
62
-
63
-
64
-
65
-
66
-
67
-
68
-
69
-
70
-
71
-
72
-
73
-
74
-
75
-
76
-
77
-
78
-
79
-
80
-
81
-
82
-
83
-
84
-
85
-
86
-
87
-
88
-
89
-
90
-
91
-
92
-
93
-
94
-
95
-
96
-
97
-
98
-
99
-
100
-
101
-
102
-
103
-
104
-
105
-
106
-
107
-
108
-
109
-
110
-
111
-
112
-
113
-
114
-
115
-
116
-
117
-
118
-
119
-
120
-
121
-
122
-
123
-
124
-
125
-
126
-
127
-
128
-
129
-
130
-
131
-
132
-
133
-
134
-
135
-
136
-
137
-
138
-
139
-
140
-
141
-
142
-
143
-
 144
144 -
 145
145 -
 146
146 -
 147
147 -
 148
148 -
 149
149 -
 150
150 -
 151
151 -
 152
152 -
 153
153 -
 154
154 -
155
-
156
-
157
-
158
-
159
-
160
-
161
-
162
-
163
-
164
-
165
-
166
-
167
-
168
 |
 |
