Bernina Aurora 430 Manual
Bernina Aurora 430 Manual
 |
View all Bernina Aurora 430 manuals
Add to My Manuals
Save this manual to your list of manuals |
Bernina Aurora 430 manual content summary:
- Bernina Aurora 430 | Manual - Page 1
INSTRUCTION BOOK Bernette MODELS 410 420 430 440 - Bernina Aurora 430 | Manual - Page 2
design techmoues to ac hove on operceng efhoen y and many years of dependoble service. Befee attempting to sew, hewevet, and to obtain the minimum benefits, please study this booklet carefully lollawina each step on veer machine. Repeal the process until you cue familial wnh the come oh and then - Bernina Aurora 430 | Manual - Page 3
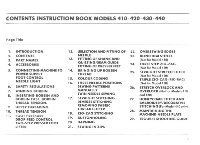
CONTENTS INSTRUCTION BOOK MODELS 410.420.430.440 Page Title I. INTRODUCTION 2. CONTENTS 3. PART NAMES 4. ACCESSORIES 5. CONNECTING MACHINE TO POWER SUPPLY FOOT CONTROL NEEDLE LIGHT 6. SAFETY REGULATIONS 7. WINDING BOBBIN 8. INSERTING BOBBIN AND BOBBIN CASE. BOBBIN THREAD TENSION. 9. UPPER - Bernina Aurora 430 | Manual - Page 4
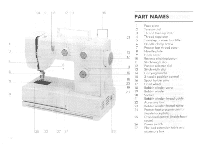
24 2 'IS 02 !Id :71? PART NAMES Face plate 2 Tension dial 3 21 4 5 Thread lake-up lever Thread pins 23 17 H d wheel 19 18 Bobbin winder cover 20 19 20 21 22 13 74 25 Bobbin winder Socket Bobbin winder Ibreod guide Accessory box Bobbin winder thread curler Presser foot pressure control ( - Bernina Aurora 430 | Manual - Page 5
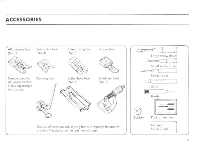
for all Owen gileheS including siroighi and zigzag Darning fool -> Button hole foot 51 ti • Blind horn foot No. 9'. The use of these special sewing feet will improve the quality 01 stitch. The design of the feel rnoy chonge C. Large screw driver Small screw driver Seam ripper Oiler la Brush - Bernina Aurora 430 | Manual - Page 6
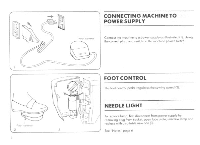
TO POWER SUPPLY .1111 (41/1.1.0 Connect the machine too power supply as illustrated (11. Using the correct plug. and switch on the machine power switch. `2 3 FOOT CONTROL The foot control pedal regulates the sewing speed (21. NEEDLE LIGHT To reploce lomp, first disconnect from power supply - Bernina Aurora 430 | Manual - Page 7
be removed from the socket outlet When servicing the sewing machine. Or when removing covers or changing lamps, the machine or the electrical set must be of the plug ore unmarked consult a qualified electrician before use. IMPORTANT The following sofery regulations must be observed without foil - Bernina Aurora 430 | Manual - Page 8
rho spool through the guide at the rear sight as illustrated. (3) PLACING BOBBIN ON SPINDLE Push the bobbin on to the bobbin winder spindle until ii WINDING THREAD AROUND BOBBIN Wind the threadbyhand seven a eight timesround the bobbin in the direction of the arrow on the machine and holding the - Bernina Aurora 430 | Manual - Page 9
2 afizsrc) c-Ff5U7.,5 _Mita INSERTING BOBBIN AND CASE INTO MACHINE INSERTING BOBBIN INTO CASE Open hook cover as illustrated. (1) a Insert filled bobbin into cose os decoded. (2) Holding the hinged latch (3) insert bobbin and case into the hook making sure the finger "A" is locoted inside - Bernina Aurora 430 | Manual - Page 10
(2) under and into the threod regulator from right to left (3/ up and through the take-up lever from right to left (4) and down through the guides (5, 6) and through the eye of the needle from (tont lo back. Fi 9 - Bernina Aurora 430 | Manual - Page 11
-F THREAD TENSION to. 5 To mcreose the lop tension turn dial to a higher number. to de• crease the tension turn to a lower number. The normal setting is d. Normal thread tension is achieved when tho yelper end lower threads me equally set (cross in the middle - Bernina Aurora 430 | Manual - Page 12
pressure, open the face plate and turn the pressure control dtol. (I) The fob, u such as denim and leather, use 7. TWO-STEP PRESSER FOOT LIFTER For e sewing the eed dogs should be in the raised position 131 When the fobnc is not required to be fed through the machine. e for free hand embroidery - Bernina Aurora 430 | Manual - Page 13
1.0.C•f • C3\ f itoota a I IL: • 4.1013 ,* N hasten [lama viol free Of fur tomcat ted e. to as .,!poet Change the needle regularly and at the lust sgn of sewing problems. lased as (2) il lustrated. 12 - Bernina Aurora 430 | Manual - Page 14
SAaani WI se. as* W•t1,5f 1.9nret. LOINfrh ( + - Bernina Aurora 430 | Manual - Page 15
BRINGING UP THE BOBBIN THREAD Hold the upper 'brood in your left hand, tern the hand wheel cowards you so that the needle goes down and up arm t l; r Gently pull the upper thread and the lower thread will be looped over it (2) Place both 'broods under the presser fool °ad to the feel 2 14 - Bernina Aurora 430 | Manual - Page 16
3 STEP ZIG-ZAG STITCH MODEL 410 BLIND HEM STITCH STRAIGHT STRETCH STITCH AND TRIPLE ZIG-ZAG IRIC.RAO STITCH _ STRETCH. OVERLOC.K. STITCH MODEL 430 MODEL 440 COLOUR CODING Simply select the stitch pattern you requite ay rotating the peen n CCIOCIOr dial lo the dewed position. Then match the - Bernina Aurora 430 | Manual - Page 17
5 and return n from 0.5 f,r 411,0111W-04;',Ir 5lo 0 drawing some curved lines While sewing turn the diul slowly al the some speed hum 0 to 5 and return it O5 I -wAIA.61 quickly horn 5 ro 0 SEWING PATTERNS MANUALLY By selettirig u autrn attic F. (closed-up zig Yogi and by chorigrng the trayog - Bernina Aurora 430 | Manual - Page 18
longer the stitch length, 11) e 1/4. 2 17 REVERSE STITCHING To finish n scam, push the reverse button and hold it, sewing few stitches backwards. When the button is released the machine sill sew forwards ogain (21 REMOVING FABRIC Raise the thread take up lever to its highest position by tur nirg - Bernina Aurora 430 | Manual - Page 19
ZIG-ZAG STITCHING • The sig-zog sleds can be set al venous sleds widths and lengths according to the appIrcatron required. Set the pattern selector dial (AI os shown and the stitch length dial(CIbetween 0.5und 5.0 ri 1 C 1 The stitch width dial (0) con be set between 1 and S. (2r B 2 - Bernina Aurora 430 | Manual - Page 20
USER TIPS Always sew o sample buttonhole on some spore fobnc ossettings will change according to the fabric used. For very thin, stretchy or other dillicult fabrics. try using interfoong (vilene) or tissue or other paper underneath the fabric to old machine feeding. Always use the Buttonhole loot - Bernina Aurora 430 | Manual - Page 21
under the foot between both bonds and move it os illustrated whilst sewing. First sew round the hole lel then from side 10 side ICI. Turn the fobric through 90 and continue to move the fabric from side to side to achieve. (Di An embroidery ring will be needed to dote forger areas. 2 8 20 - Bernina Aurora 430 | Manual - Page 22
' 0 9 2 2s Enonono 3 SEWING IN ZIPS Set the machine as illustrated fining [he Zipper loot. II l The Zipper foot can be moved to the leh or right. (2) To sew on the right hand side of the zipper, move foot over to the right as illustrated and 'ewe: se the procedure to sew the left hand side - Bernina Aurora 430 | Manual - Page 23
o suitable stitch width and length ( l) When sewing, the needle should just pass over the edge of the fabric. a) On fobr.cs that are opt to pucker. use the Nr 8 overcasting tool. Note On Models 410.430 and 440, the 3step zigzag stitch can n150 In used, but use the All Purpose foot not the Nt - Bernina Aurora 430 | Manual - Page 24
machine os illustroted fining the Blind Hem foot. II / 5 3 23 - 7 h\ Fold the fabric as illustrated with the "wrong" side facing upwards. lz Place the folded fabric under the foot as shown. (3) Turn set, position the "guide" of the fool (5) up against the fold (3+4) by turning the nut (61. - Bernina Aurora 430 | Manual - Page 25
OS illustrated fining the Nr. 3 All Pur pose fool (I) The three step fig-lag stitch has a wide range of sewing applica. bons, suc has potching, darning, reposing tears. mending. sewing on elastic and lace, oversewing edges etc on o wide 'tinge of lobrics. • (0) Fig. 2 shows patching, where the - Bernina Aurora 430 | Manual - Page 26
n" 2 A STRAIGHT STRETCH STITCH (Not for Model 410) Set the machine os illustrated fining the All Purpose foot. ;11 The sly night stretch sews two stitches forward and one stitch backwards. thereby giving "triple strengrh. Use it for stretch fabrics and for oreos of "'stress- when a strong stitch is - Bernina Aurora 430 | Manual - Page 27
U Ft_ STRETCH OVERLOCKING AND OVERLOCKING (Not lot Models 410 and 420 Set the machine os illustrated using the Nr. 3 or Ns. 8 foot for finer Fobrecs i for thicker fabricsFT liil$§ K.! Both these stitches o e designed to seom and overlock the edge of a fabric in - Bernina Aurora 430 | Manual - Page 28
A B C O O (t" 2 27 HONEYCOMB STITCH AND EMBROIDERY/DECORATIVE STITCHING (For Model 440 only) THE HONEYCOMB STITCH Select the Honeycomb stitch fik) and fit the AN Purpose fool. This stitch can be used for mony types of jersey and genet al woven fabrics. Fat visible seams and hemscol-shirts, - Bernina Aurora 430 | Manual - Page 29
manner. Turn the bond- wheel unit the needle bar reaches its top position.Remove the bobbin cose ond clean every port with o piece of oily cloth. {4) Use sewi ng-mochine oil, or some other high-qtrebly refined minetol machine oil. DO NOT OVEROIL. Your machine should be serviced regularly by - Bernina Aurora 430 | Manual - Page 30
TROUBLE-SHOOTING GUIDE nd owed [avec*, 2 &Oben cola nonpropnlyelyoneled 3 Bobbin Wixom,oao ?lest I Needles no. •oseled conc./ On herdic bow 3 Flame .2.1ho• Sri used and rpnet-vp mac &ne Needle & 400 , 44/I roeswe reduce/on for d. tedd profs sews? I lose° nes. needie 2. Remsra needle curecor (flat - Bernina Aurora 430 | Manual - Page 31
Fritz Gegoul Ltd. 8266 Sieckboin.Swiizeiland Copyright by Fritz Gegoul Ltd. Form Nr. 0109095001 q3ernette 021/30102
-
 1
1 -
 2
2 -
 3
3 -
 4
4 -
 5
5 -
 6
6 -
 7
7 -
8
-
9
-
10
-
11
-
12
-
13
-
14
-
15
-
16
-
17
-
18
-
19
-
20
-
21
-
22
-
23
-
24
-
25
-
26
-
27
-
28
-
29
-
30
-
31
 |
 |

INSTRUCTION
BOOK
Bernette
MODELS
410
420
430
440