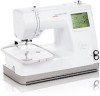
Bernina Bernette 340 deco User Guide
Bernina Bernette 340 deco Manual
 |
View all Bernina Bernette 340 deco manuals
Add to My Manuals
Save this manual to your list of manuals |
Bernina Bernette 340 deco manual content summary:
- Bernina Bernette 340 deco | User Guide - Page 1
- Bernina Bernette 340 deco | User Guide - Page 2
the needle, threading the bobbin or changing the presser foot etc. 10. Always unplug the sewing computer from the e lectrical outlet when removing covers, lubricating or when making any other user servicing adjustments mentioned in this instruction manual. SERVICING DOUBLEINSULATED PRODUCTS In - Bernina Bernette 340 deco | User Guide - Page 3
this instruction manual first. With a wide selection of available embroidery designs, educational publications and useful accessories we can support you even further. Please visit your BERNINA dealer; he will provide you with help, ideas and embroidery essentials, to make your sewing experience - Bernina Bernette 340 deco | User Guide - Page 4
Information 21- 24 Key Operations 25- 35 Embroidery 36- 40 Lettering 41- 45 Editing and Combining Designs 46- 53 Design Transfer and Compatibility 54- 58 Care and Maintenance 59- 60 Troubleshooting 61 Index 62 Built-in Design Chart Appendix Table of Preset Colors Appendix - Bernina Bernette 340 deco | User Guide - Page 5
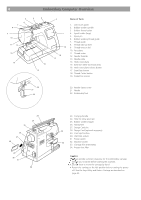
24. Hole for extra spool pin 25. Bobbin winder stopper 26. Handwheel 27. Design Card slot 34 28. Design Card (optional accessory) 29. Card eject button 30. USB Stick socket 31. Power switch 33 32. Machine socket 33. Carriage (for embroidery) 34. Presser foot lifter Caution - Bernina Bernette 340 deco | User Guide - Page 6
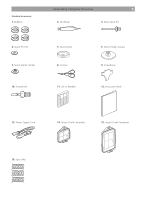
Standard accessories 1. Bobbins Embroidery Computer Overview 5 2. Lint Brush 3. Extra Spool Pin 4. Spool Pin Felt 7. Spool Holder (Small) 10. Screwdriver 5. Spool Stand 8. Scissors 11. Set of Needles 6. Spool Holder (Large) 9. Screwdriver 12. Instruction Book 13. Power Supply Cord 14. Hoop - Bernina Bernette 340 deco | User Guide - Page 7
6 Embroidery Computer Overview 1 Detachable Extension Table To remove, lift out the extension table toward you as illustrated. To attach, position the tabs on the base tab holes and push down 1 gently. 1. Extension table 2. Tabs 3. Base tab holes 2 3 4 Sewing accessories are stored in the - Bernina Bernette 340 deco | User Guide - Page 8
overheating when the machine is running overloaded. Follow safety instructions that appear on the visual touch screen if it happens. For Your Safety: While in operation, always keep your eyes on the embroidery area, and do not touch any moving parts such as the thread take-up lever, handwheel - Bernina Bernette 340 deco | User Guide - Page 9
of the spool pin 7. Spool stand Extra spool pin Use the extra spool pin when you need to wind the bobbin without unthreading the machine while working on a project. When working with metallic thread the use of the extra spool pin is also highly recommended. Insert the extra spool pin into the spool - Bernina Bernette 340 deco | User Guide - Page 10
while the machine is running. For safety purposes, the motor will stop automatically after running for two minutes. Adjust how much the bobbin is filled by rotating the bobbin winder stopper. To achieve the best embroidery quality, BERNINA recommends to use only high quality bobbin thread such as - Bernina Bernette 340 deco | User Guide - Page 11
to Embroider Inserting the bobbin Place the bobbin in the bobbin holder with the thread unwinding counter-clockwise. 1. Thread 2. Bobbin holder 2 Guide the thread into front notch on the front of the bobbin holder. Draw the thread to the left, sliding it between tension spring blades. 3. Front notch - Bernina Bernette 340 deco | User Guide - Page 12
foot can be raised about 6 mm (1/4") higher than the normal up position. This will help you to place the embroidery hoop under the foot. 2 1 3 Threading the Machine Raise the presser foot lifter. Turn the handwheel counterclockwise to bring the needle to its highest position. 1. Presser foot - Bernina Bernette 340 deco | User Guide - Page 13
the take-up lever 4 6 Slip the thread behind the lower thread guide from the right. 6 Lower thread guide Slip the thread in the needle bar thread guide from the left. 7 Needle bar thread guide Thread the needle from front to back by hand or use the built-in needle threader. 7 Note: Refer to - Bernina Bernette 340 deco | User Guide - Page 14
as this could cause malfunction of the threader. 2 Draw the thread down around the threader guide and under the hook. 3. Thread guide 2 3 Release the threader lever slowly while holding the thread end with your fingers. A loop of the thread is pulled up through the needle eye. Remove the loop - Bernina Bernette 340 deco | User Guide - Page 15
foot lifter. Hold the needle thread with your finger. 1. Needle thread 1 2 Turn the handwheel one complete turn toward you. Draw the needle thread to bring up a loop of the bobbin thread. 2. Loop of the bobbin thread Pass the needle thread through the hole in the embroidery foot and draw it up - Bernina Bernette 340 deco | User Guide - Page 16
Adjust the thread tension of the upper thread with the thread tension dial (9. on page 4). The initial position for the thread tension dial is «4». For most applications this adjustment will give suitable upper thread tension. Depending on the material and the thickness of the embroidery thread, as - Bernina Bernette 340 deco | User Guide - Page 17
16 Getting Ready to Embroider 1 3 1 2 Change Needle Turn off the power switch and disconnect the machine from the power supply. Raise the needle by turning the handwheel and lower the presser foot. Holding the needle tight, loosen the needle clamp screw - Bernina Bernette 340 deco | User Guide - Page 18
more detailed informations please contact your BERNINA dealer or read specific technical literature. Embroidery Hoop The Deco 340 is supplied with two hoops. Use hoop A for regular designs up to 126 x 110 mm (5" x 43/8"), while the hoop B will accommodate a large design up to a 200 x 140 mm (8" x 51 - Bernina Bernette 340 deco | User Guide - Page 19
are two things to keep in mind when hooping fabric: the act of hooping and the stabilization. Following carefully the related instructions in this manual will help you to achieve the best results for your embroidery project. For hooping instructions follow the descriptions below, for the use of - Bernina Bernette 340 deco | User Guide - Page 20
Getting Ready to Embroider 19 1 3 2 Attaching the Embroidery Hoop to the Machine Turn the attaching knob so it is parallel with the hoop, and set it on the carriage. 1. Attaching knob 2. Carriage holes 3. Pins 1 Turn the attaching knob clockwise. Caution: • Always provide sufficient clearance - Bernina Bernette 340 deco | User Guide - Page 21
• for more stability, apply to the wrong side of the fabric with temporary spray adhesive before hooping • carefully tear away excess stabilizer from the back of the embroidery after stitching • stabilizer will remain under larger embroidered areas Application: For all wovens and non-stretchables - Bernina Bernette 340 deco | User Guide - Page 22
lace embroidery place one or two layers of water soluble stabilizer in hoop (as the motif is not embroidered on any fabric, only the thread embroidered fabrics Embroidery test • always stitch an embroidery test on a sample fabric. Adjust color, thread quality, needle, stitch density, tension, etc - Bernina Bernette 340 deco | User Guide - Page 23
Thread key. Bobbin Threads Bobbin-Fil (Special Bobbin Thread) Bobbin-Fil is an especially soft and light polyester thread suitable for bobbin thread. This special bobbin thread ensures a steady thread tension and an optimal intertwining of the upper and bobbin thread. Darning and Embroidery Thread - Bernina Bernette 340 deco | User Guide - Page 24
and can get jammed. This can break the thread. Needle Summary BERNINA uses needle system 130/705 H. This system number refers to shank shape as well as to length and form of the needle point. 130/705 H S 70 Shank diameter = 0,7 mm (needle size) Needle point e.g. medium ball point Needle scarf - Bernina Bernette 340 deco | User Guide - Page 25
705 H-SUK Embroidery 130/705 H-E Metafil 130/705 H-MET Ball point Large eye, slight ball point Large eye Jersey, stretch fabrics Embroidery on all natural and synthetic fabrics sewing with metallic threads Needle size 60-100 70-90 75-90 75-90 Special needles are available at your BERNINA dealer. - Bernina Bernette 340 deco | User Guide - Page 26
machine is switched on, the pattern selection window appears on the LCD touch screen. Note: It requires approximately six seconds for the pattern selection window to be displayed on the LCD touch screen. This is the required boot up time and is not a defect. During the boot up the bernette 340 Deco - Bernina Bernette 340 deco | User Guide - Page 27
off or eject the card while the warning sign or hourglass is displayed. Otherwise, data stored in the memory may be lost or damaged. = warning sign USB Stick (Optional accessory) The USB Sticks can be used to save stitch data and transfer embroidery designs between the Deco 340 and your PC - Bernina Bernette 340 deco | User Guide - Page 28
Key Operations 27 Adjust User Preferences / Setup Use these screens to personalize the functions on the emboridery computer. All these settings are stored • Language selection tab 3 Setup tab Press this key to open the machine settings page. 4 Language selection tab Press this tab to select the - Bernina Bernette 340 deco | User Guide - Page 29
Press the minus key to reduce the maximum embroidery speed. Press the plus key to increase the maximum embroidery speed. Note Note Reduce the embroidery speed when designs with narrow satin stitchesaresewn.Thosetendtobecomeunevenat - Bernina Bernette 340 deco | User Guide - Page 30
Presstheclose X key to close the confirmation window without formatting. Caution! Caution Formattingeither theinternalmemory,theUSBStickorthe ATA Design Card will delete all designs in the corresponding memory or - Bernina Bernette 340 deco | User Guide - Page 31
Choose the default hoop size by pressing the corresponding key. 1 2 Note: This selection will only be assigned for monogramming. 3 2 Auto Stop 4 Activate to have the embroidery computer automatically stop after 5 stitches in order to allow trimming the thread tail. 3 Thread Check Choose OFF - Bernina Bernette 340 deco | User Guide - Page 32
for the basic operations of the machine. Press the utility key. Index Changing needles ? Inserting the bobbin ? Threading the machine ? Winding the bobbin ? Press the help key in to scroll through the pages of the instructions. Press the close X key to go back to the previous display. - Bernina Bernette 340 deco | User Guide - Page 33
built into the Deco 340. Further there is a choice of 3- letter and 2- letter monogramming available. Use this selection as well to open fonts from the optional Design Cards with alphabets. 3 Open Designs on Cards Use this category to open embroidery designs from the optionally available Design - Bernina Bernette 340 deco | User Guide - Page 34
page. 2 Built-in/Personal key Press this key to switch between - Built-in designs - Personal designs from the internal design, press the corresponding key. The display will switch to the embroidery window. 2/4 A.B.C Folders on USB Stick USB Sticks may contain design folders as well as design files - Bernina Bernette 340 deco | User Guide - Page 35
34 Key Operations USBɿ \ Embf5 \ FOLDER1AB 1/2 EMB_1 EMB_2 EMB_3 EMB_4 A.B. C EMB_5 EMB_6 EMB_7 EMB_8 Deleting Designs from Memory You may delete design files from your Personal Designs, ATA card or USB Stick provided, that these memory media are not write protected. 1. In the Pattern - Bernina Bernette 340 deco | User Guide - Page 36
35 1/4 FOLDR5IJ A.B.C FOLDR6KL FOLDR7MN FOLDR8OP Deleting Folders from USB Stick You may delete folders with all its contained files at once from a USB Stick. Caution: All designs will be deleted permanently - careful use of this function is highly recommended. 1. In the Pattern Selection Window - Bernina Bernette 340 deco | User Guide - Page 37
the fabric. Further there are functions to select parts of a design for stitching. Screen Information In the embroidery window, the following information will be shown. 1 Sewing time in minutes 2 Number of colors 3 Design size 4 Hoop to be used and its size 5 Image key Each time you press this key - Bernina Bernette 340 deco | User Guide - Page 38
is stitched out step by step. Press the plus key to move the hoop 10 stitches forward in the design Press the minus key to move the hoop 10 stitches back. Notes: • You can use these keys to move the embroidery hoop to where the thread has broken or run out. • At the start of the - Bernina Bernette 340 deco | User Guide - Page 39
Lower the presser foot. Press the start/stop button to start embroidery. The computer will stop automatically after stitching 5 stitches and requests the user to cut the thread tail by showing the instruction window (A) Note: The embroidery computer will not stop if Auto Stop is deactivated in the - Bernina Bernette 340 deco | User Guide - Page 40
# 04095 Embroidery 39 After finishing the first section, the screen will show the instruction window (C). Raise the presser foot. The screen will show the instruction window (D). • If Auto Thread Cutter is set to ON, the machine has trimmed the threads automatically. • If Auto Thread Cutter is - Bernina Bernette 340 deco | User Guide - Page 41
Upper Thread End or Thread Breakage If during embroidery the upper thread runs out or breaks, the machine stops automatically and the following sequence of instruction windows will be displayed. Caution: Please follow the instructions carefully. Otherwise the thread may jam in the hook system - Bernina Bernette 340 deco | User Guide - Page 42
allows to create lettering using the three built-in fonts or using fontsfromoptionallyavailable MMa moonn oo gg rraa mm 2 Built-in/cTaordsekleecytthedesiredlette - Bernina Bernette 340 deco | User Guide - Page 43
) Press «B». Press the letter case key to select lower case letters. Select «e», «a» and «r». Press the OK key. The display will change to the embroidery screen. Selecting the Starting Point Choose the location of the start position in the letter string by pressing the alignment key. 1 Alignment key - Bernina Bernette 340 deco | User Guide - Page 44
computer will stop automatically after stitching 5 stitches and requests the user to cut the thread tail. Refer to detailed process description on Page 38, «Starting to Embroider») Depending on the setting of the Color change key the embroidery computer will stop after each letter and ask to change - Bernina Bernette 340 deco | User Guide - Page 45
44 Gothic BEAT Gothic BEAT Gothic BAT Gothic BAT Gothic BAT Gothic BEAT Lettering Editing the Monogram Deleting a letter AB Example: To delete «E» from «BEAT» B Press the cursor key to shift the cursor under the letter to delete. AB B AB Press the delete key. B The letter «E» will be - Bernina Bernette 340 deco | User Guide - Page 46
a crest Select «2 Letters». Note: When the screen language is switched to Russian, there are three more fonts displayed to choose from. 2 Letters AB B A B C D E F G H A.B.C I J the OK key. The screen will change to the embroidery window. Press the start/stop button to start stitching. - Bernina Bernette 340 deco | User Guide - Page 47
window for the hoop B Edit A.B.C B: 140x200mm X Edit Editing Mode The editing window can be used to combine embroidery designs. Built-in designs, letters as well as designs from USB Sticks or Design Cards can be merged on the Deco 340 into one single design. These new designs are limited to - Bernina Bernette 340 deco | User Guide - Page 48
. A frame around the pattern indicates it is selected. A.B.C Alternate Edit Entry Procedure Starting from the Embroidery Window (with a design already selected) you may press the Edit tab to open the current design for modification. Even if you enter the Editing Mode like this, you may add further - Bernina Bernette 340 deco | User Guide - Page 49
): 140 x 200 mm (5.5 x 7.9") Hoop C (Option): 50 x 50 mm (2.0 x 2.0") Press the OK will open. key and the Editing Window for the selected hoop Press the close X key to return to the default setting (Hoop B). Note: Only the hoops which will fit the current design are shown for selection - Bernina Bernette 340 deco | User Guide - Page 50
1 B: 140x200mm Editing and Combining Designs 49 1 Resize Key Press this key to open the Resize Window. To alter the pattern size, press the plus or minus key. A.B.C The size of the pattern can be altered from 90% to 120% of the original size. The size will change 1% each time you press the - Bernina Bernette 340 deco | User Guide - Page 51
50 Editing and Combining Designs Editing and Combining Designs Example: Combine the built-in design #4 and text «Sky» 1. Select design #4 from the built-in designs. 2. Press the Editing tab. 3 Select the hoop B. 4. Press the Lettering tab. Gothic S ABCD IJKL QR S T YZ AB L MS AB AB B E F G H - Bernina Bernette 340 deco | User Guide - Page 52
key. 9. Position the letters by dragging or with by using the position keys. 10. Press the OK key and the screen will change to the Embroidery Window. Start the machine to embroider. - Bernina Bernette 340 deco | User Guide - Page 53
Save Embroidery Designs From the editing window embroidery design can be stored at two different locations: A. Personal designs on the Deco 340 B. ATA Personal Design Card C. USB Stick The built-in memory of the Deco 340 can hold a large number of your own embroidery design creations. Designs with - Bernina Bernette 340 deco | User Guide - Page 54
message will appear. Press the Close key . The Edit Window will show up again. Save your design temporarily to another memory location. Then close the Edit Window and in the File Open Window delete some files that you do not need anymore. This will create space for future saves. If the same name - Bernina Bernette 340 deco | User Guide - Page 55
on CD cannot be transferred to the Deco 340. Most other brand cards and designs on the market can be used by converting these files or cards through optionally available PC software and accessories. This includes Bernette / BERNINA deco 500/600/650 cards, for which you may use the Magic BoxTM - Bernina Bernette 340 deco | User Guide - Page 56
MMC. While we have run extensive tests with memory media available on the markets the function of every of these cards can however not be guaranteed Transfer of Embroidery Designs Below is a graphical summary of all different ways to transfer embroidery designs into the Deco 340 and back. The most - Bernina Bernette 340 deco | User Guide - Page 57
Embroidery Software or OESD Exploratinons Software. BERNINA Design Cards Every BERNINA design card can be read directly by the Deco 340. Just plug them in and select the design in the Card Register in the Design Selection Window. Even older design cards bought for BERNINA artista sewing machine - Bernina Bernette 340 deco | User Guide - Page 58
a Laptop PC you may require a BERNINA Card Reader. Personal Design Card (artista 165 / 185) Existing embroidery designs as well as files downloaded from the internet may be transferred through the BERNINA Reader/Writer Box and a Personal Design Card to the Deco 340. Note: • Limited functionality! No - Bernina Bernette 340 deco | User Guide - Page 59
/640, artista 160 - 185 Deco 330/340 Bernina extended .EXP embroidery design format based on .EXP with added color information. In applications that use USB Stick or ATA Personal Design Card (Windows based) you will see a second file with the same file name, but the extension .INF. For artista 630 - Bernina Bernette 340 deco | User Guide - Page 60
embroidery computer. Note: Do not dismantle the machine 7 Soft dry cloth f Insert the bobbin holder so that the knob fits next to guide pins with the guide holes on the needle plate and tighten the screw. 10 Needle plate guide pins 11 Needle plate guide holes Note: After cleaning the machine - Bernina Bernette 340 deco | User Guide - Page 61
60 1 2 Care and Maintenance Replacing the Light Bulb Warning: Turn off the power and unplug the embroidery computer before replacing the light bulb. The bulb could be HOT, wait until it has cooled down before touching it. To remove: 3 Remove the cap - Bernina Bernette 340 deco | User Guide - Page 62
Troubleshooting 61 Problem Cause Reference The machine is noisy. 1 Threads have been caught in the hook mechanism. 2 Lint has collected in the bobbin holder. See page 59 See page 59 The needle thread breaks 1 The needle thread is not threaded properly. 2 The needle thread tension is too - Bernina Bernette 340 deco | User Guide - Page 63
Hoop 17 Embroidery Information, Important 21 Embroidery Threads 22 Embroidery Window 36 Extra spool pin 8 Extension Table, detachable 6 F Formatting the memory 29 G Getting Ready to Embroider 7 I Inserting and Removing of a Design Card 26 Inserting the bobbin - Bernina Bernette 340 deco | User Guide - Page 64
1 Butterfly 71.9 mm Built-in Design Chart Start Screen 2 Beach Logo 100.3 mm 3 Jewel Flower 80.8 mm 95.2 mm 89.6 mm 49.3 mm 91.8 mm 69.7 mm 4149 4 Night Balloon 72.4 - Bernina Bernette 340 deco | User Guide - Page 65
12 Shells and Starfish 88.3 mm 13 Big Fireworks 80.5 mm 14 Fireworks 80.9 mm 98.9 mm 126.3 mm 69.6 mm 55 mm 101.6 mm 9008 15 Punpins & Vine 73.6 mm 7350 16 Pumpkins 99.8 mm 87.4 mm 4149 18 Fall Leaves 74 mm 9887 21 Santa 107.9 mm 33467 102 mm 87.1 mm 10522 19 Pine - Bernina Bernette 340 deco | User Guide - Page 66
62.7 mm 24 Redwork Ornament 28.8 mm 25 Redwork Candy 66 mm 26 Snowflake 76.4 mm 76.1 mm 97.5 mm 3362 5091 4712 27 Breezy (Snowman) 88.9 mm 95.3 mm 15975 28 Sunrise on the Geens 92 mm Sports 29 Golf 94.6 mm 30 Baseball 127.4 mm 41.3 mm 49.9 mm 49.9 mm 95.2 mm 10354 - Bernina Bernette 340 deco | User Guide - Page 67
Grecian tassel 67 mm 87.4 mm 93.4 mm 5185 40 Milky Way Ellipse 101.6 mm 4470 Decoration 41 Pop Flower 50.1 mm 22 min 42 Sewing-Border 86.5 mm 34.2 mm 50.9 mm 7118 43 Heart Monogram 98.8 mm 3837 44 Lace Bouquet 92 mm 2523 45 Lace Border 2 21 mm - Bernina Bernette 340 deco | User Guide - Page 68
151.6 mm 46 Lac Heart Border 67 mm 47 Flower Heart 70.3 mm 89 mm 12435 49 Lac Flower 56.5 mm 5474 50 Lace Paisley 71.1 mm 33.2 mm 48 Fancy Gizmo Border 98.6 mm 2685 97.9 mm 98.5 mm 7285 51 Lily 95.4 mm 6199 Flowers 52 Aster 71.9 mm 53 Orchids 58.8 mm 71.9 mm 89.2 - Bernina Bernette 340 deco | User Guide - Page 69
71.4 mm 57 3 Sunflowers 98.7 mm 58 2 Roses 71.1 mm 136 mm 16622 60 Flowers Meadow 90.6 mm 17298 61 Flowers 86.1 mm 117.7 mm 3470 63 Strawberries 52.7 mm 2498 64 Floral Border 98 mm 46.3 mm 52.6 mm 59 Rose Corner 53 mm 3019 62 Grape 26.5 mm 2602 65 Evergreen Corner - Bernina Bernette 340 deco | User Guide - Page 70
58.5 mm 69 Edelweiss 102.9 mm 70 Red Bouquet 92.5 mm 193.4 mm 8211 71 Rocking Horse 70.3 mm 12041 Children 72 Rattle 98.7 mm 73 Party Balloons 81.6 mm 153.2 mm 76.4 mm 74 mm 78.7 mm 6335 74 Bear 60.5 mm 5689 75 Bear with Heart 65.6 mm 10981 76 1910 Locomotive 92.2 - Bernina Bernette 340 deco | User Guide - Page 71
53.8 mm 80 Cute Bunny 38.4 mm 4535 83 Girls Rule 98.7 mm 13881 85 Moonlit Bats 65.5 mm 81.2 mm 99.7 mm 81 It's a Girl 96.1 mm 8322 84 I Love You 99.7 mm 6053 Animals 86 Dragonfly 99 mm 93.4 mm 82 It's a Boy 114.4 mm 8498 87 Hummingbird 71 mm 90.5 mm 84.9 mm 62.4 - Bernina Bernette 340 deco | User Guide - Page 72
152.6 mm 77.2 mm 88 mm 94.6 mm 91 Gazelles 90.7 mm 15293 94 Buck 88 mm 18675 97 Wolf 99.1 mm 24256 100 Dragon 68.3 mm 17255 85.6 mm 101.1 mm 127 mm 92 Giraffe 117.8 mm 7616 95 Deer Head 65.6 mm 5739 98 Moorish Idol 89 mm 68.6 mm 127 mm 93 Lion 95 mm 9242 96 - Bernina Bernette 340 deco | User Guide - Page 73
Table of Preset Colors 0015 0870 1755 0124 0142 0111 4174 0020 0600 0310 0630 0702 0640 0704 0311 0761 0945 1172 0934 0853 0940 0932 1342 1355 1346 0933 0842 1760 0800 1102 1304 1900 2123 1911 2250 2550 2152 2241 2520 2300 1921 2640 3040 2830 3331 3600 Colour White Yellow Beige Beige Salmon Pink - Bernina Bernette 340 deco | User Guide - Page 74
3650 3840 3910 3900 5220 6051 5610 5531 5415 5326 5833 5944 5633 Colour Gray Blue Pale Sky Sky Blue Dark Sky Ice Blue Deep Ice Blue Light Aquamarine Turquois Dark Turquois Light Turquois Pale Turquois Very Pale Turquois Yellow Green Mint Green Light Leaf Green Meadow Green Green Deep Green Emerald - Bernina Bernette 340 deco | User Guide - Page 75
11/10 EN 854800087 502060.06.63 Copyright 2011 Bernina International AG, Steckborn
-
 1
1 -
 2
2 -
 3
3 -
 4
4 -
 5
5 -
 6
6 -
 7
7 -
8
-
9
-
10
-
11
-
12
-
13
-
14
-
15
-
16
-
17
-
18
-
19
-
20
-
21
-
22
-
23
-
24
-
25
-
26
-
27
-
28
-
29
-
30
-
31
-
32
-
33
-
34
-
35
-
36
-
37
-
38
-
39
-
40
-
41
-
42
-
43
-
44
-
45
-
46
-
47
-
48
-
49
-
50
-
51
-
52
-
53
-
54
-
55
-
56
-
57
-
58
-
59
-
60
-
61
-
62
-
63
-
64
-
65
-
66
-
67
-
68
-
69
-
70
-
71
-
72
-
73
-
74
-
75
 |
 |
