Bernina Bernette 340 deco User Guide - Page 53
New Folder key
 |
View all Bernina Bernette 340 deco manuals
Add to My Manuals
Save this manual to your list of manuals |
Page 53 highlights
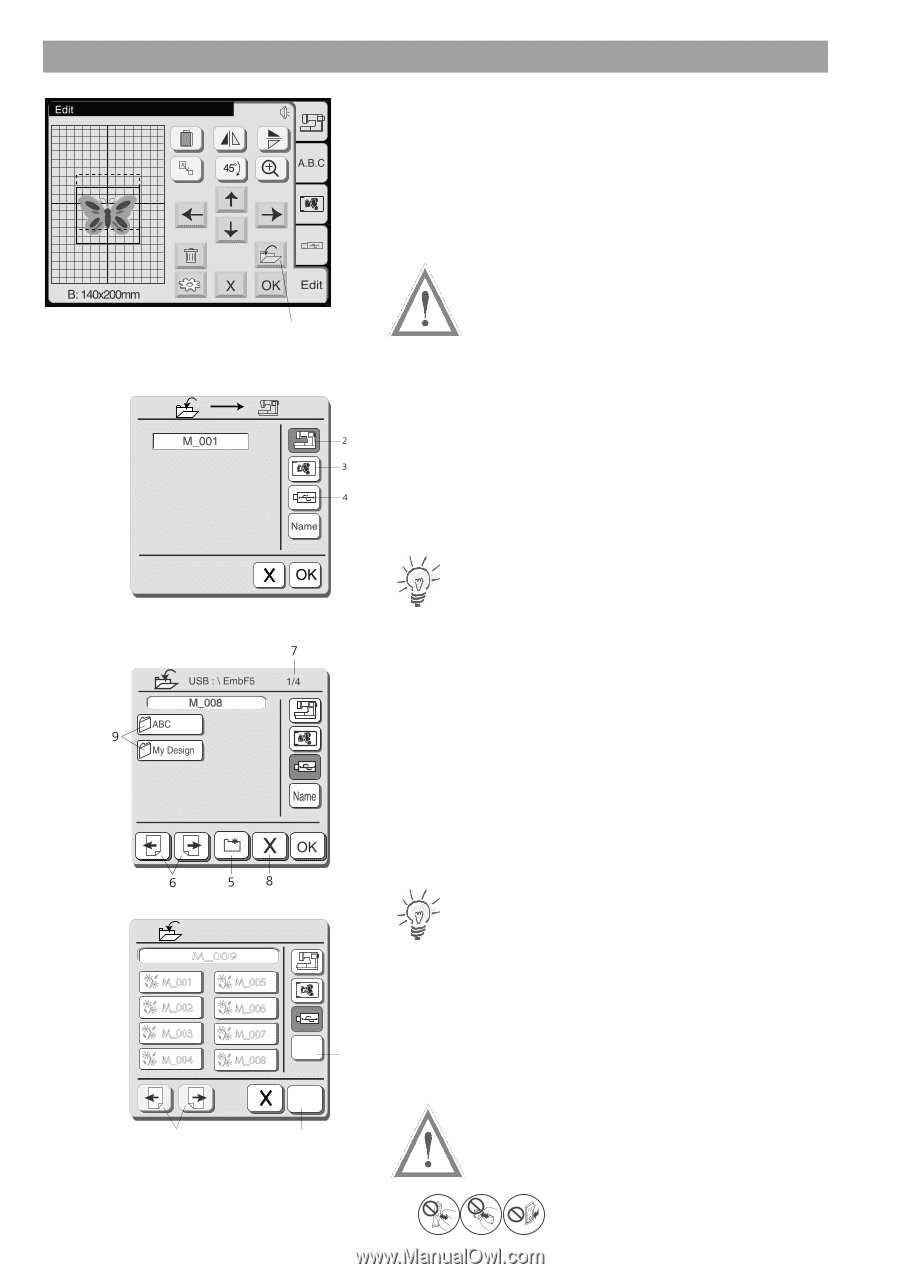
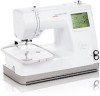
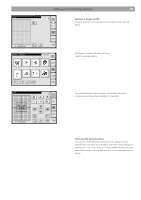
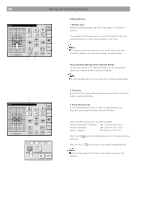
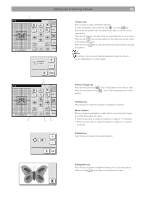
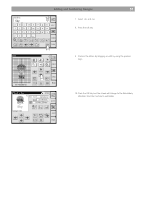
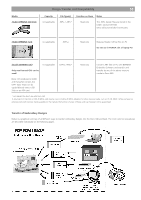
52 Editing and Combining Designs 1 USB : \ EmbF5 \ ABC 1/2 M_009 M_001 M_005 M_002 M_006 M_003 M_004 M_007 M_008 Name 10 OK 6 11 Save Embroidery Designs From the editing window embroidery design can be stored at two different locations: A. Personal designs on the Deco 340 B. ATA Personal Design Card C. USB Stick The built-in memory of the Deco 340 can hold a large number of your own embroidery design creations. Designs with a combined number of max. 290'000 stitches can be stored. Caution: It is recommended to make backup copies of important designs to a Personal Design Card or USB Stick. This will reduce the potential risk of data corruption. 1 Save File key Press this key to open the File Save dialog box. The screen shows the designs already stroed in a certain memory location. To select a memory location, press one of the following keys: 2 Personal Memory key Press this key to select the internal memory to save the file. 3 ATA Card key Press this key to select the ATA Personal Design Card to save the file. 4 USB Stick key Press this key to select the USB Stick to save the file. Note: If no writeable Design Card or USB Stick is inserted an error message will appear and the Page and File Name keys are not shown. 5 New Folder key Press this key to create a new folder (only available on USB Sticks). 6 Page keys Press these keys to scroll between pages with designs. On USB Sticks folders are shown first, then individual designs. 7 Page Number Indication Shows the actual page and the total number of all pages. 8 Close key If you do not wish to save the file, press this key to close the File Save box. 9 Folder keys Press one of these keys to open the corresponding folder. (only on USB Sticks) Note: The screen shows the folders and file names of formerly stored designs for your reference. 10 File Name key The file name will be automatically assigned, starting from M_001 in order. Press this key to assign your own file name (refer to next page for more details). The assigned file name is shown in the window above the file list. 11 OK key Press this key to save the design with the assigned file name. After saving the design the Edit Window is shown. Caution: Never turn off the power, eject the Design Card or remove the USB Stick when the warning sign or hourglass appears on the screen. Otherwise, data stored in the memory may be lost or damaged. = warning sign
-
 1
1 -
2
-
3
-
4
-
5
-
6
-
7
-
8
-
9
-
10
-
11
-
12
-
13
-
14
-
15
-
16
-
17
-
18
-
19
-
20
-
21
-
22
-
23
-
24
-
25
-
26
-
27
-
28
-
29
-
30
-
31
-
32
-
33
-
34
-
35
-
36
-
37
-
38
-
39
-
40
-
41
-
42
-
43
-
44
-
45
-
46
-
47
-
 48
48 -
 49
49 -
 50
50 -
 51
51 -
 52
52 -
 53
53 -
 54
54 -
 55
55 -
 56
56 -
 57
57 -
 58
58 -
59
-
60
-
61
-
62
-
63
-
64
-
65
-
66
-
67
-
68
-
69
-
70
-
71
-
72
-
73
-
74
-
75
 |
 |