Bernina Bernette 92C Operation Manual
Bernina Bernette 92C Manual
 |
View all Bernina Bernette 92C manuals
Add to My Manuals
Save this manual to your list of manuals |
Bernina Bernette 92C manual content summary:
- Bernina Bernette 92C | Operation Manual - Page 1
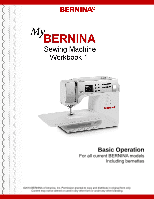
Basic Operation For all current BERNINA models Including bernettes ©2010 BERNINA of America, Inc. Permission granted to copy and distribute in original form only. Content may not be altered or used in any other form or under any other branding. - Bernina Bernette 92C | Operation Manual - Page 2
Zippers...20 Stitch, Function, and Foot Charts 21 8 Series activa 1008 bernette aurora 12/13/10 artista 3 Series The information in this workbook applies to all current BERNINA and bernette sewing machines. Note: Some exercises apply only to models equipped with the highlighted feature. 2 - Bernina Bernette 92C | Operation Manual - Page 3
Introduction This workbook is designed to be used as a step-by-step guide to familiarize you with the basic operation of your BERNINA or bernette sewing machine. Once you have completed the exercises designated for your machine, attach the sewn samples to the information pages (or add an extra - Bernina Bernette 92C | Operation Manual - Page 4
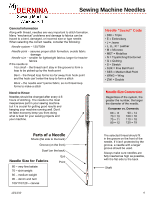
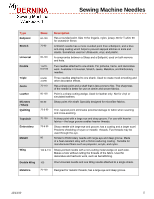
thread loop forms to make a stitch Need to Know Needles should be changed after every 4-6 hours of stitching. The needle is the most inexpensive part in your sewing machine . European vs. Domestic 60 = 8 70 = 10 75 = 11 80 = 12 90 = 14 100 = 16 110 = 18 120 = 19 The selected thread should fit in - Bernina Bernette 92C | Operation Manual - Page 5
Sewing Machine Needles Type Ballpoint Stretch Universal Double Triple Jeans Leather Microtex 100 & 110 Sharp-pointed needle with a non-cutting metal wedge on each side. Makes a hole without cutting the threads of the fabric. Used for decorative and heirloom work, such as hemstitching. 100 One - Bernina Bernette 92C | Operation Manual - Page 6
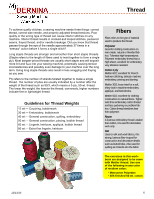
form a single ply). Most bargain-priced threads are usually short staple and will deposit more lint and fuzz into your sewing machine, potentially causing tension inconsistencies and possibly even damage to your machine over the long term. Using long staple threads also result in less snagging and - Bernina Bernette 92C | Operation Manual - Page 7
, resulting in easier threading ▪ are, in some cases, modeled after commercial feet used in factories to increase speed and production with professional results ▪ do the job intended in relation to all types of sewing (example, quilting, garment-making, home dec, etc.) ▪ are supported by the best - Bernina Bernette 92C | Operation Manual - Page 8
BERNINA Presser Foot: Reverse Pattern Foot #1/1C/1D with optional Quilting Seam Guide or optional Seam Guides with Rulers bernette Presser Foot: Zigzag/Universal Foot guide. Place it under the presser foot and align one 6" edge with the ⅝" guide line. Select the Securing Stitch. Begin to sew; machine - Bernina Bernette 92C | Operation Manual - Page 9
: Center BERNINA Presser Foot: Reverse Pattern Foot #1/1C/1D bernette Presser Foot: Zigzag/Universal Foot Select the foot down (default). To change needle setting, touch the Needle Down icon. Machine will stop with the needle down and the presser foot up. 12/13/10 Do you know how to: ▪ Use the Free - Bernina Bernette 92C | Operation Manual - Page 10
80/12 Universal Needle Position: As directed in instructions BERNINA Presser Foot: Reverse Pattern Foot #1/1C/1D bernette Presser Foot: Zigzag/Universal Foot Select the Zigzag Stitch (width = 4, length = 2). Finish one 6" edge using the following steps. Guide the edge of the fabric under the middle - Bernina Bernette 92C | Operation Manual - Page 11
Needle Position: As programmed BERNINA Presser Foot: Reverse Pattern Foot #1/1C/1D and Blind Hem Foot #5 bernette Presser Foot: Zigzag/Universal Foot and Blind Hem Foot (optional accessory) Attach Reverse Pattern Foot #1 or bernette Zigzag/Universal Foot to the machine Finish one 6" edge of - Bernina Bernette 92C | Operation Manual - Page 12
instructions BERNINA Presser Foot: Reverse pattern Foot #1/1C/1D and Edgestitch Foot #10/10C/10D (optional accessory) bernette Presser Foot: Zigzag/Universal Foot Attach Reverse Pattern Foot #1/1C/1D or bernette Zigzag/ Universal Foot to the machine guide of the foot in the ditch of the seam, sewing - Bernina Bernette 92C | Operation Manual - Page 13
Position: As programmed BERNINA Presser Foot: Overlock Foot #2/2A bernette Presser Foot: Overcasting Foot (optional accessory) Place the two foot and stitch the two layers together. The stitch will form over the pin and the edge of the fabric. bernette: Guide the fabric against the blade of the foot - Bernina Bernette 92C | Operation Manual - Page 14
As programmed BERNINA Presser Foot: Reverse pattern Foot #1/1C/1D bernette Presser Foot: Zigzag/Universal Foot Select the sew the seam and press it open. Note: If the fabric is pulling and stretching as it is sewn, adjust the presser foot pressure to a lower number to lighten the pressure of the foot - Bernina Bernette 92C | Operation Manual - Page 15
Medium weight cotton, 12" x 4" and Narrow cord such as perle cotton or embroidery floss, 18" Needle: 80/12 Universal Needle Position: Center BERNINA Presser Foot: Clear Embroidery Foot #39/39C/39D bernette Presser Foot: Cording Foot (optional accessory) Attach the desired foot to the machine. Thread - Bernina Bernette 92C | Operation Manual - Page 16
Buttonhole Foot #3C for manual buttonholes on rotary models Automatic Buttonhole Foot #3A for automatic buttonholes Buttonhole Foot with Slide #3B - measuring foot for manual buttonholes 4-Step Buttonhole Foot For the bernette model 56. 12/13/10 Automatic Buttonhole Foot For bernette models 66 - Bernina Bernette 92C | Operation Manual - Page 17
, etc.), 18" Needle: 80/12 Universal Needle Position: As programmed BERNINA Presser Foot: Standard Buttonhole Foot #3/3C bernette Presser Foot: Models 46 & 56 only: 4-step Buttonhole Foot Note: For making buttonholes with bernette models 66 and 92c, see Automatic Button- holes on the following page - Bernina Bernette 92C | Operation Manual - Page 18
buttonhole; the machine will complete the buttonhole automatically. ▪ When stitching is complete, remove the fabric from under the presser foot. ▪ Bring the thread tails to back and tie off. ▪ Push the lever up when not in use. Note: To make a corded Automatic Buttonhole on bernette models 66 and - Bernina Bernette 92C | Operation Manual - Page 19
of the button. Hold the thread tails as you begin to sew. If using the Button Sew-on stitch, the machine stops automatically when the program is complete; the thread tails are secured as part of the program. BERNINA or bernette: Use the Universal or Zigzag stitch, sew 6-8 stitches, and stop. Bring - Bernina Bernette 92C | Operation Manual - Page 20
: 80/12 Universal BERNINA Presser Foot: Reverse Pattern Foot #1/1C/1D and Zipper Feet #4 and Zipper Foot with Guide #14 bernette Presser Foot: Zigzag/Universal foot and Zipper Foot Attaching the Zipper to Garment Place fabric pieces right sides together. Using a straight stitch, sew a ¾" seam from - Bernina Bernette 92C | Operation Manual - Page 21
21 21 21 30 30 Blindstitch 9 9 9 9 9 9 Button Sew-On 60 60 60 60 60 60 Quilter's Securing 1324 1324 324 324 -- 3 3 3 -- 3 6 5 76 2 2 2 2 2 3 3 33 * The stitches on bernette model 46 are not numbered on the machine but are indicated on the chart in the order they appear on - Bernina Bernette 92C | Operation Manual - Page 22
yes yes yes 11 11 11 yes yes yes no no no yes yes yes yes yes yes 3 Series activa mechanical bernette 380 350PE 330 210 1008 92c 66 56 46 yes yes yes no no yes yes yes no yes yes yes yes yes opt opt no yes yes yes yes - Bernina Bernette 92C | Operation Manual - Page 23
below are included with the purchase of each model as indicated on the chart (-- indicates that the presser foot is not included but may be available as an optional accessory). The BERNINA name and numbers are listed and if the bernette has a corresponding presser foot, it is indicated by the letter
-
 1
1 -
 2
2 -
 3
3 -
 4
4 -
 5
5 -
 6
6 -
 7
7 -
8
-
9
-
10
-
11
-
12
-
13
-
14
-
15
-
16
-
17
-
18
-
19
-
20
-
21
-
22
-
23
 |
 |
©2010 BERNINA of America, Inc. Permission granted to copy and distribute in original form only.
Content may not be altered or used in any other form or under any other branding.
Basic Operation
For all current BERNINA models
Including bernettes