Binatone Fusion 2815 User Guide
Binatone Fusion 2815 Manual
 |
View all Binatone Fusion 2815 manuals
Add to My Manuals
Save this manual to your list of manuals |
Binatone Fusion 2815 manual content summary:
- Binatone Fusion 2815 | User Guide - Page 1
USER GUIDE Fusion 2815 Digital Cordless Telephone with Answer Machine Binatone Helpline (for UK only) Monday to Friday from 9:00am to 5:00pm Tel: 0845 345 9677 **Please note that all calls are charged at local rate - Binatone Fusion 2815 | User Guide - Page 2
phone includes a telephone answering machine that records unanswered calls when it is on.The answering machine can store up to 59 messages within the maximum recording time of approximately 15 minutes. As well as recording incoming messages,you can record memos for other users of your phone. 23 24
-
 1
1 -
 2
2
 |
 |
THIS EQUIPMENT IS NOT DESIGNED FOR MAKING
EMERGENCY TELEPHONE CALLS WHEN THE POWER
FAILS. ALTERNATIVE ARRANGEMENTS SHOULD BE
MADE FOR ACCESS TO DIAL EMERGENCY SERVICES.
Before operating this set,
please read these instructions carefully.
TECHNICAL DETAILS
Monday to Friday from 9:00am to 5:00pm
Tel: 0845 345 9677
**Please note that all calls are charged at local rate
Or visit our website:
www.binatoneonline.com
USER GUIDE
Standard
Frequency range
Channel bandwidth
Operating range
Operating time
Temperature range
Digital Enhanced Cordless
Telecommunication (DECT)
1.88 to 1.9 GHz
1.728 MHz
Up to 300m outdoors;
Standby: 100 hours,Talking:
10 hours
Battery charge time:15 hours
Operating 0 C to 40 C,
Storage -20 C to 60 C
(bandwidth = 20 MHz)
Up to 50m indoors
CLEANING AND CARE
Do not clean
any part of your phone system with benzene, thinners
or other solvent chemicals as this may cause
permanent damage which is not
covered by the Guarantee.
When necessary, clean it with
a damp cloth.
Keep your
hot, humid conditions
or
strong sunlight,
and
don't let it
get wet.
Every effort has
been made to
ensure high standards
of reliability for your
However, if something does go wrong,
please
repair it yourself, but
consult your supplier or the Helpline.
do
not try
to
phone system away from
phone system.
1
2
TABLE OF CONTENTS
1
IMPORTANT SAFETY INSTRUCTIONS
...........................................................
2
INSTALLING YOUR PHONE
............................................................................
5
2.1
C
ONNECTING THE BASE STATION
..........................................................................
5
2.2
I
NSTALLING AND CHARGING THE BATTERIES
......................................................
5
3
GETTING TO KNOW YOUR PHONE
................................................................
6
3.1
H
ANDSET
O
VERVIEW
................................................................................................
6
3.2
D
ISPLAY
I
CONS AND
S
YMBOLS
...............................................................................
7
3.
M
ENU
S
TRUCTURE
....................................................................................................
3.
T
EXT AND
D
IGIT
E
NTRY
T
ABLE
................................................................................
8
4
USING YOUR PHONE
.....................................................................................
4.1
M
AKE A
C
ALL
............................................................................................................
4.2
A
NSWER A
C
ALL
.....................................................................................................
4.3
E
ND A
C
ALL
..............................................................................................................
4.4
4.6
M
UTE A
C
ALL
............................................................................................................
4.7
12
4.8
T
URN ON THE
K
EYPAD
L
OCK
................................................................................
4.9
R
EDIAL THE LAST NUMBER
...................................................................................
4.10 F
IND THE
H
ANDSET
.................................................................................................
4.1
AKE AN
I
NTERNAL
C
ALL (FOR MULTI-HANDSET VERSIONS ONLY )
...............
5
PRIVATE PHONEBOOK
..................................................................................
5.3
V
IEW A
P
HONEBOOK
E
NTRY
.................................................................................
5.1
A
DD A
N
EW
P
HONEBOOK
E
NTRY
..........................................................................
5.2
S
EARCH A
P
HONEBOOK
E
NTRY
.............................................................................
8
11
11
11
TURN OFF HANDSET RINGER
3
11
12
12
................................................................................
12
12
13
13
15
15
15
15
5.4
E
DIT A
P
HONEBOOK
E
NTRY
...................................................................................
5.5
D
ELETE A
P
HONEBOOK
E
NTRY
.............................................................................
5.6
D
ELETE
5.7
C
HECK THE
P
HONEBOOK
U
SAGE
.........................................................................
6
CALLER DISPLAY (NETWORK DEPENDENT)
..............................................
6.1
V
IEW THE
C
ALL
L
IST
................................................................................................
6.2
S
TORE A
C
ALL
L
IST
N
UMBER INTO THE
P
HONEBOOK
.......................................
6.3
D
ELETE AN ENTRY IN THE
C
ALL
L
IST
...................................................................
6.4
D
ELETE
7
PHONE SETTINGS
.........................................................................................
7.1
D
ATE AND
T
IME
S
ETTINGS
.....................................................................................
7.2
A
LARM
S
ETTINGS
.....................................................................................................
7.3
H
ANDSET
S
ETTINGS
................................................................................................
7.4
B
ASE
S
ETTINGS
.......................................................................................................
22
TROUBLESHOOTING
.............................................................................................
DECLARATION OF CONFORMITY
........................................................................
7.5
R
EGISTRATION
.........................................................................................................
24
7.6
R
ESET
Y
OUR
P
HONE
...............................................................................................
9
ALL PHONEBOOK ENTRIES
17
ALL CALL LIST ENTRIES
11
GUARANTEE AND SERVICE
..................................................................................
24
8
ANSWERING MACHINE
10
32
33
34
................................................................................
REMOTE CARD
...............
...........................................................................................
R
EMOTE CARD
29
16
17
17
17
.....................................................................
17
19
18
18
18
.........................................................................
19
19
20
24
................................................................................
..........................................................
25
8.1
TURN THE ANSWERING MACHINE ON/OFF
...........................................................................................
8.2
LISTEN TO MESSAGES
................................................................................................
26
8.3
DELETE MESSAGES
..
....................................................................................................
26
8.4
RECORD A MEMO
.........................................................................
8.5
ANSWERING MACHINE SETTINGS
26
25
4.5
A
DJUST
E
ARPIECE
V
OLUME
...................................................................................
12
1M
HANDSET SPEAKERPHONE
...................................................................................
1
IMPORTANT SAFETY INSTRUCTIONS
When using your telephone equipment, basic safety precautions should always
be followed to reduce the risk of fire, electric shock and injury, including the
1)
Read and understand all the instructions.
2)
Follow all warnings and instructions marked on the product.
3)
Unplug this product from the wall outlet before cleaning. Do not use liquid
cleaners or aerosol cleaners. Use a damp cloth for cleaning.
4)
sink, swimming pool).
5)
Do not overload wall outlets and extension cords as this can result in the
6)
Unplug this product from the wall outlet and refer servicing to our Repair
•
When the power supply cord or plug is damaged or frayed.
• If the product does not operate normally by following the operating instructions.
•
If the product has been dropped and the cabinet has been damaged.
•
If the product exhibits a distinct change in performance.
7)
NEVER use your phone outdoors during a thunderstorm-unplug the
8)
Do not use the telephone to report a gas leak in the vicinity of the leak.
9)
Use only the supplied NiMH (Nickel Metal Hydride) batteries! The operation
periods for the handsets are only applicable with the default battery capacities
10) The use of other battery types or non-rechargeable batteries/primary cells
can be dangerous. These may cause interference and/or damage to the unit
or surroundings. The manufacturer will not be held liable for damage arising
from such non-compliance.
11) Do not use third party charging bays. Damage may be caused to the batteries.
12) Please ensure the battery connector is inserted correcty.
13) Dispose of batteries safely. Do not immerse them in water, burn them, or put
Package contents
The package contains the following items:
• 1 Handset
• 1 Base station
• 1 Mains power adapter
• 1 Telephone line cord
• 1 Rechargeable battery pack
• 1 User manual
them
where they could get
punctured.
Centre under the
following conditions:
following:
near water (for example, near
a bath tub, kitchen
Keep your phone away from hot, humid conditions or strong sunlight,
se this product
and don't let it get wet or u
base from the telephone line and the mains socket when there are storms
in your area. Damage caused by lightning is not covered by the guarantee.
To use your handset and base together, you must be able to establish a radio link
between them. The signal between the handset and the base is in accordance
with the normal standards for a DECT phone: Maximum range up to 300 metres
outdoors or 50 metres indoors.
The signal range may decrease if there is any large metal object between the
handset and the base, such as a refrigerator, a mirror, a filing cabinet, metallic
doors or reinforced concrete. The signal strength may also be reduced by other
solid structures like walls, or by other radio or electrical interference.
Note: If you have a Twin, Triple or Quad system, you will also have the requisite
extra handset(s) and battery packs, and a charger pod for each extra handset.
risk of fire or electric shock.
3
4
Connection and conditions for use:
You can connect your phone to a direct exchange line (DEL) on a local
exchange with its own phone number; to an extension socket connected to a DEL;
or to an extension on an approved compatible PBX. Do not connect as an
extension to a payphone.
The ringer equivalence numbers (REN) of all equipment (phones, fax machines,
modems, etc.) connected to an exchange line must not add up to more than 4,
otherwise one or more of them may not ring and/or answer calls correctly. The
r telephones have a REN of 1 unless
marked otherwise.
phone has a REN of 1, and most othe
6
5
2
INSTALLING YOUR PHONE
2.1
Connecting the base station
1) Plug the power supply
and line cord
into
2) Plug the power adapter into a 230Vac,
3) Always use the cables provided in the box
Warning
: Use only the provided adaptor, using
other power supplies may cause a hazard.
and the line cord into
the base station.
50Hz mains socket,
2.2
Installing and charging the batteries
1) Place the
supplied battery pack into the battery
compartment
3
GETTING TO KNOW YOUR PHONE
3)
Put the handset on the base and charge for
15 hours before using the handset for the first time.
If you have a
Broadband line
If you connect your telephone to a line with
insert a micro-filter between the telephone
and the telephone line, otherwise you may get
interference between the telephone and the broadband,
which could cause problems.
a broadband connection, you will need to
Warning: Install the base unit in a position where the mains adapter plug
will reach an easily accessible mains socket. Never try to lengthen the
mains power cable.
Note: The base unit needs mains power for normal operation, not just for
charging the handset batteries.
Use only the NiMH rechargeable battery type provided.
2) Position the battery compartment cover over the batteries
click into place.
and slide up to
The handset will give a beep when it is properly placed on the base or charger.
with the connector fully inserted as shown
In a home with broadband, every telephone must have a micro-filter connected,
not just the one at the telephone point that your modem is connected to.
If you need more broadband micro-filters, contact your broadband supplier.
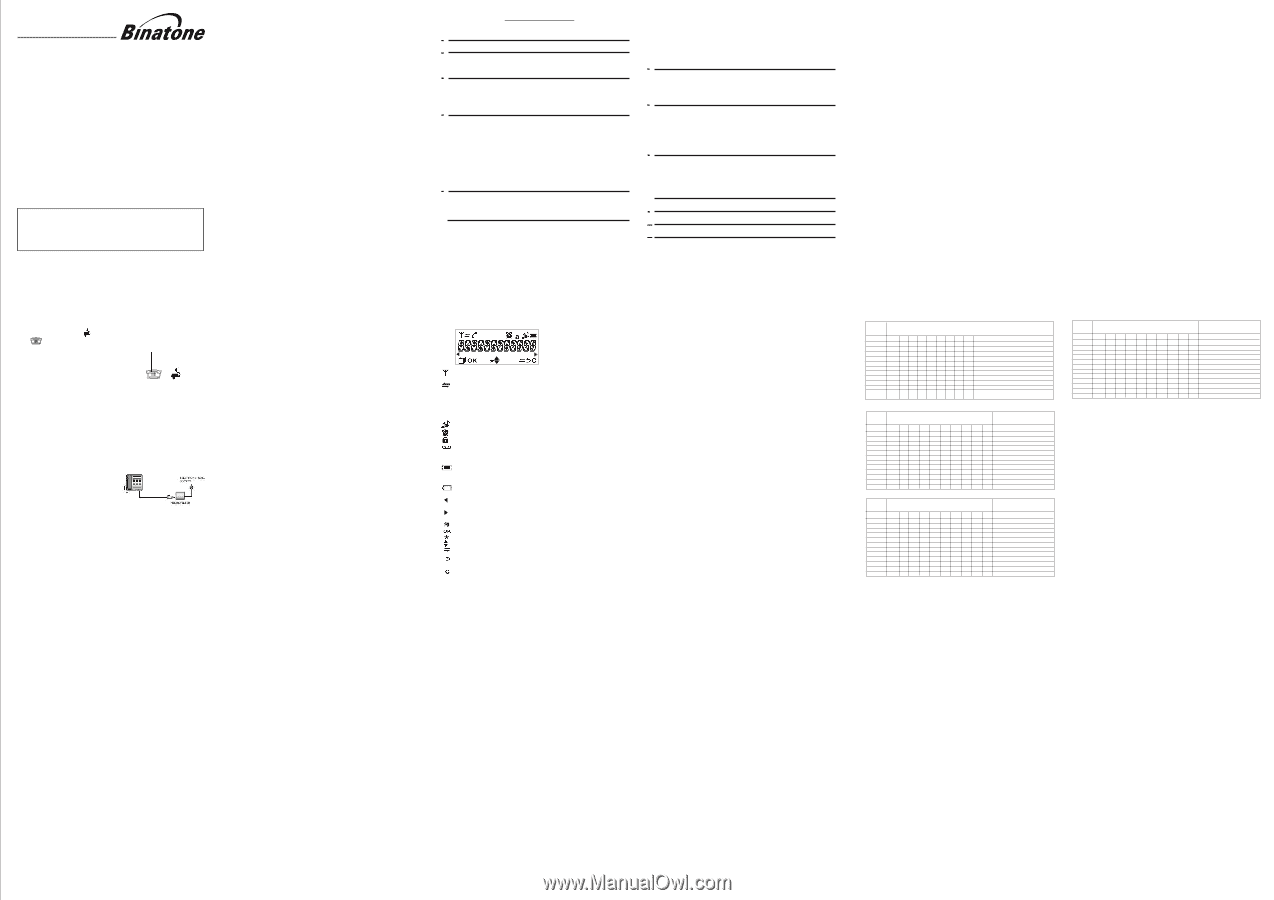
The LCD display gives you information on the current status of the telephone.
Indicates more options available in lists, above or below.
Steady when the handset is in range of the base.
Flashes when out of
Steady when an intercom call is in progress.
Flashes when there is an incoming internal call.
Indicates a call is in progress on that handset.
Indicates that the
ringer is switched off.
Steady when an alarm is set.
Flashes when the alarm is sounding.
Indicates that the keypad is locked.
Indicates when you have a new Voice Mail message.
(This is a Caller Display service and is not usually available from
range of the base or not registered to the base.
UK network providers.)
Indicates when the battery is fully charged.
Whole icon flashes when the battery s charging.
Internal block icon flashes when the battery is in final charging stage.
Indicates when the battery needs charging.
Flashes when low battery power level is detected.
(BACK)
(INT)
Indicates when there are more characters or numbers in front of those
Indicates when there are more characters or numbers after those being
Press the MENU/OK key to access the main menu.
Press the MENU/OK key to confirm the current selection.
Indicates new TAM message / new call in TAM message list / call list.
Press the C/MUTE key to start an intercom call.
Press the C/MUTE key to go back to the previous menu level or cancel
Press the C/MUTE key to clear a character, stop the alarm, or mute/unmute
being
displayed.
displayed.
the current action.
the microphone during a call.
3.
Menu Structure
idle mode, press <MENU/OK>
fer to the
following for the menu structure.
3.4.
Key
Press 1st
2
nd
3rd
4th
5th
6th
7th
8th
9th 10th
1
SP
-
1
1
2
A
B
C
2
2
3
D
E
F
3
3
4
G
H
I
4
4
5
J
K
L
5
5
6
M
N
O
6
6
7
P
Q
R
S
7
7
8
T
U
V
8
8
9
W
X
Y
Z
9
9
0
0
0, P (Pause)
*
*
#
Alphanumeric Editing
(For phonebook name editing and renaming handset)
Number Editing (For phone
editing, date/time editing)
Ł
Key
Press 1st
2
nd
3rd
4th
5th
6th
7th
8th
9th 10th
1
SP
-
1
1
2
3
D
E
F
3
3
4
G
H
I
4
4
5
J
K
L
5
5
6
M
N
O
6
6
7
P
Q
R
S
7
7
8
T
U
V
8
8
9
W
X
Y
Z
9
9
0
0
0, P (Pause)
*
*
#
Alphanumeric Editing
(For phonebook name editing and renaming handset)
Number Editing (For phone
editing, date/time editing)
Key
Press 1st
2
nd
3rd
4th
5th
6th
7th
8th
9th 10th
1
SP
-
1
1
2
A
B
2
2
3
E
3
3
4
H
I
4
4
5
K
5
5
6
6
6
7
7
7
8
8
8
9
9
9
0
0
0, P (Pause)
*
*
#
Alphanumeric Editing
(For phonebook name editing and renaming handset)
Number Editing (For phone
editing, date/time editing)
Γ
Δ
Ζ
Θ
Λ
Μ
Ν
Ξ
Ο
Π
Ρ
Σ
Τ
Υ
Φ
Χ
Ψ
Ω
2
Polish Character Set
3.4.3
Norwegian Character Set
3. .4
Greek Character Set
3.
Text and Digit Entry Table
The following table shows you where each letter and punctuation character can
be found, by using repeated presses of the alphanumeric keypad. This will be
helpful when storing a name in the phonebook and renaming your handset.
In editing mode, a cursor is displayed to indicate the current text entry position.
It is positioned at the right of the last character entered.
Writing Tips:
1.
Once a character is selected, the cursor will move to the next position after a
short pause.
2.
You can move the cursor within the text with the <UP/DOWN> keys to
amend the text entry.
3.
Press <C> to delete the last character.
4.
Press and hold <C> to delete the entire text string.
3.4.1
English Cha
racter Set
KeyF