Binatone LS1000 User Guide
Binatone LS1000 Manual
 |
View all Binatone LS1000 manuals
Add to My Manuals
Save this manual to your list of manuals |
Binatone LS1000 manual content summary:
- Binatone LS1000 | User Guide - Page 1
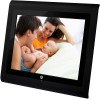
User's Guide For LS1000 10.4" Digital Photo Frame with Slideshow Warning Use only the power adapter supplied with your product. - Binatone LS1000 | User Guide - Page 2
. For warranty service of your Motorola www.motorola.com This User's Guide provides you with all the information your digital photo frame. Follow the simple instructions in "Getting started", on the next few Remote control z 1 x Quick Start Guide z 1 x User's Guide Key features z 3 view modes: - Binatone LS1000 | User Guide - Page 3
Getting started Frame Overview 1. Navigation and buttons 2. EXIT button 3. ON/OFF button 4. Hanging slot (Portrait position) 5. Hanging slot (Landscape position) 6. Stand locking slot 7. Loudspeakers 8. Earphone jack for connecting to an earphone/headset or external speaker to play the audio. 9. - Binatone LS1000 | User Guide - Page 4
Calendar menu 21 3.5 Using the Settings menu 22 3.5.1 Setting an alarm 25 3.5.2 Enabling auto on/off 26 4. General information 27 5. Technical specifications 33 6. Wall mounting instructions 35 4 Getting started - Binatone LS1000 | User Guide - Page 5
direct sunlight. z Do not disassemble your digital photo frame; there are no user-serviceable parts inside. z If the LCD screen breaks, do not touch the glass or liquid. Contact Motorola customer support for assistance. z Use only the power adapter supplied with your digital photo frame. Compatible - Binatone LS1000 | User Guide - Page 6
1.1 Installing the stand 3. Insert the stand into the stand locking slot as illustrated, until the stand is secured to the photo frame. 1.1.1 Landscape position To place the photo frame in landscape position, follow the steps below to install the stand. 1. Hold the photo frame in landscape - Binatone LS1000 | User Guide - Page 7
1.1.2 Portrait position To place the photo frame in portrait position, follow the steps below to install the stand. 1. Hold the photo frame in portrait position. 2. Attach the stand to the stand locking slot on the back of the photo frame. 3. Insert the stand into the stand locking slot as - Binatone LS1000 | User Guide - Page 8
the photo frame to power, the photo frame will automatically start to display photos in slideshow mode. z The memory card slot and USB port both support hot-swap function. z The memory card slot accepts these types of memory cards: SD, SDHC, MMC. z You can play audio and image files on the - Binatone LS1000 | User Guide - Page 9
1.4 Replacing the remote control battery The supplied remote control comes installed with a CR2025 lithium battery. When you need to replace the battery, follow the steps below. 1. Slide the locking tab to the right. 3. Insert the new battery into the battery holder. The battery must be placed with - Binatone LS1000 | User Guide - Page 10
2. Using the photo frame To operate the photo frame, you can: z Use the control buttons on the back of the photo frame Or z Use the supplied remote control 2.1 Using the control buttons 10 No. Description 1 Navigation and buttons a. UP/VOLЀ: moves up/increases the volume. b. DOWN/VOLЁ: moves down - Binatone LS1000 | User Guide - Page 11
When using the Main Menu Button Function UP/VOLЀ Selects Internal Memory, USB or Memory Card. DOWN/VOLЁ Selects Internal Memory, USB or Memory Card. LEFT Selects Photo, Music, Calendar or Settings menu. RIGHT Selects Photo, Music, Calendar or Settings menu. Enters sub-pages of Photo, - Binatone LS1000 | User Guide - Page 12
When using the Calendar menu Button Function LEFT Selects Photo, Music, Calendar or Settings menu. RIGHT Selects Photo, Music, Calendar or Settings menu. Enters Calendar full screen mode when the Calendar menu is selected. EXIT Goes back to the previous page. When using the Settings menu - Binatone LS1000 | User Guide - Page 13
2.2 Using the remote control The following table describes the buttons and their functions that are available on the supplied remote control. No. Description 1 ON/OFF z Turns on the screen backlight. z Turns off the screen backlight to enter Standby mode. 2 MENU You can press this button to - Binatone LS1000 | User Guide - Page 14
No. Description 8 EXIT Goes back to the previous page. 9 RIGHT/NEXT Moves right or selects the next item. 10 (OK/PLAY/PAUSE) Enters and confirms the selection, or starts/pauses the playback. 11 ZOOM Zooms in the photo by a factor of 2x, 4x, 8x and 16x. 14 Using the photo frame - Binatone LS1000 | User Guide - Page 15
3. Using the menus To exit slideshow mode and return to the Main Menu, press the EXIT button on the back of the photo frame. 3.1 Using the Main Menu After turning on the power of the photo frame, photos will play in slideshow mode automatically. z If a memory card has been inserted, photos in the - Binatone LS1000 | User Guide - Page 16
3.2 Using the Photo menu NOTE The photo frame only supports JPEG (*.jpg) image file format. 1. In the Main Menu, press the LEFT or RIGHT button to select the Photo menu. 2. Press the UP/VOLЀ or - Binatone LS1000 | User Guide - Page 17
3.2.1 Copying one or all photos NOTE z To copy photos from your memory card or USB to the internal memory, please insert your memory card or USB flash drive first. z Use the supplied remote control for this operation. 1. In Photo Viewer, press the MENU button on the remote control. Copy One, Copy - Binatone LS1000 | User Guide - Page 18
3.2.2 Deleting one or all photos NOTE Use the supplied remote control for this operation. 1. In Photo Viewer, press the MENU button on the remote control. Copy One, Copy All, Delete One and Delete All options will appear on the screen. 2. Press the LEFT or RIGHT button to select Delete One or - Binatone LS1000 | User Guide - Page 19
3.3 Using the Music menu NOTE The photo frame only supports MP3 (*.mp3) audio file format. 1. In the Main Menu, press the LEFT or RIGHT button to select the Music menu. 2. Press the UP/VOLЀ or - Binatone LS1000 | User Guide - Page 20
3.3.1 Copying one or all music files NOTE z To copy music files from your memory card or USB to the internal memory, please insert your memory card or USB flash drive first. z Use the supplied remote control for this operation. 1. In Music Player, press the MENU button on the remote control. Copy - Binatone LS1000 | User Guide - Page 21
3.3.2 Deleting one or all music files NOTE Use the supplied remote control for this operation. 1. In Music Player, press the MENU button on the remote control. Copy One, Copy All, Delete One and Delete All options will appear on the screen. 2. Press the LEFT or RIGHT button to select Delete One or - Binatone LS1000 | User Guide - Page 22
3.5 Using the Settings menu 1. In the Main Menu, press the LEFT or RIGHT button to select the Settings menu. 2. Press the button to enter the Settings menu. z To move among sub-menus under Settings, press the UP/VOLЀ or DOWN/VOLЁ button. z To apply the settings you have selected, press the - Binatone LS1000 | User Guide - Page 23
Sub-menu Date & Time setting Alarm setting Option Year Month Day Hour Minute Time Format Alarm on/off Alarm hour Alarm minute Volume Tone Day Description/Function Allows you to set up the date and time. Activates/deactivates the alarm clock function. Sets the alarm hour. Sets the alarm minute. - Binatone LS1000 | User Guide - Page 24
Sub-menu On/Off schedule Display Photo view options Music slideshow Option Auto On/Off Auto on hour Auto on minute Auto off hour Auto off minute Brightness Contrast Original Fit to screen On Off Description/Function Enables/disables the Auto power on/power off options. Powers on the photo frame - Binatone LS1000 | User Guide - Page 25
3.5.1 Setting an alarm 1. In the Main Menu, press the LEFT or RIGHT button to select the Settings menu. 2. Press the button to enter the Settings menu. 3. Press the DOWN/VOLЁ button to select Alarm setting, and then press the button. 4. Press the LEFT or RIGHT button to set the alarm to On. - Binatone LS1000 | User Guide - Page 26
3.5.2 Enabling auto on/off The photo frame comes with the Programmable On/Off Time feature, making it possible to power on and off automatically according to the time you set. 1. In the Main Menu, press the LEFT or RIGHT button to select the Settings menu. 2. Press the button to enter the - Binatone LS1000 | User Guide - Page 27
4. General information If your product is not working properly... 1. Read this User's Guide or the Quick Start Guide. 2. Visit our website: www.motorola.com 3. Contact Customer Service: • 1-888-331-3383 in US and Canada • 0845 218 0890 in UK • (65) 68412668 in Singapore Consumer Products and - Binatone LS1000 | User Guide - Page 28
What will BINATONE ELECTRONICS INTERNATIONAL LTD. do? BINATONE ELECTRONICS INTERNATIONAL LTD., at its sole option, will at no charge repair, replace or refund the purchase price of any Products or Accessories that does not conform to this warranty. Binatone Electronics International LTD. may use - Binatone LS1000 | User Guide - Page 29
failure to follow or operation outside the usage parameters stated in the user instructions that came with the Products or Accessories; (c) contact with liquid, water, from coverage. Unauthorized Service or Modification. Defects or damages resulting from service, testing, adjustment, installation - Binatone LS1000 | User Guide - Page 30
is excluded from coverage. How to Obtain Warranty Service or Other Information? To obtain service or information, please call: • 1-888-331-3383 in US and Canada • 0845 218 0890 in UK • (65) 68412668 in Singapore You will receive instructions on how to ship the Products or Accessories, the - Binatone LS1000 | User Guide - Page 31
. This equipment generates, uses, and can radiate radio frequency energy, and if not installed and used in accordance with the instructions, may cause harmful interference to radio communications. However, there is no guarantee that interference will not occur in a particular installation - Binatone LS1000 | User Guide - Page 32
WARNING You are cautioned that changes or modifications not expressly approved by the party responsible for compliance could void your authority to operate the equipment. FCC and Industry Canada This device complies with Industry Canada and FCC Rules. Operation is subject to the following two - Binatone LS1000 | User Guide - Page 33
audio file format Auto rotation 10.4" diagonal TFT LCD 4:3 800 (H) x 600 (V) pixels 512MB 300 cd/m2 500:1 50° / 60° / 75° / 75° SD, SDHC, MMC Supported 0.5W x 2 z AC input: 100-240V; 50/60 Hz; 0.6A z DC output: 9.0V, 2A JPEG (*.jpg) MP3 (*.mp3) Built-in tilt sensor NOTE Specifications are subject - Binatone LS1000 | User Guide - Page 34
34 Technical specifications - Binatone LS1000 | User Guide - Page 35
6. Wall mounting instructions Landscape wall mounting 1. Cut the illustration below and drill holes in the wall exactly as illustrated. 2. Insert 8mm and 9.5mm Then, align your photo frame with the screws. 3. Mount your photo frame in landscape position on the wall. Wall mounting instructions 35 - Binatone LS1000 | User Guide - Page 36
36 Wall mounting instructions - Binatone LS1000 | User Guide - Page 37
Portrait wall mounting 1. Drill a hole in the wall and insert an 8mm head screw (to be purchased separately) into the hole. 2. Align your photo frame with the screw. 3. Mount your photo frame in portrait position on the wall. Wall mounting instructions 37 - Binatone LS1000 | User Guide - Page 38
38 Wall mounting instructions - Binatone LS1000 | User Guide - Page 39
. and are used under license from Motorola, Inc. MOTOROLA and the Stylized M Logo are registered in the US Patent & Trademark Office. All other product or service names are the property of their respective owners. © Motorola, Inc. 2009. All rights reserved. Version 1.0 Printed in China
-
 1
1 -
 2
2 -
 3
3 -
 4
4 -
 5
5 -
 6
6 -
 7
7 -
8
-
9
-
10
-
11
-
12
-
13
-
14
-
15
-
16
-
17
-
18
-
19
-
20
-
21
-
22
-
23
-
24
-
25
-
26
-
27
-
28
-
29
-
30
-
31
-
32
-
33
-
34
-
35
-
36
-
37
-
38
-
39
 |
 |

User’s Guide
For LS1000
10.4” Digital Photo Frame
with Slideshow
Warning
Use only the power adapter supplied with your product.