Biostar NF61S-M2 TE Setup Manual - Page 3
Introduction - motherboard
 |
View all Biostar NF61S-M2 TE manuals
Add to My Manuals
Save this manual to your list of manuals |
Page 3 highlights
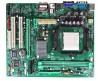
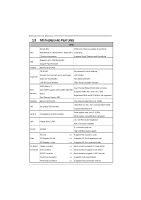
NF61S-M2 TE CHAPTER 1: INTRODUCTION 1.1 BEFORE YOU START Thank you for choosing our product. Be fore you start installing the mo the rboa rd, plea se make sure you fo llo w the instructio ns be lo w: „ Prepare a dry and stable work ing environment with sufficie nt lighting. „ Always disconne ct the compute r from powe r outle t be fore ope ration. „ Before you take the mothe rboard out from anti-static bag, ground yourse lf prope rly by touching any safe ly grounde d appliance, or use grounded wrist strap to remove the static charge. „ Avoid touching the compone nts on mothe rboard or the rear side of the board unless ne cessary. Hold the board on the edge , do not try to be nd or flex the board. „ Do not leave any unfastene d small parts inside the case afte r installation. Loose parts will cause short circuits which may damage the equipment. „ Keep the compute r from dange rous a rea, such as hea t source , humid air and wate r. 1.2 PACKAGE CHECKLIST HDD Cable X 1 Rear I/O Panel for ATX Case X 1 Installation Guide X 1 Fully Se tup Drive r C D X 1 (full ve rsion manual files inside ) Se rial ATA Cable X 1 FDD Cable X 1 (optional) Se rial ATA Powe r Cable X 1 (optional) USB 2.0 Cable X1 (optional) S/PDIF out Cable X 1 (optional) Note: The package contents may differ by area or your motherboard version. 1
-
 1
1 -
 2
2 -
 3
3 -
 4
4 -
 5
5 -
 6
6 -
 7
7 -
 8
8 -
 9
9 -
10
-
11
-
12
-
13
-
14
-
15
-
16
-
17
-
18
-
19
-
20
-
21
-
22
-
23
-
24
-
25
-
26
-
27
-
28
-
29
-
30
-
31
-
32
-
33
-
34
-
35
-
36
-
37
-
38
-
39
-
40
-
41
-
42
-
43
-
44
-
45
-
46
-
47
-
48
-
49
 |
 |
