Bissell Carpet Cleaners User Guide
Bissell Carpet Cleaners Manual
 |
View all Bissell Carpet Cleaners manuals
Add to My Manuals
Save this manual to your list of manuals |
Bissell Carpet Cleaners manual content summary:
- Bissell Carpet Cleaners | User Guide - Page 1
Earn BISSELL Rewards! Register your product today! See details on back page USER'S GUIDE 8920, 8930, 8960, 9200, 9300, 9400 SERIES 2 Thank You 3 Safety Instructions 4-5 Product View 6 Assembly 7-16 Operations 17-19 Maintenance and Care 20 Troubleshooting 21 Replacement Parts 22 Accessories 23 - Bissell Carpet Cleaners | User Guide - Page 2
complete, high-tech home cleaning system. Your BISSELL deep cleaner is well made, and we back it with a limited two year warranty. We also stand behind it with a knowledgeable, dedicated Consumer Services department, so, should you ever have a problem, you'll receive fast, considerate assistance. My - Bissell Carpet Cleaners | User Guide - Page 3
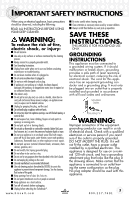
cleaning process. ■ Always connect to a properly grounded outlet. ■ See Grounding Instructions. ■ Unplug from outlet when not in use and before conducting maintenance or troubleshooting. ■ Do not leave machine when it is plugged in. ■ Do not service machine when it is plugged in. ■ Do not use with - Bissell Carpet Cleaners | User Guide - Page 4
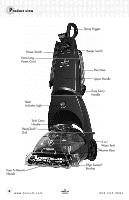
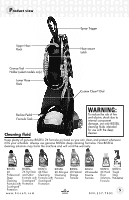
Product view Power Switch Extra Long Power Cord Heat Indicator Light Tank Carry Handle ReadyTools™ Dial Easy To Remove Nozzle 4 www.bissell.com Spray Trigger Heater Switch Flex Hose Upper Handle Easy Carry Handle 2-in-1 Water Tank Lower Base Edge Sweep® Brushes 800.237.7691 - Bissell Carpet Cleaners | User Guide - Page 5
damage, use only BISSELL cleaning fluids intended for use with the deep cleaner. Keep plenty of genuine BISSELL 2X formula on hand BISSELL deep cleaning formulas. Non-BISSELL cleaning solutions may harm the machine and will void the warranty. BISSELL BISSELL BISSELL BISSELL BISSELL 2X 2X Pet - Bissell Carpet Cleaners | User Guide - Page 6
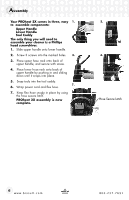
to assemble components: Upper Handle Lower Handle Tool Caddy The only thing you will need to assemble your cleaner is a Phillips head screwdriver. 1. Slide upper handle onto lower handle. 2. Screw 3 screws into the 2X assembly is now complete. 2. 4. Hose Secure Latch 6 www.bissell.com 800.237.7691 - Bissell Carpet Cleaners | User Guide - Page 7
mix with the cleaning formula. Dirty water pulled out of your carpets will collect around the outside of the bladder so that clean and your cleaner until you have completely assembled it per the above instructions and are familiar with all instructions and operating procedures. www.bissell.com - Bissell Carpet Cleaners | User Guide - Page 8
in the corner farthest from your exit. ATTENTION: Some Berber carpets have a tendency to fuzz with wear. Repeated strokes in the same area with an ordinary vacuum or deep cleaner may aggravate this condition. Please see Stain Removal instructions on page 14. 8 www.bissell.com 800.237.7691 - Bissell Carpet Cleaners | User Guide - Page 9
, soiled areas, or stains. b. Allow to penetrate for at least 3 minutes. c. Clean as normal, using the BISSELL PROheat 2X machine on the high traffic setting, following the instructions below. Carpet cleaning 1. Fill the 2-in-1 Water Tank. Remove the tank from the base of the machine by lifting up - Bissell Carpet Cleaners | User Guide - Page 10
Carpet cleaning continued 2. 3. 2. Remove formula tank from back of machine. 3. Fill the formula tank by first unscrewing the cap and insert. Always use genuine BISSELL component damage, use only BISSELL cleaning fluids intended for use with the deep cleaner. 10 www.bissell.com 800.237.7691 - Bissell Carpet Cleaners | User Guide - Page 11
Fill the heavy duty bladder with clean hot tap water, following instructions 1c through 1e on page 9. Note: Remember to secure the step that can be done during the cleaning process or after the carpeted area has been completed. Switch to the water rinse setting, on bissell.com 11 800.237.7691 - Bissell Carpet Cleaners | User Guide - Page 12
activities to allow upholstery time to dry. e. Pick up any loose dirt, debris and pet hair before deep cleaning. 2. Follow the instructions on pages 9-10 for filling the 2-in-1 water tank and the formula tank. 3. ) and suction as needed. Caution: Do no overwet. 12 www.bissell.com 800.237.7691 - Bissell Carpet Cleaners | User Guide - Page 13
. 3. 2. Follow instructions 3-6 on page 12 under "Cleaning with attachments". 3. Set tool on stain and press the trigger to spray solution onto the area to be cleaned. 4. Slowly move the tool back and forth 5. over the soiled surface, keeping the tool in contact with the carpet. 5. Release - Bissell Carpet Cleaners | User Guide - Page 14
should occur, try a different solution or call a professional. 5. If cleaning on Berber carpeting, gently run your machine over a hidden area. If no fuzzing occurs, continue cleaning in soiled area. 6. Using the BISSELL Tough Stain PreCleaner, spray evenly over soiled area. Do not overwet. Wait - Bissell Carpet Cleaners | User Guide - Page 15
not, these products are available for purchase by contacting the BISSELL Consumer Services department by phone or at the website. The hard floor debris and pet hair. 2. Move any furniture, if needed. 3. Fill the formula tank to "WATER" line with water. Fill to "FORMULA" line with BISSELL 2X Hard - Bissell Carpet Cleaners | User Guide - Page 16
can remain filled and ready to go. Note: Store cleaner in a protected, dry area. Since this product uses while making forward and backward passes on carpet. Release the trigger to suction. servicing. Tip: Let all parts dry completely before storing 3 & 4 Filter 16 www.bissell.com 800.237.7691 - Bissell Carpet Cleaners | User Guide - Page 17
tabs into the holes on the bottom sides of the machine. Secure into place with the screw. 5a. Solution Filter Cap 5b. 5c. Filter 6. www.bissell.com 17 800.237.7691 - Bissell Carpet Cleaners | User Guide - Page 18
outlet before performing maintenance or troubleshooting. 8. To clean attachments that hose. Refer to page 13. 9. After carpet is dry, vacuum with a sepcialized dry vacuum If that is needed, please follow the instructions below. 1. Turn off the machine, and bissell.com 5. 7. 9. 800.237.7691 - Bissell Carpet Cleaners | User Guide - Page 19
for cleaning or replacement as needed. 1. Follow small belt removal Instructions on page 18. 2. Remove brush rolls by pulling them off of questions or are having trouble installing or replacing your belt(s) or brushes, please call BISSELL Consumer Services. 8. www.bissell.com 19 800.237. - Bissell Carpet Cleaners | User Guide - Page 20
Troubleshooting ) and unplug unit from outlet. Follow instructions on page 19 2. The unit is in to reset circuit breaker Cleaner not picking up solution Possible service not included in the manual should be performed by an authorized service representative. Thank you for selecting a BISSELL - Bissell Carpet Cleaners | User Guide - Page 21
Replacement parts - BISSELL PROheat 2X Below please find a list of common replacement parts. While not all of these parts may have come with Hose Rack, Screws) *Not all parts are included with every model. 1 2 3 4 5 6 7 8 9 10 11 12 13 14 15 16 17 www.bissell.com 21 800.237.7691 - Bissell Carpet Cleaners | User Guide - Page 22
Hard Floor Solutions formula 7 203-7412 Deep Reach Pet Tool 8 62E5-2 2X Fiber Cleansing Formula with Scotchgard™ Protection 60 oz. 9 99K5-2 2X Pet Stain and Odor Formula with Scotchgard™ Protection 60 . 1 2 3 4 5 6 7 8 9 10 11 12 13 14 15 16 22 www.bissell.com 800.237.7691 - Bissell Carpet Cleaners | User Guide - Page 23
you need additional instruction regarding this warranty or have questions regarding what it may cover, please contact BISSELL Consumer Services by E-mail, guide is not covered. If your BISSELL product should require service: Contact BISSELL Consumer Services to locate a BISSELL Authorized Service - Bissell Carpet Cleaners | User Guide - Page 24
Service Supplying your information now saves you time should you need to contact us with questions regarding your product. Product Support ET ATTN: Consumer Services Or visit the BISSELL website - www.bissell.com When contacting BISSELL, have model number of cleaner available. Please record your
-
 1
1 -
 2
2 -
 3
3 -
 4
4 -
 5
5 -
 6
6 -
 7
7 -
8
-
9
-
10
-
11
-
12
-
13
-
14
-
15
-
16
-
17
-
18
-
19
-
20
-
21
-
22
-
23
-
24
 |
 |

2
Thank You
USER'S GUIDE
8920, 8930, 8960, 9200,
9300, 9400 SERIES
Safety Instructions
Product View
Assembly
Operations
Maintenance and Care
Troubleshooting
Product Registration
Replacement Parts
Consumer Services
3
4-5
6
7-16
17-19
20
24
21
24
Accessories
Warranty
22
23
Earn BISSELL Rewards!
R
egister your
product today!
See details on
back page