Bissell Garage Pro® Wet/Dry Vacuum Cleaner User's Guide
Bissell Garage Pro® Wet/Dry Vacuum Cleaner Manual
 |
View all Bissell Garage Pro® Wet/Dry Vacuum Cleaner manuals
Add to My Manuals
Save this manual to your list of manuals |
Bissell Garage Pro® Wet/Dry Vacuum Cleaner manual content summary:
- Bissell Garage Pro® Wet/Dry Vacuum Cleaner | User's Guide - Page 1
Garage Pro™ VACUUM USER'S GUIDE 18P0 SERIES 3 Safety Instructions 4 Product View 5-6 Assembly 6-9 Operation 10-12 Maintenance and Care 13 Troubleshooting 14 Consumer Services 15 Replacement Parts 16 Warranty ug110-4025_18P0_208.indd 1 2/12/08 12:17:17 PM - Bissell Garage Pro® Wet/Dry Vacuum Cleaner | User's Guide - Page 2
, high-tech home cleaning system. Your BISSELL Garage Pro™ vacuum is well made, and we back it with a limited two year warranty. We also stand behind it with a knowledgeable, dedicated Consumer Services Department, so, should you ever have a problem, you'll receive fast, considerate assistance - Bissell Garage Pro® Wet/Dry Vacuum Cleaner | User's Guide - Page 3
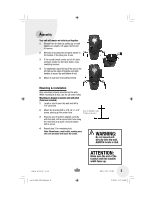
be observed, including the following: READ ALL INSTRUCTIONS BEFORE USING YOUR GARAGE PRO VACUUM. Always connect to a polarized outlet (left replacement parts. See instructions for servicing of double-insulated appliances. ■ Turn off all controls before plugging or unplugging vacuum cleaner. ■ - Bissell Garage Pro® Wet/Dry Vacuum Cleaner | User's Guide - Page 4
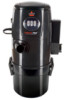
Product view Face Plate Power Switch Wet/Dry Hose Inlet Muffler Blower Hose Outlet 4 www.bissell.com ug110-4025_18P0_208.indd 4 Power Cord Hooks Dirt Tank Handles Dirt Tank 800.237.7691 2/12/08 12:17:17 PM - Bissell Garage Pro® Wet/Dry Vacuum Cleaner | User's Guide - Page 5
2. Remove all accessories and parts stored in the bottom of dirt tank before reassembling vacuum. 4. To reassemble, 5. Mount to wall (see instructions below). Mounting & installation Only the next hole as a guide. Securely fasten with a screw into dry wall. ALWAYS locate a stud. www.bissell.com - Bissell Garage Pro® Wet/Dry Vacuum Cleaner | User's Guide - Page 6
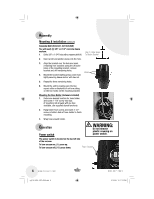
Operation Power switch WARNING: Do not remove plastic covering on power switch. The power switch is located on the top left side of the vacuum. To turn vacuum on, ( I ) press up. To turn vacuum off, ( O ) press down. Power Switch 6 www.bissell.com ug110-4025_18P0_208.indd 6 800.237.7691 2/12 - Bissell Garage Pro® Wet/Dry Vacuum Cleaner | User's Guide - Page 7
Wet or dry vacuuming mode 1. Attach hose to the wet/dry switch up to begin vacuuming. Blower mode 1. Attach hose to the blower hose outlet opening (located vacuum has a protection device to automatically power off when the tank reaches its water capacity (this prevents water from reaching the motor - Bissell Garage Pro® Wet/Dry Vacuum Cleaner | User's Guide - Page 8
OFF and unplug from electrical outlet. 2. Check the vacuum for the source of overheating problem (i.e. full dirt cup, dirty filters or clog). 3. Fix the problem by following the steps in the maintenance section of the user guide. Face plate Green LED light The LED power will turn on when unit is - Bissell Garage Pro® Wet/Dry Vacuum Cleaner | User's Guide - Page 9
outer brushes. Upholstery cleaning Crevice tool May be used for both dry vacuuming or wet cleaning in tight spaces and corners. Dusting brush Use soft of the vacuum. Use one hand to hold the tank and use the other hand to clip the handles to hold the tank securely. Carpet www.bissell.com ug110 - Bissell Garage Pro® Wet/Dry Vacuum Cleaner | User's Guide - Page 10
inside the top portion of the vacuum. Pull either black tab towards the middle of the unit and remove. 4. Shake filter over trash can to release any loose debris. 5. Use a damp cloth to wipe the inside and outside of the filter if desired. Air dry thoroughly before replacing. 6. To replace, hold - Bissell Garage Pro® Wet/Dry Vacuum Cleaner | User's Guide - Page 11
, follow these steps to clear the clog: 1. Unplug vacuum from electrical outlet. 2. Check the filter and clean as necessary (see cleaning your filters above and on page 10). 3. Check to see if dirt tank is full. Empty if needed. 4. Check wet/dry or blower outlet for clogs. If the clog is contained - Bissell Garage Pro® Wet/Dry Vacuum Cleaner | User's Guide - Page 12
wand or tool. 2. Attach hose to the blower outlet and turn the power on. 3. This get wet. If it needs cleaning, wipe with damp cloth only. SERVICING OF done only by qualified service personnel. Replacement parts for a double-insulated appliance must be identical to the parts they replace. 12 - Bissell Garage Pro® Wet/Dry Vacuum Cleaner | User's Guide - Page 13
full 3. Empty dirt container 4. Clog in cleaner 4. Follow instructions on pg 12 for clearing clogs 5. Filters are dirty 5. Check and clean filter 6. Hose not properly attached 6. Make sure hose collar is pushed in or in locked position 7. Vacuum is not suctioning or blowing 7. Make sure - Bissell Garage Pro® Wet/Dry Vacuum Cleaner | User's Guide - Page 14
BISSELL Consumer Services For information about repairs or replacement parts, or questions about your warranty, call: BISSELL Consumer Services 1-800-237-7691 Monday - Friday 8 a.m. - 10 p.m. ET Saturday Or write: BISSELL Homecare, Inc. PO Box 3606 Grand Rapids MI 49501 9 a.m. - 8 p.m. ET ATTN: - Bissell Garage Pro® Wet/Dry Vacuum Cleaner | User's Guide - Page 15
Replacement parts - BISSELL Garage Pro™ Vacuum You may purchase parts from your retailer, by calling BISSELL Consumer Services or by visiting our website. Below is a list of common replacement parts. While not all of these parts may have come with your specific model, they are available for purchase - Bissell Garage Pro® Wet/Dry Vacuum Cleaner | User's Guide - Page 16
- BISSELL Garage Pro™ Vacuum This warranty gives you specific legal rights, and you may also have other rights which may vary from state to state. If you need additional instruction regarding this warranty or have questions regarding what it may cover, please contact BISSELL Consumer Services by
-
 1
1 -
 2
2 -
 3
3 -
 4
4 -
 5
5 -
 6
6 -
 7
7 -
8
-
9
-
10
-
11
-
12
-
13
-
14
-
15
-
16
 |
 |

USER’S GUIDE
18P0 SERIES
3
Safety Instructions
Product View
Assembly
Operation
Maintenance and Care
Troubleshooting
Consumer Services
Replacement Parts
4
5-6
6-9
10-12
13
14
15
Warranty
16
Garage Pro
™
VACUUM
ug110-4025_18P0_208.indd
1
ug110-4025_18P0_208.indd
1
2/12/08
12:17:17 PM
2/12/08
12:17:17 PM