Bissell PowerGroom® Multi Cyclonic Canister User Guide
Bissell PowerGroom® Multi Cyclonic Canister Manual
 |
View all Bissell PowerGroom® Multi Cyclonic Canister manuals
Add to My Manuals
Save this manual to your list of manuals |
Bissell PowerGroom® Multi Cyclonic Canister manual content summary:
- Bissell PowerGroom® Multi Cyclonic Canister | User Guide - Page 1
USER'S GUIDE 80Q2 SERIES 2 Thank You 3 Safety Instructions 4 Product View 5 Assembly 6-8 Operations 9-12 Maintenance and Care 13 Troubleshooting 14 Replacement Parts 15 Warranty 16 Consumer Services - Bissell PowerGroom® Multi Cyclonic Canister | User Guide - Page 2
and we back it with a limited one year warranty. We also stand behind it with a knowledgeable, dedicated Consumer Services department, so, should you ever have a problem, you'll receive fast, considerate assistance. My great-grandfather invented the floor sweeper in 1876. Today, BISSELL is a global - Bissell PowerGroom® Multi Cyclonic Canister | User Guide - Page 3
outdoors, or dropped into water, return it to a service agent. ■ Do not pull or carry by cord, any purpose other than described in this User's Guide. ■ Use only manufacturer's recommended attachments. ■ allow to be used as a toy. SAVE THESE INSTRUCTIONS FOR FUTURE USE This model is for household use - Bissell PowerGroom® Multi Cyclonic Canister | User Guide - Page 4
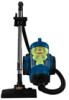
Floor Nozzle Brush Switch Hose Connector Upholstery Tool Crevice Tool Dusting Brush 4 w w w. b i s s e l l . c o m CAUTION: Do not plug in your vacuum until you are familiar with all instructions and operating procedures. 800.237.7691 - Bissell PowerGroom® Multi Cyclonic Canister | User Guide - Page 5
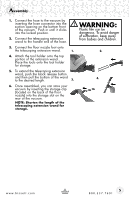
Assembly 1. Connect the hose to the vacuum by inserting the hose connector into the suction opening on the bottom front of the vacuum. Push in until it clicks into the locked position. 2. Connect the telescoping extension wand to the handle end of the hose. 3. Connect the floor nozzle foot onto - Bissell PowerGroom® Multi Cyclonic Canister | User Guide - Page 6
Operations Power cord The power cord is located at the rear of the vacuum. Gently pull out the power cord, watching for the yellow line. Stop pulling the power cord once the yellow line is visible. There is also a red line, which indicates the end of the usable cord. Do not pull the power cord out - Bissell PowerGroom® Multi Cyclonic Canister | User Guide - Page 7
Operations Power button Turn the power ON or OFF by pressing lightly downward on the power button ( ). Power Button Variable suction power control The variable suction power control is located on the back of the vacuum. Turn the control toward the larger dots for maximum suction. Turn the - Bissell PowerGroom® Multi Cyclonic Canister | User Guide - Page 8
Operations Special tools Your BISSELL PowerGroom Multi Cyclonic is not only a powerful carpet and rug vacuum cleaner, it's also a versatile bare floor and 1. above floor vacuum cleaner when you select one of the special tools. Floor nozzle: Use to vacuum carpets, rugs and bare floors. - Bissell PowerGroom® Multi Cyclonic Canister | User Guide - Page 9
To reduce the risk of electric shock, turn power switch OFF and disconnect plug from electrical outlet before performing maintenance or troubleshooting checks. 3. Choose an emptying method. Method #2 is recommended for allergy sufferers. Method #1 - Hold the dirt container over a trash can and push - Bissell PowerGroom® Multi Cyclonic Canister | User Guide - Page 10
Maintenance and care Cleaning the inner cyclone & screen Filters protect the motor from dirt and dust particles. Use only BISSELL replacement filters in your PowerGroom Multi Cyclonic 1. Unplug the vacuum from the electrical outlet. 3. 2. Remove the dirt container from the vacuum and make sure - Bissell PowerGroom® Multi Cyclonic Canister | User Guide - Page 11
Maintenance and care Cleaning the pre-motor filter The pre-motor filter protects the motor from dirt and dust particles. Use only BISSELL replacement filters in your PowerGroom Multi Cyclonic. 1. Turn the power OFF. Unplug the vacuum from the electrical outlet. 2. Remove the dirt container from the - Bissell PowerGroom® Multi Cyclonic Canister | User Guide - Page 12
filters and air passages for dirt accumulation. 3. The thermal protector automatically resets after approximately 2 hours. If the thermal protector does not reset, call BISSELL Consumer Services or visit the website. 12 w w w. b i s s e l l . c o m Post-Motor HEPA Media Filter* 800.237.7691 - Bissell PowerGroom® Multi Cyclonic Canister | User Guide - Page 13
and disconnect plug from electrical outlet before performing maintenance or troubleshooting. Remedies 1. Vacuum cleaner is not plugged in 2. Power if needed Other maintenance or service not included in the manual should be performed by an authorized service representative. Thank you for selecting - Bissell PowerGroom® Multi Cyclonic Canister | User Guide - Page 14
Replacement parts - BISSELL vacuum Item 1 2 3 4 5 6 7 8 9 10 Part No. 203-1578 203-1579 203-1536 203-1583 203-1581 203-1580 203-1582 203-1575 203-1569 203-1557 Part Name Hose Telescoping Extension Wand Multi-Surface Floor Nozzle Tool Holder Upholstery Tool Crevice Tool Dusting Brush Inner - Bissell PowerGroom® Multi Cyclonic Canister | User Guide - Page 15
additional instruction regarding this warranty or have questions regarding what it may cover, please contact BISSELL Consumer Services by warranty, contact BISSELL Consumer Services. Website or E-mail: www.bissell.com Use the "Customer Support" tab. Or Call: BISSELL Consumer Services 1-800-237-7691 - Bissell PowerGroom® Multi Cyclonic Canister | User Guide - Page 16
earn points for discounts and free shipping on future purchases. Faster Service Supplying your information now saves you time should you need to contact us with questions regarding your product. Product Support Reminders and Alerts We'll contact you with any important product maintenance
-
 1
1 -
 2
2 -
 3
3 -
 4
4 -
 5
5 -
 6
6 -
 7
7 -
8
-
9
-
10
-
11
-
12
-
13
-
14
-
15
-
16
 |
 |

2
Thank You
USER'S GUIDE
80Q2 SERIES
Safety Instructions
Product View
Assembly
Operations
Maintenance and Care
Troubleshooting
Replacement Parts
3
4
5
6-8
9-12
13
14
Warranty
Consumer Services
15
16