Bissell Rewind CleanView® Pet Vacuum User Guide
Bissell Rewind CleanView® Pet Vacuum Manual
 |
View all Bissell Rewind CleanView® Pet Vacuum manuals
Add to My Manuals
Save this manual to your list of manuals |
Bissell Rewind CleanView® Pet Vacuum manual content summary:
- Bissell Rewind CleanView® Pet Vacuum | User Guide - Page 1
Earn BISSELL Rewards! Register your product today! See details on back page ® ® USER'S GUIDE 58F8, 18M9, 84G9, 26T5 SERIES 2 Thank You 3 Safety Instructions 4 Product View 5 Assembly 6-8 Operations 8-12 Maintenance and Care 13 Troubleshooting 14 Replacement Parts 14 Accessories 15 - Bissell Rewind CleanView® Pet Vacuum | User Guide - Page 2
, so, should you ever have a problem, you'll receive fast, considerate assistance. My great-grandfather invented the floor sweeper in 1876. Today, BISSELL is a global leader in the design, manufacture, and service of high quality homecare products like your BISSELL vacuum. Thanks again, from all of - Bissell Rewind CleanView® Pet Vacuum | User Guide - Page 3
on dry, indoor surfaces. ■ Keep appliance on a level surface. ■ Do not carry the vacuum cleaner while it is running. ■ Hold plug when rewinding onto cord reel. Do not allow plug to whip when rewinding. SAVE THESE INSTRUCTIONS FOR FUTURE USE THIS APPLIANCE HAS A POLARIZED PLUG To reduce the risk of - Bissell Rewind CleanView® Pet Vacuum | User Guide - Page 4
Filter Automatic Cord Rewind Handle Release Pedal Furniture Protection Guard Powerfoot Height Adjustment Knob Quick Reach® Handle Hose Wand Hose Wand Base Foot Hose caution: Do not plug in your vacuum cleaner until you are familiar with all instructions and operating procedures. Warning - Bissell Rewind CleanView® Pet Vacuum | User Guide - Page 5
Insert the screw provided from the screw packet into the existing hole. Tighten securely with a screwdriver. Attach vacuum hose and tools 1. 1. Line up tabs on the base of the Twist 'n Snap hose with the base of holder in handle and push 5. back to snap into place. www.bissell.com 5 800.237.7691 - Bissell Rewind CleanView® Pet Vacuum | User Guide - Page 6
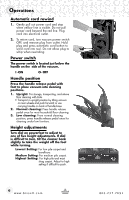
wind cord into reel. Do not allow plug to whip when rewinding. Power switch The power switch is located just below the handle on the side of the vacuum. I -ON O- OFF Handle position Press the handle release shag carpet. Adjust to high setting if difficult to push. 6 www.bissell.com 800.237.7691 - Bissell Rewind CleanView® Pet Vacuum | User Guide - Page 7
- follow same instructions for operation and maintenance. Clean Filter Indicator NOTICE: The floor brush will continue to rotate while you use your vacuum for above floor cleaning. To prevent carpet damage, do not lean on the vacuum or let the powerfoot tilt forward. www.bissell.com 7 800.237 - Bissell Rewind CleanView® Pet Vacuum | User Guide - Page 8
to remove from vacuum and empty. 3. 4. Place dirt container back in the vacuum and slide lever to circular filter 1. Turn power OFF. Unplug vacuum cord from electrical outlet. 2. Remove dirt container THE FILTER CUP WHILE IT IS STILL IN THE VACUUM. 3. Grasp the plastic tab on the top of the - Bissell Rewind CleanView® Pet Vacuum | User Guide - Page 9
Filter 2. Locate filter behind door on side of vacuum. Remove and replace when filter becomes dirty. The white, pleated filter is NOT washable. Select model 18M9-W includes an Activated Carbon Filter that follows the same operation and replacement instructions. www.bissell.com 9 800.237.7691 - Bissell Rewind CleanView® Pet Vacuum | User Guide - Page 10
for obstructions. Remove debris from this area. Replace drive belt 1. Turn power OFF. Unplug vacuum cord from electrical outlet. 2. With rotating brush removed (steps 1-4 of checking rotating floor back into place. Air Passageway 3 &4. Motor Pulley 6. 10 www.bissell.com Brush Cover 800.237.7691 - Bissell Rewind CleanView® Pet Vacuum | User Guide - Page 11
clog in the vacuum. If you notice a change in the sound of the vacuum motor, check for clogs. 1. Turn power OFF. Unplug vacuum cord from electrical outlet the hose. 5. Remove the screw attaching the hose wand base to the vacuum. Straighten the hose wand base and unclog with long, narrow object such - Bissell Rewind CleanView® Pet Vacuum | User Guide - Page 12
place. 2. TurboBrush Tool maintenance Select models include Pet TurboEraser Tool that follows same maintenance instructions. 1. Turn power OFF. Unplug vacuum cord from electrical outlet. 2. Turn tool so Reposition faceplate and secure with two screws. 3. 4. 12 www.bissell.com 800.237.7691 - Bissell Rewind CleanView® Pet Vacuum | User Guide - Page 13
/replace fuse or reset breaker 3. Damaged cord 3. Refer to a BISSELL authorized service center for repair or replacement Vacuum cleaner won't pick up Possible causes Remedies 1. Clog in hose or elsewhere in vacuum 1. Follow instructions on page 11 for clearing clogs 2. Filters are dirty - Bissell Rewind CleanView® Pet Vacuum | User Guide - Page 14
vacuum: To purchase call 1-800-237-7691 or visit www.bissell.com. Item 1 2 3 4 5 Part No. 203-2447 203-7529 203-1063 203-1099 203-1084 Part Name TurboBrush Tool Pet TurboEraser Tool (18M9-W model only) Crevice Tool Combination Dusting/Upholstery Brush Extension Wand 1 2 3 4 5 14 www.bissell - Bissell Rewind CleanView® Pet Vacuum | User Guide - Page 15
you need additional instruction regarding this warranty or have questions regarding what it may cover, please contact BISSELL Consumer Services by E-mail, Guide is not covered. If your BISSELL product should require service: Contact BISSELL Consumer Services to locate a BISSELL Authorized Service - Bissell Rewind CleanView® Pet Vacuum | User Guide - Page 16
Product Support Reminders and Alerts We'll contact you with any important product maintenance reminders and alerts. Special Promotions Optional: Register your email to receive notice of offers, contests, cleaning tips and more! Visit www.bissell.com/registration now! BISSELL consumer services For
-
 1
1 -
 2
2 -
 3
3 -
 4
4 -
 5
5 -
 6
6 -
 7
7 -
8
-
9
-
10
-
11
-
12
-
13
-
14
-
15
-
16
 |
 |

Earn BISSELL Rewards!
R
egister your
product today!
See details on
back page
2
Thank You
USER'S GUIDE
58F8, 18M9, 84G9, 26T5 SERIES
Safety Instructions
Product View
Assembly
Operations
Maintenance and Care
Troubleshooting
Consumer Services
Replacement Parts
3
4
5
6-8
8-12
13
16
14
Accessories
Warranty
14
15
Earn BISSELL Rewards!
R
egister your
product today!
See details on
back page
®
®