Bissell Rewind CleanView Pet User Guide
Bissell Rewind CleanView Pet Manual
 |
View all Bissell Rewind CleanView Pet manuals
Add to My Manuals
Save this manual to your list of manuals |
Bissell Rewind CleanView Pet manual content summary:
- Bissell Rewind CleanView Pet | User Guide - Page 1
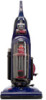
! Register your product today! See details on back page ® ® USER'S GUIDE 58F8, 18M9, 84G9, 26T5 SERIES 2 Thank You 3 Safety Instructions 4 Product View 5 Assembly 6-8 Operations 8-12 Maintenance and Care 13 Troubleshooting 14 Replacement Parts 14 Accessories 15 Warranty 16 Consumer - Bissell Rewind CleanView Pet | User Guide - Page 2
made, and we back it with a limited three year warranty. We also stand behind it with a knowledgeable, dedicated Consumer Services department, so, should you ever have a problem, you'll receive fast, considerate assistance. My great-grandfather invented the floor sweeper in 1876. Today, BISSELL is - Bissell Rewind CleanView Pet | User Guide - Page 3
for any purpose other than described in this user's guide. ■ Use only manufacturer's recommended attachments. ■ dropped into water, have it repaired at an authorized service center. ■ Do not pull or carry by cord plug to whip when rewinding. SAVE THESE INSTRUCTIONS FOR FUTURE USE THIS APPLIANCE HAS A - Bissell Rewind CleanView Pet | User Guide - Page 4
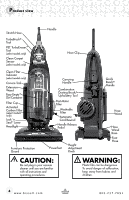
Quick Reach® Handle Hose Wand Hose Wand Base Foot Hose caution: Do not plug in your vacuum cleaner until you are familiar with all instructions and operating procedures. Warning: Plastic film can be dangerous. To avoid danger of suffocation, keep away from babies and children. 4 www.bissell.com - Bissell Rewind CleanView Pet | User Guide - Page 5
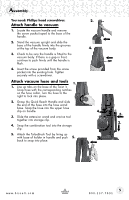
Assembly You need: Phillips head screwdriver. 2. Attach handle to vacuum 1. Locate the vacuum handle and remove the screw packet taped to the base of the handle. 2. Stand the vacuum upright and slide the base of the handle firmly into the grooves at the top of the vacuum body. 4. 3. Check - Bissell Rewind CleanView Pet | User Guide - Page 6
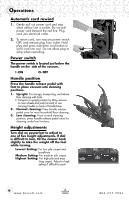
Operations Automatic cord rewind 1. Gently pull out power cord and stop when yellow line is visible. Do not pull power cord beyond the red line. Plug cord into electrical outlet. 2. To return cord, turn vacuum power switch OFF, and remove plug from outlet. Hold plug and press automatic cord button - Bissell Rewind CleanView Pet | User Guide - Page 7
the air flow is reduced - and then will change to red. When fully red, the airflow is greatly reduced or clogged by a dirty filter; follow instructions on pages 8 & 9 to clean/replace your filters. Tools Attach desired tool to hose for above floor cleaning surfaces or hard to reach areas. 1. Remove - Bissell Rewind CleanView Pet | User Guide - Page 8
Operations Empty Dirt Container Empty when dirt reaches the "Full" line on the container. 1. Turn power OFF. Unplug power cord from electrical outlet. 2. Slide Lock 'n Seal lever to "Unlock" position. Unlock Position 3. Grasp dirt cup handle portion and pull straight out to remove from vacuum - Bissell Rewind CleanView Pet | User Guide - Page 9
filter becomes dirty. The white, pleated filter is NOT washable. Select model 18M9-W includes an Activated Carbon Filter that follows the same operation and replacement instructions. www.bissell.com 9 800.237.7691 - Bissell Rewind CleanView Pet | User Guide - Page 10
Maintenance and care Checking rotating floor brush and drive belt Check your vacuum's rotating floor brush and drive belt regularly for wear or damage. 3. 1. Turn power OFF. Unplug vacuum cord from electrical outlet. 2. Place handle in low position and turn vacuum over so bottom side is - Bissell Rewind CleanView Pet | User Guide - Page 11
Maintenance and care Clearing a clog Low suction or poor pickup may be due to a clog in the vacuum. If you notice a change in the sound of the vacuum motor, check for clogs. 1. Turn power OFF. Unplug vacuum cord from electrical outlet. 2. Empty dirt container. 3. Check upper tank and suction inlet - Bissell Rewind CleanView Pet | User Guide - Page 12
side and then pushing the right side back into place. 2. TurboBrush Tool maintenance Select models include Pet TurboEraser Tool that follows same maintenance instructions. 1. Turn power OFF. Unplug vacuum cord from electrical outlet. 2. Turn tool so bottom side faces up and remove the two screws - Bissell Rewind CleanView Pet | User Guide - Page 13
Cord will not retract Possible causes Remedies 1. Knotted or twisted 1. Follow instructions on page 6 Other maintenance or service not included in the manual should be performed by an authorized service representative. Thank you for selecting a BISSELL product. Please do not return - Bissell Rewind CleanView Pet | User Guide - Page 14
Replacement parts Item 1 2 3 4 5 6 7 8 9 10 11 Part No. 32074 203-1297 203-2450 203-2468 203-2449 32R9 73K1 69B1 32076 203-1215 203-5685 Part Name Style 9 Drive Belt (2-Pack) Standard Headlight Bulb Hose Assembly (84G9/18M9/26T5 series) Hose Assembly (58F8 series) Brush Dowel (15") Style 16 Inner - Bissell Rewind CleanView Pet | User Guide - Page 15
you need additional instruction regarding this warranty or have questions regarding what it may cover, please contact BISSELL Consumer Services by E-mail, Guide is not covered. If your BISSELL product should require service: Contact BISSELL Consumer Services to locate a BISSELL Authorized Service - Bissell Rewind CleanView Pet | User Guide - Page 16
earn points for discounts and free shipping on future purchases. Faster Service Supplying your information now saves you time should you need to contact us with questions regarding your product. Product Support Reminders and Alerts We'll contact you with any important product maintenance
-
 1
1 -
 2
2 -
 3
3 -
 4
4 -
 5
5 -
 6
6 -
 7
7 -
8
-
9
-
10
-
11
-
12
-
13
-
14
-
15
-
16
 |
 |

Earn BISSELL Rewards!
R
egister your
product today!
See details on
back page
2
Thank You
USER'S GUIDE
58F8, 18M9, 84G9, 26T5 SERIES
Safety Instructions
Product View
Assembly
Operations
Maintenance and Care
Troubleshooting
Consumer Services
Replacement Parts
3
4
5
6-8
8-12
13
16
14
Accessories
Warranty
14
15
Earn BISSELL Rewards!
R
egister your
product today!
See details on
back page
®
®