Bosch 1347A Operating Instructions
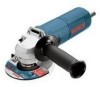
Bosch 1347A - 4-1/2 Inch Small Angle Grinder Manual
 |
UPC - 000346017571
View all Bosch 1347A manuals
Add to My Manuals
Save this manual to your list of manuals |
Bosch 1347A manual content summary:
- Bosch 1347A | Operating Instructions - Page 1
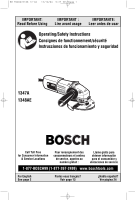
: Read Before Using Lire avant usage Leer antes de usar Operating/Safety Instructions Consignes de fonctionnement/sécurité Instrucciones de funcionamiento y seguridad 1347A 1348AE Call Toll Free for Consumer Information & Service Locations Pour renseignement des consommateurs et centres de - Bosch 1347A | Operating Instructions - Page 2
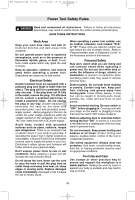
injury. SAVE THESE INSTRUCTIONS Work Area Keep your work area clean and well lit. Cluttered benches and dark areas invite accidents. Do not operate power tools in explosive atmospheres, such as in the presence of flammable liquids, gases, or dust. Power tools create sparks which may ignite the - Bosch 1347A | Operating Instructions - Page 3
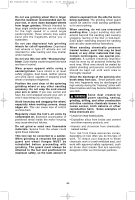
, safety guard return springs may be improperly mounted. When servicing a tool, use only identical replacement parts. Follow instructions in the Maintenance section of this manual. Use of unauthorized parts or failure to follow Maintenance Instructions may create a risk of electric shock or injury - Bosch 1347A | Operating Instructions - Page 4
tool, or worn down damaged wheels from larger grinders. Wheels intended for large angle sander/grinders are not suitable for the high speed of a small angle sander/grinder materials. Sparks from the wheel could ignite these materials. This tool can Some dust created by power sanding, sawing, grinding - Bosch 1347A | Operating Instructions - Page 5
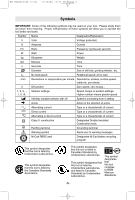
tool better and safer. Symbol Name Designation/Explanation V Volts Voltage (potential) A Amperes Current Hz Hertz Frequency (cycles per second) W Watt Power Class II construction Designates Double Insulated Construction tools. Earthing terminal Grounding terminal Warning symbol - Bosch 1347A | Operating Instructions - Page 6
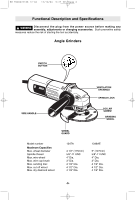
Description and Specifications ! WARNING Disconnect the plug from the power source before making any assembly, adjustments or changing accessories. Such preventive safety measures reduce the risk of starting the tool accidentally. Angle Grinders SWITCH BUTTON SIDE HANDLE VENTILATION OPENINGS - Bosch 1347A | Operating Instructions - Page 7
tool from power source. Position the guard on spindle neck, then secure guard with the collar screw. LOCK NUT AND BACKING FLANGE Your tool HANDLE The side handle used to guide and balance the tool can be threaded into the front housing on either side of the tool, depending on personal preference and - Bosch 1347A | Operating Instructions - Page 8
as far as you can with your fingers. Press in the spindle lock, then tighten the backing pad securely with lock nut wrench. TO REMOVE BACKING PAD AND SANDING DISC Disconnect tool from power source. Using the lock nut wrench unscrew the nut from the spindle, while holding spindle lock in. BACKING - Bosch 1347A | Operating Instructions - Page 9
not exceeded by the nameplate speed of the grinder. Do not exceed the recommended wheel diameter. angle between wheel and workpiece at 10° to 15°. If the wheel is flat, the tool is difficult to control. If the angle . heavy-duty service and long life. The discs vary as to size and spacing - Bosch 1347A | Operating Instructions - Page 10
a 10° to 15° angle while sanding so that only and snagging will result. Guide the Disc Sander with tool down. If faster stock removal is desired, change to a coarser grit disc. Remove gummy paint from metal with an "open coat" disc. Sand until sparks sanding automobiles or appliances, wipe the metal - Bosch 1347A | Operating Instructions - Page 11
Bosch Factory Service Center or Authorized Bosch Service Station. Bearings which become noisy (due to heavy load or very abrasive material cutting) should be replaced at once to avoid overheating or motor failure. Cleaning ! WARNING To avoid accidents always disconnect the tool from the power - Bosch 1347A | Operating Instructions - Page 12
that is capable of carrying the current necessary for your tool must be used. This will prevent excessive voltage drop, loss of power or overheating. Grounded tools must use 3-wire extension cords that have 3-prong plugs and receptacles. NOTE: The smaller the gauge number, the heavier - Bosch 1347A | Operating Instructions - Page 13
BM F000622188 12-04 12/10/04 9:27 PM Page 13 Règles de Sécurité Générales ! AVERTISSEMENT Vous devez lire et comprendre toutes les instructions. Le non-respect, même partiel, des instructions ci-après entraîne un risque de choc életrique, d'incendie et/ou de blessures graves. CONSERVEZ CES - Bosch 1347A | Operating Instructions - Page 14
manuel. L'emploi de pièces non autorisées ou le non-respect des instructions d'entretien peut créer un risque de choc électrique ou de blessures. pièces en plastique. Consignes de sécurité de la rectifieuse d'angle Utilisez toujours un protecteur approprié avec la meule. Un protecteur protè - Bosch 1347A | Operating Instructions - Page 15
BM F000622188 12-04 12/10/04 9:27 PM Page 15 N'utilisez pas cet outil avec une lame de travail du bois. Ces lames provoquent souvent un rebond et une perte de contrôle. Portez des vêtements appropriés en utilisant une ponceuse/rectifieuse. Écran facial ou à tout le moins lunettes à coques latérales - Bosch 1347A | Operating Instructions - Page 16
BM F000622188 12-04 12/10/04 9:27 PM Page 16 Symboles IMPORTANT : Certains des symboles suivants peuvent être utilisés sur votre outil. Veuillez les étudier et apprendre leur signification. Une interprétation appropriée de ces symboles vous permettra d'utiliser l'outil de façon plus efficace et - Bosch 1347A | Operating Instructions - Page 17
le risque d'une mise en marche accidentelle de l'outil. Rectifieuses d'angles BOUTON DE L'INTERRUPTEUR POIGNÉE LATÉRALE PRISES D'AIR BLOCAGE DE L' . max. Disque de ponçage max. Meule de découpage max. Meule diamant sèche max. 1347A 115 mm 5/8 po -11 UNC 101 mm diam. 76 mm diam. 114 mm diam. 114 - Bosch 1347A | Operating Instructions - Page 18
BM F000622188 12-04 12/10/04 9:27 PM Page 18 Assemblage POSE DU PROTECTEUR Le protecteur doit être en ! AVERTISSEMENT place quand vous travaillez avec des meules. Maintenez toujours le protecteur entre vous et la pièce en meulant. Pour fixer le protecteur de meule, DÉBRANCHEZ l'outil de la prise - Bosch 1347A | Operating Instructions - Page 19
BM F000622188 12-04 12/10/04 9:27 PM Page 19 Ensemble de meule pour coupe de maçonnerie Pour tailler les matériaux de maçonnerie tels que la brique, le carrelage, la pierre, etc., il est préférable d'utiliser une meule abrasive diamantée. N'utilisez que l'écrou de blocage et la bride de même diamè - Bosch 1347A | Operating Instructions - Page 20
Avant d'utiliser une meule, assurez-vous que la vitesse Vous aurez de meilleurs résultats si vous maîtrisez la pression sur l'outil et maintenez l'angle d'inclinaison de maximale de rotation qu'elle peut atteindre, sans la meule entre 10 à 15° avec la pièce. L'outil sera compromettre la sécurit - Bosch 1347A | Operating Instructions - Page 21
-24-30 Moyen 36-50-80 Fin 100-120 Très fin 150-180 CONSEILS PRATIQUES Pour obtenir de meilleurs résultats, inclinez la ponceuse à disque à un angle de 10 à 15°, de sorte que la seule partie du disque qui est en contact avec la pièce soit une bande d'environ 2,5 cm de - Bosch 1347A | Operating Instructions - Page 22
ou tous les deux changements de balais, il est conseillé de faire remplacer les paliers par un centre de service d'usine Bosch ou une station service agréée Bosch. Si les paliers commencent à faire du bruit (à cause de surcharges importantes ou du toupillage de matériaux très abrasifs - Bosch 1347A | Operating Instructions - Page 23
BM F000622188 12-04 12/10/04 9:27 PM Page 23 Accessories ! AVERTISSEMENT Si un cordon de rallonge s'avère nécessaire, vous devez utiliser un cordon avec conducteurs de dimension adéquate pouvant porter le courant nécessaire à votre outil. Ceci préviendra une chute excessive de tension, une - Bosch 1347A | Operating Instructions - Page 24
el riesgo de que se produzcan sacudidas eléctricas. Consulte "Tamaños recomendados de los cordones de extensión" en la sección Accesorios de este manual. Seguridad personal Manténgase alerta, fíjese en lo que está haciendo y use el sentido común cuando utilice una herramienta mecánica. No use la - Bosch 1347A | Operating Instructions - Page 25
de una herramienta, utilice únicamente piezas de repuesto idénticas. Siga las instrucciones que aparecen en la sección Mantenimiento de este manual. El uso de piezas no autorizadas o el incumplimiento de las instrucciones de Mantenimiento puede ocasionar un peligro de que se produzcan sacudidas - Bosch 1347A | Operating Instructions - Page 26
BM F000622188 12-04 12/10/04 9:27 PM Page 26 presentes. Normalmente, las muelas con defectos se romperán en pedazos durante este período de tiempo. Maneje cuidadosamente la herramienta y las ruedas de amolar individuales para evitar que se mellen o se agrieten. Instale una muela nueva si la - Bosch 1347A | Operating Instructions - Page 27
BM F000622188 12-04 12/10/04 9:27 PM Page 27 Símbolos IMPORTANTE: Es posible que algunos de los símbolos siguientes se usen en su herramienta. Por favor, estúdielos y aprenda su significado. La interpretación adecuada de estos símbolos le permitirá utilizar la herramienta mejor y con más seguridad - Bosch 1347A | Operating Instructions - Page 28
Rosca del husillo Máx. rueda con rayos de alambre Máx. escobilla acopada de alambre Máx. disco de lijar Máx. rueda de corte Máx. rueda de diamante de corte en seco 1347A 1348AE 115 mm 5/8"-11 GNU 101 mm de diám. 76 mm de diám. 114 mm de diám. 114 mm de diám. 114 mm de di - Bosch 1347A | Operating Instructions - Page 29
BM F000622188 12-04 12/10/04 9:27 PM Page 29 Ensamblaje INSTALACION DEL PROTECTOR DE LA MUELA El protector de la muela se debe ! ADVERTENCIA colocar cuando se utilizan ruedas de amolar de disco. Mantenga siempre el protector de la muela entre usted y la pieza de trabajo cuando esté amolando. Para - Bosch 1347A | Operating Instructions - Page 30
BM F000622188 12-04 12/10/04 9:27 PM Page 30 Ensamblaje de la rueda de corte de mampostería Para cortar materiales de mampostería tales como ladrillo, loseta, piedra, etc, es mejor utilizar una rueda de diamante de corte en seco. Utilice únicamente una tuerca de fijación y una pestaña con diámetros - Bosch 1347A | Operating Instructions - Page 31
BM F000622188 12-04 12/10/04 9:27 PM Page 31 Instrucciones de funcionamiento INTERRUPTOR CORREDIZO "ON/OFF" (DE ENCENDIDO Y APAGADO) CON CIERRE La herramienta se enciende con el botón del interruptor ubicado en un lado de la caja del motor. El interruptor se puede fijar en la posición "ON" ( - Bosch 1347A | Operating Instructions - Page 32
BM F000622188 12-04 12/10/04 9:27 PM Page 32 Los discos de lijar varían en grano desde 16 (muy grueso) hasta 180 (muy fino). Para obtener mejores resultados, seleccione los discos de lijar cuidadosamente. Muchos trabajos requieren la utilización de varios tamaños de grano y a veces se requieren - Bosch 1347A | Operating Instructions - Page 33
un rendimiento óptimo del motor, recomendamos que cada dos a seis meses se examinen las escobillas. Sólo se deben usar escobillas de repuesto Bosch genuinas diseñadas específicamente para su herramienta. RODAMIENTOS Después de 300-400 horas de funcionamiento, o después de cada segundo cambio de - Bosch 1347A | Operating Instructions - Page 34
BM F000622188 12-04 12/10/04 9:27 PM Page 34 Accesorios Si es necesario un cordón de ! ADVERTENCIA extensión, se debe usar un cordón con conductores de tamaño adecuado que sea capaz de transportar la corriente necesaria para la herramienta. Esto evitará caídas de tensión excesivas, pérdida de - Bosch 1347A | Operating Instructions - Page 35
BM F000622188 12-04 12/10/04 9:27 PM Page 35 NOTES: REMARQUES : NOTAS: -35- - Bosch 1347A | Operating Instructions - Page 36
this Limited Warranty, you must return the complete portable or benchtop power tool product, transportation prepaid, to any BOSCH Factory Service Center or Authorized Service Station. For Authorized BOSCH Power Tool Service Stations, please refer to your phone directory. THIS LIMITED WARRANTY DOES
-
 1
1 -
 2
2 -
 3
3 -
 4
4 -
 5
5 -
 6
6 -
 7
7 -
8
-
9
-
10
-
11
-
12
-
13
-
14
-
15
-
16
-
17
-
18
-
19
-
20
-
21
-
22
-
23
-
24
-
25
-
26
-
27
-
28
-
29
-
30
-
31
-
32
-
33
-
34
-
35
-
36
 |
 |
IMPORTANT:
IMPORTANT :
IMPORTANTE:
Read Before Using
Lire avant usage
Leer antes de usar
Operating/Safety Instructions
Consignes de fonctionnement/sécurité
Instrucciones de funcionamiento y seguridad
1347A
1348AE
For English
Parlez-vous français?
¿Habla español?
See page 2
Voir page 13
Ver página 24
1-877-BOSCH99 (1-877-267-2499)
www.boschtools.com
Call Toll Free
for Consumer Information
& Service Locations
Pour renseignement des
consommateurs et centres
de service, appelez au
numéro gratuit :
Llame gratis para
obtener información
para el consumidor y
ubicaciones de servicio
BM F000622188 12-04
12/10/04
9:27 PM
Page 1