Bosch 1803EVS Operating Instructions
Bosch 1803EVS - 5" Angle Grinder Manual
 |
UPC - 000346302431
View all Bosch 1803EVS manuals
Add to My Manuals
Save this manual to your list of manuals |
Bosch 1803EVS manual content summary:
- Bosch 1803EVS | Operating Instructions - Page 1
: IMPORTANT : IMPORTANTE: Read Before Using Lire avant usage Leer antes de usar Operating/Safety Instructions Consignes de fonctionnement/sécurité Instrucciones de funcionamiento y seguridad 1800 1801 1803EVS 1806E Call Toll Free for Consumer Information & Service Locations Pour obtenir des - Bosch 1803EVS | Operating Instructions - Page 2
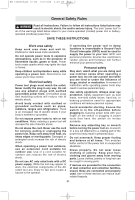
the warnings listed below refers to your mains-operated (corded) power tool or battery- operated (cordless) power tool. SAVE THESE INSTRUCTIONS Work area . Never use the cord for carrying, pulling or unplugging the power tool. Keep cord away from heat, oil, sharp edges or moving parts. Damaged or - Bosch 1803EVS | Operating Instructions - Page 3
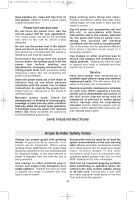
etc. may damage plastic parts. SAVE THESE INSTRUCTIONS Angle Grinder Safety Rules Always use proper guard with grinding wheel. accessory must have a maximum safe operating speed greater than the "no load RPM" marked on the tool's nameplate. Use clamps or other practical way to secure and support - Bosch 1803EVS | Operating Instructions - Page 4
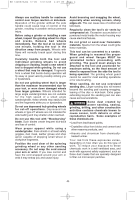
tool, or worn down damaged wheels from larger grinders. Wheels intended for large angle sander/grinders are not suitable for the high speed of a small angle sander/grinder, these wheels may easily burst and the fragments strike you or bystanders. Do not use depressed hub grinding wheels for cut-off - Bosch 1803EVS | Operating Instructions - Page 5
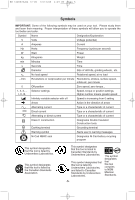
IMPORTANT: Some of the following symbols may be used on your tool. Please study them and learn direct current Speed, torque or position settings. Higher number means greater speed Speed is increasing is listed by Underwriters Laboratories. This symbol designates that this tool is listed by the - Bosch 1803EVS | Operating Instructions - Page 6
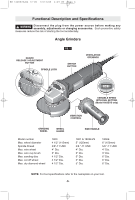
, adjustments or changing accessories. Such preventive safety measures reduce the risk of starting the tool accidentally. Angle Grinders FIG. 1 GUARD RELEASE / ADJUSTMENT BUTTON SPINDLE LOCK SWITCH BUTTON VENTILATION OPENINGS VARIABLE SPEED WITH DIAL SETTING (Model 1803EVS only) VIBRATION - Bosch 1803EVS | Operating Instructions - Page 7
The side handle used to guide and balance the tool can be threaded into the front housing on either side of the tool, depending on personal preference and comfort. Use the side handle for safe control and ease of operation. Disc Grinding Wheel Assembly (Models 1800, 1801 & 1803EVS only) Disconnect - Bosch 1803EVS | Operating Instructions - Page 8
/12/05 4:07 PM Page 8 Disc Grinding Wheel Assembly (Model 1806 only) Disconnect tool from power source. Be sure that wheel guard is in place for grinding. When using spin-on grinding wheels, thread directly onto the spindle. When using mounting wheels, thread BACKING FLANGE onto spindle, then place - Bosch 1803EVS | Operating Instructions - Page 9
Accessories Assembly BACKING PAD ! WARNING Before attaching a backing pad be sure its maximum safe operating speed is not exceeded by the nameplate speed of the tool. ! WARNING Wheel guard may not be used PAD SANDING DISC LOCK NUT Operating Instructions SLIDE ON-OFF SWITCH WITH LOCK - Bosch 1803EVS | Operating Instructions - Page 10
force is causing the tool to overload. Don't press so hard and let the tool do the work. VARIABLE SPEED WITH DIAL SETTING (1803EVS ONLY) Your tool is also equipped with a variable speed dial. The grinder's RPM can be preset from zero to maximum nameplate rated RPM by rotating the dial on the motor - Bosch 1803EVS | Operating Instructions - Page 11
-180 SANDING TIPS For best results, tilt the Disc Sander at a 10° to 15° angle while sanding so that only about 1" of the surface around the edge of the disc contacts the work. ! WARNING If the disc (accessory) is held flat or the back edge of the disc comes in contact with - Bosch 1803EVS | Operating Instructions - Page 12
which could cause serious hazard. We recommend that all tool service be performed by a Bosch Factory Service Center or Autho- rized Bosch Service Station. TOOL LUBRICATION Your Bosch tool has been properly lubricated and is ready to use. It is recommended that tools with gears be regreased with - Bosch 1803EVS | Operating Instructions - Page 13
solvents damage plastic parts. Some of these used. This will prevent excessive voltage drop, loss of power or overheating. Grounded tools must use guard * Grinding wheel * Side handle (*= standard equipment) (**= optional accessories) Accessories * Lock nut * Backing flange * Lock nut wrench -13- - Bosch 1803EVS | Operating Instructions - Page 14
BM 1609929J64 12-05 12/12/05 4:07 PM Page 14 Consignes générales de sécurité ! AVERTISSEMENT Veuillez lire et comprendre toutes les consignes. Si on n'observe pas toutes les consignes décrites ci-dessous, il y a risque de choc électrique, d'incendie et/ou de blessures corporelles graves. Dans - Bosch 1803EVS | Operating Instructions - Page 15
réparer votre outil électroportatif par un agent de service qualifié n'utilisant que des pièces de rechange CONSERVEZ CES INSTRUCTIONS Consignes de sécurité de la rectifieuse d'angle Utilisez brides ou d'autres moyens pratiques de brider ou de supporter la pièce sur une plate-forme stable. Tenir - Bosch 1803EVS | Operating Instructions - Page 16
ées provenant de rectifieuses de dimensions supérieures. Les meules destinées à des ponceuses/rectifieuses à grand angle ne conviennent pas à la vitesse élevée d'une ponceuse/rectifieuse à petit angle ; ces meules peuvent éclater facilement et les fragments peuvent frapper des personnes présentes ou - Bosch 1803EVS | Operating Instructions - Page 17
Vitesse à vide Tours ou mouvement alternatif par minute 0 Position d'arrêt 1, 2, 3, ... Réglages du sélecteur l, ll, lll, ... A A 0 A 0 Sélecteur variable à l'infini avec arrêt A 0 Flèche Courant alternatif A Courant continu 0A Courant alternatif ou continu A Construction classe II - Bosch 1803EVS | Operating Instructions - Page 18
une mise en marche accidentelle de l'outil. Rectifieuses d'angles BOUTON DE RÉGLAGE/RELÂCHEMENT DU PROTECTEUR BLOCAGE DE po diam. 3 po diam. 4 1/2 po diam. 4 1/2 po diam. 4 1/2 po diam. POIGNÉE LATÉRALE 1801 et 1803EVS 5 po (125 mm) 5/8 po - 11 UNC 4 po diam. 3 po diam. 5 po diam. 5 po diam. 5 - Bosch 1803EVS | Operating Instructions - Page 19
. Servez-vous de la poignée latérale pour votre sécurité et la facilité d'utilisation. Ensemble de meule à disque (modèles 1800, 1801 et 1803EVS seulement) Débranchez l'outil de la prise de courant. Assurez-vous que le protecteur de meule est en place pour la rectification. Placez la BRIDE D'APPUI - Bosch 1803EVS | Operating Instructions - Page 20
BM 1609929J64 12-05 12/12/05 4:07 PM Page 20 Ensemble de meule à disque (modèle 1806E seulement) Débranchez l'outil de la prise de courant. Assurez-vous que le protecteur de meule est en place pour la rectification. En cas d'utilisation de meules vissées, vissez-les directement sur l'arbre. Lors de - Bosch 1803EVS | Operating Instructions - Page 21
BM 1609929J64 12-05 12/12/05 4:07 PM Page 21 Ensemble d'accessoires de ponçage DISQUE D'APPUI Avant d'attacher un disque ! AVERTISSEMENT d'appui, assurezvous que la vitesse maximale de rotation qu'il peut atteindre, sans compromettre la sécurité de fonctionnement, n'est pas inférieure à la vitesse - Bosch 1803EVS | Operating Instructions - Page 22
1803EVS et 1806E seulement) Le dispositif de réaction interne assure un « départ en douceur », réduisant ainsi les contraintes que procure un départ service dans un tel cas, METTEZ L'INTERRUPTEUR HORS TENSION, PUIS REMETTEZ L'OUTIL EN MARCHE. PROTECTION CONTRE LA SURCHARGE (modèles 1803EVS l'angle d' - Bosch 1803EVS | Operating Instructions - Page 23
-24-30 Moyen 36-50-80 Fin 100-120 Très fin 150-180 CONSEILS PRATIQUES Pour obtenir de meilleurs résultats, inclinez la ponceuse à disque à un angle de 10 à 15°, de sorte que la seule partie du disque qui est en contact avec la pièce soit une bande d'environ 2,5 cm de - Bosch 1803EVS | Operating Instructions - Page 24
fonctionnement ou tous les deux changements de balais, il est conseillé de faire remplacer les paliers par un centre de service d'usine Bosch ou une station service agréée Bosch. Si les paliers commencent à faire du bruit (à cause de surcharges importantes ou du toupillage de matériaux très abrasifs - Bosch 1803EVS | Operating Instructions - Page 25
12 - - Calibre en mm2 Longueur en mètres 15 30 60 120 0,75 0,75 1,5 2,5 0,75 1,0 2,5 4,0 0,75 1,0 2,5 4,0 1,0 2,5 4,0 - --- - * Protecteur de meule * Meule * Poignée latérale (*= équipment standard) (**= accessorie en option) Accessoires * Écrou de blocage * Bride d'appui * Clé de serrage -25- - Bosch 1803EVS | Operating Instructions - Page 26
Los cordones dañados o enganchados aumentan el riesgo de que se produzcan sacudidas eléctricas. Cuando utilice una herramienta mecánica en el exterior, use un cordón de extensión adecuado para uso a la intemperie. La utilización de un cordón adecuado para uso a la intemperie reduce el riesgo de que - Bosch 1803EVS | Operating Instructions - Page 27
a aquéllas para las que fue diseñada podría causar una situación peligrosa. Use abrazaderas u otro modo práctico de sujetar y soportar la pieza de trabajo en una una herramienta, tenga cuidado de no desmontar ninguna de sus partes, ya que los cables internos podrían reubicarse incorrectamente o - Bosch 1803EVS | Operating Instructions - Page 28
depresión para realizar operaciones de corte. Las ruedas con parte central en forma de depresión o las muelas de tipo 27 no están diseñadas para someterse a carga lateral y pueden hacerse añicos cuando se someten a sobrecarga. No use esta herramienta con una hoja "para tallar madera". Frecuentemente - Bosch 1803EVS | Operating Instructions - Page 29
Revoluciones o alternación por minuto 0 Posición "off" (apagado) 1, 2, 3, ... I, II, III, Graduaciones del selector A A 0 0A 0 A Selector infinitamAente variable con apagado A 0 Flecha Corriente alterna Corriente continua Corriente alterna o continua A Construcción de clase II Terminal de - Bosch 1803EVS | Operating Instructions - Page 30
angulares BOTON DE SUELTA/AJUSTE DEL PROTECTOR CIERRE DEL HUSILLO FIG. 1 BOTON DEL INTERRUPTOR ABERTURA DE VENTILACION VELOCIDAD VARIABLE CON AJUSTE DE DIAL (modelo 1803EVS solamente) RUEDA DE AMOLA CONTROL DE LA VIBRACIÓN PROTECTOR DE LA MUELA MANGO LATERAL Modelo número Máx. diámetro - Bosch 1803EVS | Operating Instructions - Page 31
utilizado para guiar y equilibrar la herramienta, se puede enroscar en la parte delantera de la caja del motor en cualquiera de los dos lados cil. Ensamblaje de la rueda de amolar de disco (modelos 1800, 1801 y 1803EVS solamente) Desconecte la herramienta de la fuente de energía. Asegúrese de que - Bosch 1803EVS | Operating Instructions - Page 32
BM 1609929J64 12-05 12/12/05 4:07 PM Page 32 Ensamblaje de la rueda de amolar de disco (modelo 1806E solamente) Desconecte la herramienta de la fuente de energía. Asegúrese de que el protector de la muela esté colocado en su sitio para amolar. Cuando utilice ruedas de amolar automontables, enró - Bosch 1803EVS | Operating Instructions - Page 33
amolado. Para encender la herramienta (posicion "ON") sin dejarla fija, deslice el botón de interruptor hacia adelante ejerciendo presión UNICAMENTE sobre la parte de ATRAS del botón. Al soltar completamente el botón del interruptor, éste volverá a la posición "OFF". PARA FIJAR EL INTERRUPTOR EN LA - Bosch 1803EVS | Operating Instructions - Page 34
se sobrecargue. No presione con tanta fuerza y deje que la herramienta haga el trabajo. VELOCIDAD VARIABLE CON AJUSTE DE DIAL (modelo 1803EVS solamente) La herramienta también está equipada con undial de velocidad variable. Las RPM de la amoladora se pueden prefijar desde cero hasta las RPM máximas - Bosch 1803EVS | Operating Instructions - Page 35
(tipo H) - utilizado para materiales blandos y sobre pintura o barniz. CAPA CERRADA (tipo K) - utilizado para metal, madera dura, piedra, mármol y otros materiales donde las partículas amoladas son finas. Los discos de lijar varían en grano desde 16 (muy grueso) hasta 180 (muy fino). Para obtener - Bosch 1803EVS | Operating Instructions - Page 36
un rendimiento óptimo del motor, recomendamos que cada dos a seis meses se examinen las escobillas. Sólo se deben usar escobillas de repuesto Bosch genuinas diseñadas específicamente para su herramienta. RODAMIENTOS Después de 300-400 horas de funcionamiento, o después de cada segundo cambio de - Bosch 1803EVS | Operating Instructions - Page 37
ía antes de la limpieza o de la realización de cualquier mantenimiento. La herramienta se puede limpiar más eficazmente con aire comprimido seco. Use gafas de seguridad siempre que limpie herramientas con aire comprimido. Las aberturas de ventilación y las palancas de interruptor deben mantenerse - Bosch 1803EVS | Operating Instructions - Page 38
replacement of parts, without charge BOSCH Factory Service Center or Authorized Service Station. For Authorized BOSCH Power Tool Service Stations, please refer to your phone directory. THIS LIMITED WARRANTY DOES NOT APPLY TO ACCESSORY OR USE OF THIS POSSIBLEMENT CERTAINS DROITS VARIABLES DANS LES
-
 1
1 -
 2
2 -
 3
3 -
 4
4 -
 5
5 -
 6
6 -
 7
7 -
8
-
9
-
10
-
11
-
12
-
13
-
14
-
15
-
16
-
17
-
18
-
19
-
20
-
21
-
22
-
23
-
24
-
25
-
26
-
27
-
28
-
29
-
30
-
31
-
32
-
33
-
34
-
35
-
36
-
37
-
38
 |
 |

IMPORTANT:
IMPORTANT :
IMPORTANTE:
Read Before Using
Lire avant usage
Leer antes de usar
Operating/Safety Instructions
Consignes de fonctionnement/sécurité
Instrucciones de funcionamiento y seguridad
1800
1801
1803EVS
1806E
For English Version
Version française
Versión en español
See page 2
Voir page 14
Ver la página 26
1-877-BOSCH99 (1-877-267-2499)
www.boschtools.com
Call Toll Free for
Consumer Information
& Service Locations
Pour obtenir des informations
et les adresses de nos centres
de service après-vente,
appelez ce numéro gratuit
Llame gratis para
obtener información
para el consumidor y
ubicaciones de servicio
BM 1609929J64 12-05
12/12/05
4:07 PM
Page 1