Bosch 1873-8 Operating Instructions
Bosch 1873-8 - 7 Large Angle Grinder Manual
 |
UPC - 000346342864
View all Bosch 1873-8 manuals
Add to My Manuals
Save this manual to your list of manuals |
Bosch 1873-8 manual content summary:
- Bosch 1873-8 | Operating Instructions - Page 1
Lire avant usage Leer antes de usar Operating/Safety Instructions Consignes de fonctionnement/sécurité Instrucciones de funcionamiento y seguridad 1873-6 1873-8 1873-8F 1893-6 1894-6 Call Toll Free for Consumer Information & Service Locations Pour obtenir des informations et les adresses de - Bosch 1873-8 | Operating Instructions - Page 2
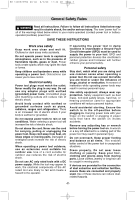
the warnings listed below refers to your mains-operated (corded) power tool or battery- operated (cordless) power tool. SAVE THESE INSTRUCTIONS Work area tool. Keep cord away from heat, oil, sharp edges or moving parts. Damaged or entangled cords increase the risk of electric shock. When operating - Bosch 1873-8 | Operating Instructions - Page 3
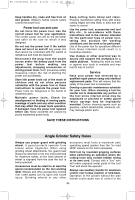
Certain cleaning agents such as gasoline, carbon tetrachloride, ammonia, etc. may damage plastic parts. SAVE THESE INSTRUCTIONS Angle Grinder Safety Rules Always use proper guard with grinding wheel. A guard protects operator from broken wheel fragments. When using grinding wheel attachments, the - Bosch 1873-8 | Operating Instructions - Page 4
from larger grinders. Wheels intended for large angle sander/grinders are not suitable for the high speed of a small angle sander/grinder, these wheels exposed from the side the tool is being operated. The grinding wheel guard cannot be used for most sanding operations or for wire brushing. When - Bosch 1873-8 | Operating Instructions - Page 5
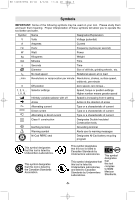
user to warning messages Ni-Cad RBRC seal Designates Ni-Cad battery recycling program This symbol designates that this tool is listed by Underwriters Laboratories. This symbol designates that this tool is listed by the Canadian Standards Association. This symbol designates that this tool is - Bosch 1873-8 | Operating Instructions - Page 6
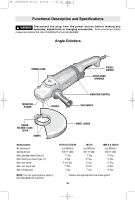
Angle Grinders SPINDLE LOCK MOUNTING FLANGE SPINDLE PADDLE SWITCH VENTILATION OPENINGS VIBRATION CONTROL SIDE HANDLE GUARD RELEASE / LOCK LATCH BUMPS WHEEL GUARD *7" Dia. 5" Dia. 6" Dia. 6" Dia. 7" Dia. 1893-6 & 1894-6 n0 6,000/min 5/8"-11 UNC *9" Dia. 5" Dia. 6" Dia. 6" Dia. 9" - Bosch 1873-8 | Operating Instructions - Page 7
BM 1609929H54 08-06 8/3/06 11:44 AM Page 7 Grinder Assembly WHEEL GUARD INSTALLATION ! WARNING Use wheel guard with disc grinding wheels. Always close the latch to secure the guard. Keep the guard between you and the wheel. Do not direct guard opening toward your body. The position of the - Bosch 1873-8 | Operating Instructions - Page 8
mounting type 28 or type 29 wheels (Fig. 1). Refer to figures 2 or 3 for proper wheel assembly when using the small flange set. SMALL FLANGE SET PART NO. 1 607 000 380 FIG. 1 FLANGE WITH SHOULDER FLANGE OR LOCK NUT FIG. 2 SPINDLE FLANGE WITH SHOULDER TYPE 28 GRINDING WHEEL FLANGE OR LOCK - Bosch 1873-8 | Operating Instructions - Page 9
guard may not be used for most sanding operations. Always reinstall wheel guard The side handle used to guide and balance the tool can grinder, resulting in possible serious personal injury. SPINDLE LOCK SPINDLE RUBBER BACKING PAD SPIN-ON WIRE BRUSH SANDING DISC LOCK NUT Operating Instructions - Bosch 1873-8 | Operating Instructions - Page 10
switch life. MOTOR HOUSING RELEASE LEVER (Model 1894-6 only) Your tool is equipped with a the nameplate speed of the grinder. Do not exceed the pressure and keeping the angle between wheel and workpiece at 10° a sturdy fiber backing for fast heavy-duty service and long life. The discs vary as to - Bosch 1873-8 | Operating Instructions - Page 11
TIPS For best results, tilt the Disc Sander at a 10° to 15° angle while sanding so that only about 1" of the surface around the edge of the be too great and a rough cut surface or gouging and snagging will result. Guide the Disc Sander with crosswise strokes. Be careful not to hold the sander in - Bosch 1873-8 | Operating Instructions - Page 12
should be replaced at Bosch Factory Service Center or Authorized Bosch Service Station. Bearings which become solvents damage plastic parts. Some of these 1.0 2.5 4.0 0.75 1.0 2.5 4.0 1.0 2.5 4.0 - --- - * Wheel guard * Side handle ** Lock nut wrench (grinding) ** Backing flange (grinding) ** Lock - Bosch 1873-8 | Operating Instructions - Page 13
BM 1609929H54 08-06 8/3/06 11:44 AM Page 13 Consignes générales de sécurité Veuillez lire et comprendre toutes les consignes. Si on n'observe pas toutes les ! AVERTISSEMENT consignes décrites ci-dessous, il y a risque de choc électrique, d'incendie et/ou de blessures corporelles graves. Dans - Bosch 1873-8 | Operating Instructions - Page 14
ou d'autres moyens pratiques de brider ou de supporter la pièce sur une plate-forme stable. Tenir réparer votre outil électroportatif par un agent de service qualifié n'utilisant que des pièces de rechange CONSERVEZ CES INSTRUCTIONS Consignes de sécurité de la rectifieuse d'angle Utilisez toujours - Bosch 1873-8 | Operating Instructions - Page 15
ées provenant de rectifieuses de dimensions supérieures. Les meules destinées à des ponceuses/rectifieuses à grand angle ne conviennent pas à la vitesse élevée d'une ponceuse/rectifieuse à petit angle ; ces meules peuvent éclater facilement et les fragments peuvent frapper des personnes présentes ou - Bosch 1873-8 | Operating Instructions - Page 16
BM 1609929H54 08-06 8/3/06 11:44 AM Page 16 Symboles IMPORTANT : Certains des symboles suivants peuvent être utilisés sur votre outil. Veuillez les étudier et apprendre leur signification. Une interprétation appropriée de ces symboles vous permettra d'utiliser l'outil de façon plus efficace et - Bosch 1873-8 | Operating Instructions - Page 17
risque d'une mise en marche accidentelle de l'outil. Rectifieuses d'angles BLOCAGE DE L'ARBRE INTERRUPTEUR À PALETTE PRISES D'AIR BRIDE DE 5/8 po -11 UNC *7 po diam 5 po diam 6 po diam 6 po diam 7 po diam 1893-6 et 1894-6 n0 6,000/min 5/8 po -11 UNC *9 po diam 5 po diam 6 po diam 6 po diam 9 po - Bosch 1873-8 | Operating Instructions - Page 18
BM 1609929H54 08-06 8/3/06 11:44 AM Page 18 Assemblage de la rectifieuse POSE DU PROTECTEUR Utiliser le protecteur de ! AVERTISSEMENT meule avec les meules à disque. Toujours fermer le verrou pour fixer le protecteur. Maintenir le protecteur entre vous et la meule. Ne pas diriger vers vous l' - Bosch 1873-8 | Operating Instructions - Page 19
BM 1609929H54 08-06 8/3/06 11:44 AM Page 19 MONTAGE DES MEULES DE TYPE 28 OU DE TYPE 29 ! AVERTISSEMENT Afin de réduire le risque de blessure, n'utilisez pas l'ensemble de bride fourni avec votre outil si vous montez des meules de type 28 ou de type 29. Les brides fournies avec votre outil - Bosch 1873-8 | Operating Instructions - Page 20
BM 1609929H54 08-06 8/3/06 11:44 AM Page 20 Assemblage de la ponceuse DISQUE D'APPUI Avant d'attacher un disque ! AVERTISSEMENT d'appui, assurezvous que la vitesse maximale de rotation qu'il peut atteindre, sans compromettre la sécurité de fonctionnement, n'est pas inférieure à la vitesse en - Bosch 1873-8 | Operating Instructions - Page 21
AM Page 21 LEVIER DE RELÂCHEMENT DU CARTER MOTEUR (Modèle 1894-6 seulement) Votre outil est pourvu d'un levier de relâchement du Vous aurez de meilleurs résultats si vous maîtrisez la pression sur l'outil et maintenez l'angle d'inclinaison de la meule entre 10 à 15° avec la pièce. L'outil sera - Bosch 1873-8 | Operating Instructions - Page 22
-24-30 Moyen 36-50-80 Fin 100-120 Très fin 150-180 CONSEILS PRATIQUES Pour obtenir de meilleurs résultats, inclinez la ponceuse à disque à un angle de 10 à 15°, de sorte que la seule partie du disque qui est en contact avec la pièce soit une bande d'environ 2,5 cm de - Bosch 1873-8 | Operating Instructions - Page 23
ou tous les deux changements de balais, il est conseillé de faire remplacer les paliers par un centre de service d'usine Bosch ou une station service agréée Bosch. Si les paliers commencent à faire du bruit (à cause de surcharges importantes ou du toupillage de matériaux très abrasifs - Bosch 1873-8 | Operating Instructions - Page 24
ánica alimentada por la red eléctrica (herramienta alámbrica) o su herramienta mecánica alimentada por baterías (herramienta inalámbrica). GUARDE ESTAS INSTRUCCIONES Seguridad del área de trabajo Mantenga el área de trabajo limpia y bien iluminada. Las áreas desordenadas u oscuras invitan a que - Bosch 1873-8 | Operating Instructions - Page 25
limpie una herramienta, tenga cuidado de no desmontar ninguna de sus partes, ya que los cables internos podrían reubicarse incorrectamente o pellizcarse , etc., podrían dañar las piezas de plástico. GUARDE ESTAS INSTRUCCIONES Normas de seguridad para amoladoras angulares Use siempre el protector - Bosch 1873-8 | Operating Instructions - Page 26
de alambre que gira de manera que se aleje de usted. Durante la acción de "limpieza" con estas escobillas pueden descargarse pequeñas partículas y diminutos fragmentos de alambre a alta velocidad que pueden incrustarse en la piel. Cierto polvo generado por el ! ADVERTENCIA lijado, aserrado, amolado - Bosch 1873-8 | Operating Instructions - Page 27
BM 1609929H54 08-06 8/3/06 11:44 AM Page 27 Símbolos IMPORTANTE: Es posible que algunos de los símbolos siguientes se usen en su herramienta. Por favor, estúdielos y aprenda su significado. La interpretación adecuada de estos símbolos le permitirá utilizar la herramienta mejor y con más seguridad. - Bosch 1873-8 | Operating Instructions - Page 28
diám 4-1/2" de diám 7" de diám 7" de diám 1873-6 n0 6,000/min 5/8"-11 UNC *7" de diám 5" de diám 6" de diám 6" de diám 7" de diám 1893-6 y 1894-6 n0 6,000/min 5/8"-11 UNC *9" de diám 5" de diám 6" de diám 6" de diám 9" de diám NOTA: Para obtener las especificaciones de la herramienta, * Utilice - Bosch 1873-8 | Operating Instructions - Page 29
BM 1609929H54 08-06 8/3/06 11:44 AM Page 29 Ensamblaje de la amoladora INSTALACION DEL PROTECTOR DE LA MUELA Utilice el protector de la rueda ! ADVERTENCIA con ruedas de amolar de disco. Cierre siempre el pestillo para asegurar el protector. Mantenga el protector entre usted y la rueda. No dirija - Bosch 1873-8 | Operating Instructions - Page 30
BM 1609929H54 08-06 8/3/06 11:44 AM Page 30 MONTAJE DE RUEDAS DE AMOLAR DE TIPO 28 O DE TIPO 29 ! ADVERTENCIA Para reducir el riesgo de lesiones, no use el juego de pestañas suministrado con su herramienta para montar ruedas de amolar de tipo 28 ó de tipo 29. Las pestañas suministradas con su - Bosch 1873-8 | Operating Instructions - Page 31
LATERAL El mango lateral utilizado para guiar y equilibrar la herramienta, se puede enroscar en la parte delantera de la caja del motor en cualquiera de los dos lados de la herramienta o en su parte superior, dependiendo de la preferencia personal y de la comodidad. Utilice el mango lateral para un - Bosch 1873-8 | Operating Instructions - Page 32
apague el interruptor. PALANCA DE SUELTA DE LA CAJA DEL MOTOR (Modelo 1894-6 solamente) La herramienta está equipada con una palanca de suelta de utilizado para metal, madera dura, piedra, mármol y otros materiales donde las partículas amoladas son finas. Los discos de lijar varían en grano desde 16 - Bosch 1873-8 | Operating Instructions - Page 33
BM 1609929H54 08-06 8/3/06 11:44 AM Page 33 OPERACION: Reacabado de superficies de madera o de metal pintadas. OBSERVACIONES GRANO Para quitar pintura y alisar irregularidades de la superficie. Grueso 16-24-30 Para alisar el lijado basto. Mediano 36-50-80 Para quitar arañazos dejados por - Bosch 1873-8 | Operating Instructions - Page 34
un rendimiento óptimo del motor, recomendamos que cada dos a seis meses se examinen las escobillas. Sólo se deben usar escobillas de repuesto Bosch genuinas diseñadas específicamente para su herramienta. RODAMIENTOS Después de 300-400 horas de funcionamiento, o después de cada segundo cambio de - Bosch 1873-8 | Operating Instructions - Page 35
BM 1609929H54 08-06 8/3/06 11:44 AM Page 35 Notes: Remarques : Notas: -35- - Bosch 1873-8 | Operating Instructions - Page 36
or condition implied by law, shall be the repair or replacement of parts, without charge, which are defective in material or workmanship and which have prepaid, to any BOSCH Factory Service Center or Authorized Service Station. For Authorized BOSCH Power Tool Service Stations, please refer to
-
 1
1 -
 2
2 -
 3
3 -
 4
4 -
 5
5 -
 6
6 -
 7
7 -
8
-
9
-
10
-
11
-
12
-
13
-
14
-
15
-
16
-
17
-
18
-
19
-
20
-
21
-
22
-
23
-
24
-
25
-
26
-
27
-
28
-
29
-
30
-
31
-
32
-
33
-
34
-
35
-
36
 |
 |

IMPORTANT:
IMPORTANT :
IMPORTANTE:
Read Before Using
Lire avant usage
Leer antes de usar
Operating/Safety Instructions
Consignes de fonctionnement/sécurité
Instrucciones de funcionamiento y seguridad
1873-6
1873-8
1873-8F
1893-6
1894-6
For English Version
Version française
Versión en español
See page 2
Voir page 13
Ver la página 24
1-877-BOSCH99 (1-877-267-2499)
www.boschtools.com
Call Toll Free for
Consumer Information
& Service Locations
Pour obtenir des informations
et les adresses de nos centres
de service après-vente,
appelez ce numéro gratuit
Llame gratis para
obtener información
para el consumidor y
ubicaciones de servicio
BM 1609929H54 08-06
8/3/06
11:44 AM
Page 1