Bosch 3365 Operating Instructions
Bosch 3365 - 3-1/4 Planer w/ Parallel Guide Fence Manual
 |
UPC - 000346309669
View all Bosch 3365 manuals
Add to My Manuals
Save this manual to your list of manuals |
Bosch 3365 manual content summary:
- Bosch 3365 | Operating Instructions - Page 1
Using IMPORTANT : Lire avant usage IMPORTANTE: Leer antes de usar Operating/Safety Instructions Consignes de fonctionnement/sécurité Instrucciones de funcionamiento y seguridad 3365 Consumer Information Renseignement des consommateurs Información para el consumidor Toll Free Number: Appel - Bosch 3365 | Operating Instructions - Page 2
electric shock. Refer to "Recommended sizes of Extension Cords" in the Accessory section of this manual. Personal Safety Stay alert, watch what you are doing and use common sense when operating a power secure and support the workpiece to a stable platform. Holding the work by hand or against your - Bosch 3365 | Operating Instructions - Page 3
start-ups may occur if planer is plugged in while changing an accessory. After changing blades, rotate the blade cylinder (cutter drum) to make sure blades are not hitting any part of the blade head housing and the blade locking screws are tight. Spinning blades could strike tool housing and - Bosch 3365 | Operating Instructions - Page 4
firmly with both hands for maximum control. Never pull the plane backward over the workpiece. Loss of control may occur. Do not put fingers or any objects into the chip ejector or clean out chips while tool is running. Contact with blade drum will cause injury. Remove plug from power source if it - Bosch 3365 | Operating Instructions - Page 5
A Amperes Current Hz Hertz Frequency (cycles per second) W Watt Power kg Kilograms Weight min Minutes Time s Seconds Time Diameter Size of Construction tools. Earthing terminal Grounding terminal Warning symbol Alerts user to warning messages Ni-Cad RBRC seal Designates Ni - Bosch 3365 | Operating Instructions - Page 6
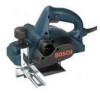
power source before making any assembly, adjustments or changing accessories. Such preventive safety measures reduce the risk of starting the tool accidentally. Planer PORT SELECTOR LEVER CHIP SWITCH DRIVE BELT COVER SCREW CHIP EXHAUST PORT GUIDE BRACKET STANDARD PARALLEL WIDTH GUIDE FENCE - Bosch 3365 | Operating Instructions - Page 7
the cutter drum. You may then tighten the clamping screws which secure the blade and your planer is ready for use. FIG. 2 CHIP BAG EXHAUST PORTS FIG. 3 VACUUM CONNECTOR (OPTIONAL) 2.5 MM BLADE WRENCH CUTTER DRUM FIG. 4 CLAMPING SCREW BLADE CLAMPING SCREW CUTTER DRUM FIG. 5 STRAIGHT EDGE - Bosch 3365 | Operating Instructions - Page 8
the blade is fully retracted. Adjusting depth of cut: Rotate depth adjustment knob until the indicator engages the detent which indicates the desired cutting depth on the depth scale (Fig. 1). The planer may be set to cut any depth from 0 to 5/64 of an inch. STANDARD PARALLEL WIDTH GUIDE FENCE - Bosch 3365 | Operating Instructions - Page 9
angle: Loosen round RABBETING DEPTH STOP The optional rabbeting depth stop accessory (Fig. 1) allows the user to set any rabbeting depth from 0 to 5/16 inch. For best results, it is important that the blade be properly aligned (See "BLADE ALIGNMENT"). The width of the rabbet is controlled by the - Bosch 3365 | Operating Instructions - Page 10
2.5 0.75 1.0 2.5 4.0 0.75 1.0 2.5 4.0 1.0 2.5 4.0 - --- - * Standard parallel width guide fence ** Deluxe angle fence ** Rabbeting depth stop * Blade wrench 2.5mm * Carbide reversible blades (2) ** Vacuum connector ** Vacuum hose * Chip bag (*= standard equipment) (**= optional accessories) -10- - Bosch 3365 | Operating Instructions - Page 11
ci-après entraîne un risque de choc életrique, d'incendie et/ou de CONSERVEZ CES INSTRUCTIONS Aire de travail Veillez à ce que l'aire de travail soit propre et bien éclairée. Le désordre et le manque de lumière favorisent les accidents. N' - Bosch 3365 | Operating Instructions - Page 12
ces non autorisées ou le non-respect des instructions d'entretien peut créer un risque de choc pousse celui-ci vers l'avant. Si le support est instable, les fers risquent de coincer et branché quand on change un accessoire, il y a risque de démarrage intempestif. Après avoir changé les fers, faites - Bosch 3365 | Operating Instructions - Page 13
Ne mettez pas les doigts ou tout autre objet dans la buse d'évacuation des copeaux. Ne dégagez jamais les copeaux avec l'outil en marche. Vous vous blesseriez si vous touchiez le tambour porte-fers. Débranchez la prise s'il devenait nécessaire de dégager les copeaux. Les fers sont cachés et ils - Bosch 3365 | Operating Instructions - Page 14
Symboles IMPORTANT : Certains des symboles suivants peuvent être utilisés sur votre outil. Veuillez les étudier et apprendre leur signification. Une interprétation appropriée de ces symboles vous permettra d'utiliser l'outil de façon plus efficace et plus sûre. Symbole V A Hz W kg min s n0 .../min - Bosch 3365 | Operating Instructions - Page 15
SONT ENVIRON : 5/64 po, 1/16 po, 3/64 po, 1mm (•), 1/32 po, 1/64 po, & 1/128 po (•) SUPPORT DE GUIDE GUIDE INCLINABLE BOUTON ROND Numéro de modèle Tension nominale Intensité nominale Régime à vide 3365 120 V 50 - 60Hz 5 A n0 18,000/min BOUTON À AILETTES BOUTON À AILETTES ÉCHELLE DES LARGEURS - Bosch 3365 | Operating Instructions - Page 16
Assemblage ÉVACUATION DES COPEAUX Le rabot est muni de deux raccords d'évacuation de copeaux sur lesquels on peut brancher soit un sac à copeaux (Fig. 2) soit un aspirateur d'atelier avec un raccord d'aspiration (Fig. 3) pour améliorer la propreté de votre environnement de travail. Le sac à copeaux - Bosch 3365 | Operating Instructions - Page 17
importe quelle profondeur de coupe entre 0 et 5/64 po. GUIDE DE LARGEUR PARALLÈLE STANDARD Le guide de largeur peut être utilisé pour raboter des largeurs variées (Fig. 1). Montage du guide : Enfilez le bouton à ailettes dans le trou du support de guide approprié et vissez-le dans le carter. Serrez - Bosch 3365 | Operating Instructions - Page 18
Réglage de la largeur de coupe : Desserrer le bouton à ailettes et, en vous aidant de l'échelle des largeurs, faites coulisser le guide le long de son support pour le mettre à la position souhaitée. Serrez fermement le bouton à ailettes (Fig. 1). Réglage de l'angle : Desserrer les boutons ronds et - Bosch 3365 | Operating Instructions - Page 19
les paliers par un centre de service d'usine Bosch ou une station service agréée Bosch. Si les paliers commencent à faire 0,75 1,0 2,5 4,0 0,75 1,0 2,5 4,0 1,0 2,5 4,0 - --- - * Guide de largeur parallèle standard ** Guide inclinable de luxe ** Butée de profondeur pour feuillures * Clé à fer de 2,5 - Bosch 3365 | Operating Instructions - Page 20
el riesgo de que se produzcan sacudidas eléctricas. Consulte "Tamaños recomendados de los cordones de extensión" en la sección Accesorios de este manual. Seguridad personal Manténgase alerta, fíjese en lo que está haciendo y use el sentido común cuando utilice una herramienta mecánica. No use la - Bosch 3365 | Operating Instructions - Page 21
las instrucciones que aparecen en la sección Mantenimiento de este manual. El uso de piezas no autorizadas o el incumplimiento de cuchillas (tambor de corte) para asegurarse de que las cuchillas no estén golpeando ninguna parte de la carcasa de la cabeza de las cuchillas y de que los tornillos de - Bosch 3365 | Operating Instructions - Page 22
bien ventilada y trabaje con equipo de seguridad aprobado, como por ejemplo máscaras antipolvo que estén diseñadas especialmente para impedir mediante filtración el paso de partículas microscópicas. -22- - Bosch 3365 | Operating Instructions - Page 23
Símbolos IMPORTANTE: Es posible que algunos de los símbolos siguientes se usen en su herramienta. Por favor, estúdielos y aprenda su significado. La interpretación adecuada de estos símbolos le permitirá utilizar la herramienta mejor y con más seguridad. Símbolo V A Hz W kg min s n0 .../min 0 1, - Bosch 3365 | Operating Instructions - Page 24
DE ANCHURA POMO DE MARIPOSA TOPE-GUÍA ANGULAR DE LUJO (OPCIONAL) Número de modelo Tensión nominal Amperaje nominal Capacidad sin carga 3365 120 V 50 - 60Hz 5 A n0 18 000/min Capacidades máximas Profundidad de acepillad Profundidad de rebajado Anchura de corte 0 - 5/64" (0 - 2 mm) 0 - 5/16 - Bosch 3365 | Operating Instructions - Page 25
de aspiradora pueden acoplarse a cualquiera de los extremos del orificio de salida. FIG. 2 Al mover la palanca selectora de orificio hasta la posición 1 (hacia la parte delantera de la herramienta), las virutas se descargan hacia la izquierda, mientras que al moverla hasta la posición 2 (hacia la - Bosch 3365 | Operating Instructions - Page 26
está utilizando (Fig. 6). El apoyo de estacionamiento de la herramienta se diseñó para oscilar por sí mismo hacia arriba y hacia abajo fuera del paso cuando la parte trasera del cepillo mecánico cruza el borde de avance de la pieza de trabajo (Fig. 7). FIG. 6 FIG. 7 humedad del material que se vaya - Bosch 3365 | Operating Instructions - Page 27
soporte de guía hasta la posición deseada. Apriete firmemente el pomo de mariposa. Asegúrese de que la arandela plana (suministrada) esté ajustada entre la parte inferior del tope-guía y el pomo de mariposa, o es posible que el tope-guía resbale. TOPE-GUÍA ANGULAR DE LUJO El tope-guía angular de - Bosch 3365 | Operating Instructions - Page 28
un rendimiento óptimo del motor, recomendamos que cada dos a seis meses se examinen las escobillas. Sólo se deben usar escobillas de repuesto Bosch genuinas diseñadas específicamente para su herramienta. RODAMIENTOS Después de 300-400 horas de funcionamiento, o después de cada segundo cambio de - Bosch 3365 | Operating Instructions - Page 29
Notes: -29- - Bosch 3365 | Operating Instructions - Page 30
Remarques : -30- - Bosch 3365 | Operating Instructions - Page 31
Notas: -31- - Bosch 3365 | Operating Instructions - Page 32
parts, BOSCH Factory Service Center or Authorized Service Station. For Authorized BOSCH Power Tool Service Stations, please refer to your phone directory. THIS LIMITED WARRANTY DOES NOT APPLY TO ACCESSORY ITEMS SUCH AS CIRCULAR SAW BLADES, DRILL BITS, ROUTER BITS, JIGSAW BLADES, SANDING BELTS ELECTRIC
-
 1
1 -
 2
2 -
 3
3 -
 4
4 -
 5
5 -
 6
6 -
 7
7 -
8
-
9
-
10
-
11
-
12
-
13
-
14
-
15
-
16
-
17
-
18
-
19
-
20
-
21
-
22
-
23
-
24
-
25
-
26
-
27
-
28
-
29
-
30
-
31
-
32
 |
 |

Operating/Safety Instructions
Consignes de fonctionnement/sécurité
Instrucciones de funcionamiento
y seguridad
3365
IMPORTANT:
IMPORTANT :
IMPORTANTE:
Read Before Using
Lire avant usage
Leer antes de usar
Consumer Information
Renseignement des consommateurs
Información para el consumidor
Toll Free Number:
Appel gratuit :
Número de teléfono gratuito:
1-877-BOSCH99 (1-877-267-2499)
For English
Parlez-vous français?
¿Habla español?
See page 2
Voir page 11
Ver página 20