Bosch 34618 Operating Instructions
Bosch 34618 - 18V Cordless Compact Drill Driver Manual
 |
UPC - 000346356120
View all Bosch 34618 manuals
Add to My Manuals
Save this manual to your list of manuals |
Bosch 34618 manual content summary:
- Bosch 34618 | Operating Instructions - Page 1
Read BeforeUsing Lire avant usage Leer antesdeusar Operating/SafetIynstructions Consignesde fonctionnement/s6curit6 Instruccionedse funcionamientoy seguridad 34612 34614 34618 Call Toll Free for ConsumerInformation & ServiceLocations Pour obtenirdes informations et les adressesde nos centres de - Bosch 34618 | Operating Instructions - Page 2
) power tool or battery-operated (cordless) power tool. SAVETHESEINSTRUCTIONS away from heat, oil, sharp edges or moving parts. Damaged or entangled cords increase the risk of electric rated tools with a DC power supply. While the tool may appear to work, the electrical components of the AC rated - Bosch 34618 | Operating Instructions - Page 3
and safer at the rate for which it was in accordance with these instructions and in the manner intended to secure and support the workpiece to a battery may cause irritation or burns. Service Have your power tool serviced by a qualified repair person using only identical replacement parts - Bosch 34618 | Operating Instructions - Page 4
make exposed metal parts of the tool "live" and shock the operator. Use clamps or other practical way to secure and support the workpiece to drilled. Never hold it in your hand or across legs. Unstable support can cause the drill bit to bind causing loss of control and injury. Disconnect battery - Bosch 34618 | Operating Instructions - Page 5
is important to prevent serious damage to the battery cells. Use only the charger which accompanied your product or direct replacement as listed in the catalog or this manual. Do not substitute any other charger. Use only Bosch approved chargers with your product. See Functional Description and - Bosch 34618 | Operating Instructions - Page 6
recycling and disposal bans/restrictions in your area, or return your batteries to a Skil/Bosch/Dremel Service Center for recycling. Robert Bosch Tool Corporation's involvement in this program is part of our commitment to preserving our Battery Recycling Seal on the nickel-cadmium (Ni-Cd - Bosch 34618 | Operating Instructions - Page 7
O no .../min 0 1,2,3 .... I, II, III, Kilograms Weight Minutes Time Seconds Time Diameter Size of drill bits, grinding wheels, etc. No load speed Rotational speed, to warning messages Designates Ni-Cad battery recycling program Tthhaist thsyismbtoooll disesliisgtneadtesby Underwriters - Bosch 34618 | Operating Instructions - Page 8
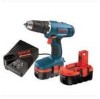
the risk of starting the tool accidentally. Cordless Drill/Driver m CHUCK VARIABLSEPEED TRIGGERSWITCH BATTERY VENTILATIONOPENINGS I FORWARD/REVERSING LEVER& TRIGGERLOCK J ] RUBBERIZED GRIP BIT STORAGE AREA I BMTERY RELEASE TABS Model number Voltage rating No load speed 1 No load speed 2 34612 - Bosch 34618 | Operating Instructions - Page 9
tool features 21 clutch settings. Output torque will increase as the clutch ring, is rotated from 1 to 20. The drill "gLllu" position will lock up the clutch to permit drilling and driving heawduty work, and also enables bits to be changed quickly and easily in the keyless chuck (Fig. 3). BRAKE - Bosch 34618 | Operating Instructions - Page 10
to the center "OFF" position. Remove battery pack and rotate the clutch ring to the drill bit symbol " ,ILlll ". Rotate the chuck sleeve counter- clockwise viewing from chuck end, and open chuck to approximate drill bit diameter. Insert a clean bit up to the drill bit flutes for small bits, or as - Bosch 34618 | Operating Instructions - Page 11
" when lights are turned off. c. Check Clean with necessary. battery cotton pack terminals for dirt. swab and alcohol if d. If you still do not get proper charging, take or send tool, battery pack and charger to your local Bosch Service Center. See "Tools, Electric" in the Yellow Pages for names - Bosch 34618 | Operating Instructions - Page 12
pack is fully charged. contacts of the charger or battery pack are contaminated. Clean the contacts of the charger or battery pack only as directed in these operating instructions or those supplied with your tool or battery pack. Plug charger cord into your standard power outlet. Before - Bosch 34618 | Operating Instructions - Page 13
contaminated. Clean the contacts of the If the indicator lights are "OFF", the charger is charger or battery pack only as directed in not receiving power from power supply outlet. these operating instructions or those supplied , !., [_,_ j_= ] If the red indicator light is "ON", J the - Bosch 34618 | Operating Instructions - Page 14
. The light will stop blinking in less time if the battery pack was not completely discharged. When the battery pack is fully charged, unplug the charger (unless you're charging another battery pack) and slip the battery pack back into the tool handle. Twohenprevbeanttteriesfire aroer innojutryin - Bosch 34618 | Operating Instructions - Page 15
WITH SCREWS This procedure shown in (Fig. 10) will enable you to fasten materials together with your Cordless Drill/Screwdriver without stripping, splitting or separating the material. First, clamp the pieces together and drill the first hole 2/3 the diameter of the screw. If the material is soft - Bosch 34618 | Operating Instructions - Page 16
wood for work that is likely to splinter, such as thin materials. You will drill a cleaner hole if you ease up on the pressure just before the bit exceed the recommended wheel diameter. result in wire breakage and shortened brush life. CORRECTW: iretips doing the work. SANDING AND POLISHING Fine - Bosch 34618 | Operating Instructions - Page 17
Bosch Service Station. SERVICEMEN: Disconnect tool and/or charger from power source before servicing. BATTERIES Be alert for battery packs that are nearing their end of life. If you notice decreased tool performance or significantly shorter running time between charges then it is time to replace - Bosch 34618 | Operating Instructions - Page 18
_ Vcoenusililgenzleirdse6ectrictoesmcip-dreensdsorteuosui,lteysalersiscqounesdiegcnheosc.S_ileocntrinq'uoeb,sde'irnvcepeansdtioeeutt/eosuldees blessurescorporellesgraves. Danstouteslesmisesen gardeci-dessousl,e termese rapporte&des outilsbranch_ssur lesecteur(avecfil) ou - Bosch 34618 | Operating Instructions - Page 19
veclesyeux,consulteuznmedecin. Duliquide6ject6de lapilepeutcauserdesirritationsou desbralures. Entretien Faites reparer votre outil electroportatif par un agent de service qualifie n'utilisant que des pieces de rechange identiques. Ceci assure que la s_curit_ de I'outil electroportatif - Bosch 34618 | Operating Instructions - Page 20
pour les applications produisant de la poussi_re. Assujettissez I'ouvrage _ percer. Ne le tenez jamais darts votre main ou par-dessus vos jambes. Un support instable peut faire gripper le foret, provoquant ainsi une perte de contr61e et des blessures. D6branchez le bloc-piles de I'outil ou placez - Bosch 34618 | Operating Instructions - Page 21
aucun autre chargeur. N'utiliser que les chargeurs approuv_s par Bosch avec votre produit. Voir Description fonctionnelle et Specifications. Ne incendie ou un courtcircuit de pile. Ne charger que des piles rechargeables approuv6es par Bosch. Voir Description fonctionnelle et Sp6cifications. Les - Bosch 34618 | Operating Instructions - Page 22
- cadmium (Ni-Od) indique que Robert Bosch Tool Corporation participe volontairement & un programme industriel de ramassage et de recyclage de ces piles au terme de leur vie utile, pourvu qu'elles soient mises hors service aux t_tats-Unis ou au Canada. Le programme du RBRC offre une alternative - Bosch 34618 | Operating Instructions - Page 23
IMPORTANT : Certains des symboles suivants peuvent etre utilis_s sur votre outil. Veuillez les _tudier et apprendre leur signification. Une interpretation appropri_e de ces symboles vous permettra d'utiliser I'outil de fa(_onplus efficace et plus sQre. Symbole V A Hz W Nom Volts Amperes Hertz Watt - Bosch 34618 | Operating Instructions - Page 24
mm 32 mm 38 mm 34614 14,4 V_ no O-400/min no 0-1 400/min 13 mm #16 x 76 mm 13 mm 38 mm 51 mm 34618 18V_ noO-450/min no0-1 450/min 13 mm #16 x 76 mm 13 mm 38 mm 51 mm Bloc piles Chargeur Tension nominale BAT043 & BAT046 - Bosch 34618 | Operating Instructions - Page 25
Consignes de fonctionnement GACHETTEDECOMMANDEA VITESSEVARIABLE Votre outil est _quip_ d'une g&chette de commande vitesse variable. Vous pouvez mettre le tournevis en marche ou & I'arret en appuyant sur la g&chetteou en la rel&chant, suivant le cas. En fonction de la pression exerc_esur lag&chette, - Bosch 34618 | Operating Instructions - Page 26
INSERTIONDES FORETS Placez le levier inverseur de marche & la position centrale >T. ournez le manchon du mandrin dans le sens oppos_ & celui des aiguilles d'une montre en le regardant depuis I' - Bosch 34618 | Operating Instructions - Page 27
d'alcool. d. Si vous n'arrivez toujours pas & obtenir la charge satisfaisante, confiez I'outil, le bloc-piles et le chargeur & votre centre d'entretien Bosch habituel. Voir les noms et adresses des centres d'entretien sous la rubrique _ Outils _lectriques_ dans les pages jaunes de I'annuaire de t_l - Bosch 34618 | Operating Instructions - Page 28
contacts du chargeur ou du bloc-piles sont souill_s. Nettoyez les contacts du chargeur ou du bloc-piles conform_ment aux recommandations des pr_sentes instructions ou celles qui accompagnaient I'outil ou le bloc-piles. Branchez le cordon du chargeur darts votre prise de courant standard. Avant - Bosch 34618 | Operating Instructions - Page 29
pas de courant de la prise de courant. souilles. Nettoyez les contacts du chargeur ou du bloc-piles conformement aux recommandations des presentes instructions ou celles qui accompagnaient I'outil ou le bloc-piles. ,I S [_,111_ i_= ] Sile voyant rouge est allume, le bloc-piles est trop chaud ou - Bosch 34618 | Operating Instructions - Page 30
CHARGEDUBLOC-PILE(SCHARGEUDRE1 HEURE) TflVIOINS, SYIVIBOLESET SIGNIFICATION Sile t_moin lumineux vert est _teint, ceci signifie que le chargeur ne re(_oit pas de courant de la prise de courant. est trop chaud ou trop froid pour prendre la charge rapide. Le chargeur adoptera la charge de maintien - Bosch 34618 | Operating Instructions - Page 31
premiere piece permet & la t_te de la vis de tirer les pi_cesfermement ensemble. L'accessoire r_glable de drille ex_cutera rapidement et facilement toutes ces operations. Des drilles sont offertes pour vis de tallies 6, 8, 10 et 12. FIXATION A L'AIDEDEVIS --_ _2_. Percezle m_me diam_tre que - Bosch 34618 | Operating Instructions - Page 32
fr_quemment pour enlever les copeaux sur les cannelures. Utilisez un bloc d'appui en bois pour les mat_riaux susceptibles de voler en _clats tels que les mat_riaux minces. Vous percerez un trou plus net si vous rel&chez la pression imm_diatement avant que le foret ne traverse le bois. Terminez - Bosch 34618 | Operating Instructions - Page 33
ce qui pent presenter de graves dangers. Nous recommandons de confier toute intervention d'entretiensur I'outil &un centrede service-usine Bosch ou & un centre de service apr_s-vente Bosch agree. TECHNICIENS: D_branchezI'outil et/ou le chargeur de la source de courant avant d'entretenir. PILES Faire - Bosch 34618 | Operating Instructions - Page 34
Lea todas las instrucciones.Si no se siguen todas las instruccionesque aparecen a continuacibn,el resultadopodriaser sacudidaselOctricas,incendioy/o lesiones graves. La expresiOn "herramienta mec_nica" en todas las advertencias que aparecen a continuaciOn se refiere a su herramientamec_nica - Bosch 34618 | Operating Instructions - Page 35
un programa de mantenimiento peri6dico de la herramienta. Cuando limpie una herramienta, tenga cuidado de no desmontar ninguna de sus partes, ya que los cables internospodrian reubicarse incorrectamente o pellizcarse, o los resortes de retorno de los protectores de seguridad podrian montarse - Bosch 34618 | Operating Instructions - Page 36
de corte puedan entrar en contacto con cables ocultos. El contacto con un cable que tenga corriente hard que _sta pase a las partes metAlicas descubiertas de la herramienta y que el operador reciba sacudidas el_ctricas. Use al]razaderas u otro modo prActicode sujetar y soportar la pieza de - Bosch 34618 | Operating Instructions - Page 37
en baterias bajo condiciones extremas de uso o de el cat;ilogo o en este manual. No sustituirlo por temperatura. Evite el contacto con la piel y los ojos. El liquido de la bateria es c_ustico y podria causar aprobados Bosch con su producto. Consulte quemaduras quimicas en los tejidos. Si el - Bosch 34618 | Operating Instructions - Page 38
de servicio en los Estados Unidos y Canada.El programa RBRC proporciona una alternativa conveniente la amabilidad de Ilamar al 1-800-8-BATTERY para obtener informaci6n acerca de las Bosch/Dremel para reciclarlas. La participaci6n de Robert Bosch Tool Corporation en este programa es parte - Bosch 34618 | Operating Instructions - Page 39
IMPORTANTE: Es posible que algunos de los simbolos siguientes se usen en su herramienta. Por favor, estt_dielos y aprenda su significado. La interpretaci6n adecuada de estos simbolos le permitir_ utilizar la herramienta mejor y con mAsseguridad. Simbolo V A Hz W Nombre Volt Ampere Hertz Watt - Bosch 34618 | Operating Instructions - Page 40
mm 32 mm 38 mm 34614 14,4 V_ no O-400/min no 0-1 400/min 13 mm #16 x 76 mm 13 mm 38 mm 51 mm 34618 18 V_ no O-450/min no 0-1 450/min 13 mm #16 x 76 mm 13 mm 38 mm 51 mm Paquete de baterias Cargador TensiOn nominal - Bosch 34618 | Operating Instructions - Page 41
INTERRUPTORGATILLODEVELOCIDAD VARIABLECONTROLADA La herramientaest_ provista de un interruptor gatillo de velocidad variable. La herramienta se puede encender (posici6n "ON") o apagar (posici6n "OFF")al apretar o soltar el gatillo. La velocidad se puede ajustar desde el valor minimo hasta el m_ximo - Bosch 34618 | Operating Instructions - Page 42
COLOCACIONDE LASBROCAS Mueva la palanca del interruptor de inversion hacia la posiciOn central "OFF" (desconectado). Quite el paquete de baterfas y gire la anilla del embrague hasta el simbolo de broca taladradora "Q,'L'Lm". Gire el manguito del mandril en sentido contrario al de las agujas del - Bosch 34618 | Operating Instructions - Page 43
d. Si usted sigue sin obtener una carga adecuada, Ileve o envie la herramienta, el paquete de baterias y el cargador al Centro de servicio Bosch local. Busque bajo "Herramientas el_ctricas" en las p_ginas amarillas para obtener nombres y direcciones. Nota: La utilizaciOn de cargadores o paquetes de - Bosch 34618 | Operating Instructions - Page 44
CARGA DELPAQUETDEEBATERIA(SCONBAHIAUNICA DE 30 MINUTOS BC130) I'-'" s,,a,oziod,ca INDICADORES,IMBOLOSYSIGNIFICADO Si laluz indicadoraverdeest_apagadae, lcargadorno DA", el paquete de baterias est_ estA recibiendo energia del tomacorriente de ST" demasiado caliente o demasiado frio alimentaciOn. - Bosch 34618 | Operating Instructions - Page 45
CARGA DELPAQUETEDE BATERIAS(CON DOS BAHIASDE 30 MINUTOS BC230) INDICADORES,SIMBOLOSY SIGNIFICADO Si la luz indicadora verde est_ apagada, el cargador no est_ recibiendo energia del tomacorriente de alimentaciOn. Limpie los contactos del cargador o del paquete de baterias t_nicamente tal como se - Bosch 34618 | Operating Instructions - Page 46
CARGA DELPAQUETEDE BATERIAS(CARGADORDE 1 HORA) INDICADORES,SIMBOLOSY SIGNIFICADO Si la luz indicadora verde estA apagada,el cargador no estA recibiendo energia del tomacorriente de alimentaciOn, caliente o demasiado frio para la carga r_pida. El cargador cambiarAa cargacontinua y lenta hasta que - Bosch 34618 | Operating Instructions - Page 47
Consejosdefuncionamiento Usted prolongar_ la vida de las brocas y realizar_ un trabajo mejor ejecutado si siempre pone la broca en contacto con la pieza de trabajo antes de apretar el gatillo. Durante el funcionamiento, sujete firmemente la herramientay ejerzauna presi6n ligera y uniforme. Una - Bosch 34618 | Operating Instructions - Page 48
agujero mejor hecbo si disminuye la presiOnjusto antes de que la broca atraviese la madera completamente.Luego, termineel agujero desde la parte posterior. TALADRADODEMETAL Hay dos reglas para taladrar materiales duros. Primero, cuanto m_s duro sea el material, mayor es lapresiOnque usted necesita - Bosch 34618 | Operating Instructions - Page 49
podria constituirun peligroserio. Recomendamos quetodo el servicio de las herramientas sea realizadoen un Centro de servicio de f_brica Bosch o en una EstaciOn de servicio Bosch autorizada. TECNICOS DE REPARACIONES:Desconecten la herramienta y/o el cargador de la fuente de energia antes de realizar - Bosch 34618 | Operating Instructions - Page 50
Notes: -50- - Bosch 34618 | Operating Instructions - Page 51
Remarques • Notas: -51- - Bosch 34618 | Operating Instructions - Page 52
be the repair or replacement of parts, without charge, which Service Station. For Authorized BOSCH Power Tool Service Stations, please refer to your phone directory. THIS LIMITED WARRANTY DOES NOT APPLY TO ACCESSORY ITEMS SUCH AS CIRCULAR SAW BLADES, DRILL D'AMERIQUE, AU CANADA ET AU COMMONWEALTH
-
 1
1 -
 2
2 -
 3
3 -
 4
4 -
 5
5 -
 6
6 -
 7
7 -
8
-
9
-
10
-
11
-
12
-
13
-
14
-
15
-
16
-
17
-
18
-
19
-
20
-
21
-
22
-
23
-
24
-
25
-
26
-
27
-
28
-
29
-
30
-
31
-
32
-
33
-
34
-
35
-
36
-
37
-
38
-
39
-
40
-
41
-
42
-
43
-
44
-
45
-
46
-
47
-
48
-
49
-
50
-
51
-
52
 |
 |

Read BeforeUsing
Lire avant usage
Leerantesdeusar
Operating/Safety
Instructions
Consignesdefonctionnement/s6curit6
Instrucciones
defuncionamiento
y seguridad
34612
34614
34618
Call Toll Free for
ConsumerInformation
& ServiceLocations
Pour
obtenirdesinformations
et les adressesde noscentres
de serviceapr_s-vente,
appelezce num_rogratuit
Llamegratis
para
obtenerinformaci6n
para
elconsumidory
ubicacionesdeservicio
ForEnglishVersion
Version
fran_;aise
Versi6n
en espafiol
Seepage2
Voirpage18
Vet la p_gina34