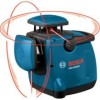
Bosch GRL160DHV Operating Instructions
Bosch GRL160DHV - Dual-Axis Self-Leveling Rotary Laser Manual
 |
UPC - 000346387308
View all Bosch GRL160DHV manuals
Add to My Manuals
Save this manual to your list of manuals |
Bosch GRL160DHV manual content summary:
- Bosch GRL160DHV | Operating Instructions - Page 1
: Lire avant usage IMPORTANTE: Leer antes de usar Operating/Safety Instructions Consignes de fonctionnement/sécurité Instrucciones de funcionamiento y seguridad GRL160DHV Call Toll Free for Consumer Information & Service Locations Pour obtenir des informations et les adresses de nos centres de - Bosch GRL160DHV | Operating Instructions - Page 2
7 6 5 4 3 2 1 89 6 12 11 10 -2- - Bosch GRL160DHV | Operating Instructions - Page 3
13 14 15 16 17 18 19 21 20 -3- - Bosch GRL160DHV | Operating Instructions - Page 4
23 24 25 26 22 27 3 28 29 34 30 31 33 32 35 36 37 17 43 38 42 39 41 40 44 45 46 22 23 24 16 25 28 29 30 31 26 27 34 33 32 -4- - Bosch GRL160DHV | Operating Instructions - Page 5
47 50 48 51 49 - Bosch GRL160DHV | Operating Instructions - Page 6
Rules ! WARNING Read all instructions. Failure to follow all instructions listed below may result in hazardous manual. This could result in serious injury. DO NOT leave the laser tool "ON" unattended in any operating mode. DO NOT disassemble the laser tool. There are no user serviceable parts - Bosch GRL160DHV | Operating Instructions - Page 7
laser tool. Serious eye injury could result. Electrical safety ! WARNING Batteries can explode or leak, cause injury or fire. To reduce this risk, always follow all instructions situation. Service Have your tool serviced by a qualified repair person using only identical replacement parts. This - Bosch GRL160DHV | Operating Instructions - Page 8
alignment applications, such as plumbing framing or aligning conduit. • Leveling - Use the Horizontal Spin or Line Dither/Scan laser for indoor and out door level applications, such as leveling cabinetry, setting concrete forms, or leveling electrical outlets. • Grading - Use the tool at a sloped - Bosch GRL160DHV | Operating Instructions - Page 9
) 10 Calibration screw, front (only for service personnel) 11 Laser warning label 12 Calibration screw, sideward (only for service personnel) 13 Serial number of the rotational laser level 14 Tripod mount 5/8- 11 15 Battery compartment, rotational laser level Detector/Remote Control 16 Control panel - Bosch GRL160DHV | Operating Instructions - Page 10
4°F to + 158°F (-20°C to +70°C) Battery Life 40 hrs (min) Tripod Mount 5/8-11 Remote Control with Laser Receiver-detector Working Range (Radius) Laser Receiver with Rotational Laser Level . .up to 5250ft (160m) Remote Control up to 300ft (91m) Measuring Accuracy Fine Adjustment 1/16in @ 30ft - Bosch GRL160DHV | Operating Instructions - Page 11
on a level and firm support, or attach it to the tripod 50. After switching on, the automatic leveling function automatically compensates irregularities within the self-leveling range up to ±6°. The leveling is finished as soon as the tool stops beeping, the LED turns green, and the laser beams stop - Bosch GRL160DHV | Operating Instructions - Page 12
in again. To avoid errors by moving the tool, check the position of the laser beams with regard to the reference points upon re-leveling. Operating Modes - Rotation and Line Dithering/Scan Mode The GRL160DHV rotary laser tool has two basic operating modes for both the Horizontal and Vertical - Bosch GRL160DHV | Operating Instructions - Page 13
have it recalibrated by a Bosch after-sales service center. Leveling In the level position, the tool automatically self-levels within ±6°. When the tool is turned on. Once the tool is level, the LED turns to a steady green, and the beeping stops. Press button 27 (Horizontal laser beam) or button 33 - Bosch GRL160DHV | Operating Instructions - Page 14
counterclockwise to raise the beam. 9. Remove the Allen wrench from the calibration port. Turn on the power, turn on the level laser beam, then check the height of the laser beam. Repeat steps 7 and 8 until the beam is at a height exactly halfway between A. and B. Caution: The Allen wrench must be - Bosch GRL160DHV | Operating Instructions - Page 15
resume normal operation. Note: Complete calibration of the level laser beam automatically calibrates the plumb laser beam. Separate calibration of the plumb laser beam is not required. Using the Remote Control / Receiver-Detector The GRL160DHV can also be operated using the RCR1 Remote Control - Bosch GRL160DHV | Operating Instructions - Page 16
to cycle through the following options: X Beeper on, Laser detector on, Coarse resolution, Level laser, Spin mode X Y Plumb laser, Spin mode, Detector off Beeper off, Laser detector on, Coarse resolution, Level laser, Spin mode X Level laser, Spin mode, Detector off Press the Line Dither/Scan - Bosch GRL160DHV | Operating Instructions - Page 17
are lit and the beep is continuous, indicating that it is properly centered. Level laser detection Plumb laser detection Note: Laser detector orientation depends on whether it is being used to locate the level or plumb laser beam. 6. To turn off the RCR1, press its power On/Off button. There - Bosch GRL160DHV | Operating Instructions - Page 18
Applications Level, Plumb, Align (Carpentry) Level (Concrete) Level (Drop Ceiling Level (Framing) Plumb (Concrete) Plumb (Framing) Grade (Concrete) Align (Flooring) Align (Framing) Align (HVAC) Align (Tiling) -18- - Bosch GRL160DHV | Operating Instructions - Page 19
50 offers a stable, height-adjustable measuring support. Place the tool via the tripod mount 14 laser appear brighter for the eyes. The red plastic used in the glasses enhances the laser beam, making the laser dot more visible. These glasses are particularly useful when using the GRL160DHV laser - Bosch GRL160DHV | Operating Instructions - Page 20
agents or solvents. Regularly clean the surfaces at the exit opening of the laser in particular, and pay attention to any fluff of fibers. If the carried out by an authorized aftersales service center for Bosch power tools. In all correspondence and spare parts orders, please always include the - Bosch GRL160DHV | Operating Instructions - Page 21
, or misrepaired by persons other than Seller or Seller Authorized Service providers. SELLER'S OBLIGATION AND YOUR REMEDY ARE FURTHER LIMITED AS BOSCH will replace your laser or measuring tool product that has failed when used in conformance with product instructions and warnings, with a new laser - Bosch GRL160DHV | Operating Instructions - Page 22
le faisceau laser. Ceci risquerait de causer des blessures graves aux yeux. NE FIXEZ PAS directement des yeux le faisceau laser et ne projetez pas la faisceau laser directement dans les yeux d'autres personnes. Ceci risquerait de causer des blessures graves aux yeux. CONSERVEZ CES INSTRUCTIONS. -22 - Bosch GRL160DHV | Operating Instructions - Page 23
se servir de l'instrument laser. Cela risquerait de produire des blessures graves aux yeux. Sécurité électrique ! AVERTISSEMENT Les piles risquent d'exploser ou de fuir, et de causer des blessures ou un incendie. Afin de réduire ce risque, suivez toujours toutes les instructions et tous les - Bosch GRL160DHV | Operating Instructions - Page 24
Service aprŹs-vente Faites réparer votre instrument par un réparateur agréé n' jamais illisibles les étiquettes d'avertissement se trouvant sur l'instrument. CONSERVEZ CES INSTRUCTIONS. Emploi prévu Cet outil projette des rayons lasers rotatifs et aléatoires ; il est conçu pour transférer et - Bosch GRL160DHV | Operating Instructions - Page 25
érale (réservée au personnel d'entretien) 13 Numéro de série du niveau à laser rotatif 14 Support de montage sur trépied 5/8-11 15 Compartiment des piles, niveau à laser rotatif Capteur/télécommande 16 Tableau de commande, récepteur laser 17 Tableau d'affichage 18 Zone de réception pour le faisceau - Bosch GRL160DHV | Operating Instructions - Page 26
ératures de stockage 20°C á +70°C Durée de vie des piles 40 h (min.) Support de montage sur trépied 5/8-11 Télécommande avec récepteur-détecteur laser Plage de fonctionnement (rayon) Récepteur laser avec niveau à laser rotatif jusqu'á 160m Plage de la télécommande jusqu'á 91m Réglage fin de la - Bosch GRL160DHV | Operating Instructions - Page 27
la température ambiante avant de le mettre en service. Des températures extrêmes ou de forts un trépied standard de géomètre en utilisant le support de montage sur trépied incorporé de 5/8-11 (situé reçue pendant 20 minutes, l'instrument laser GRL160DHV passe automatiquement au mode de veille pour - Bosch GRL160DHV | Operating Instructions - Page 28
L'outil à laser rotatif GRL160DHV a deux modes de fonctionnement de base pour les faisceaux laser horizontal et laser soit revenu à l'intérieur de la limite de plage autorisée. Instructions d'utilisation • Pour marquer, n'utiliser toujours que le milieu de la ligne laser. La largeur de la ligne laser - Bosch GRL160DHV | Operating Instructions - Page 29
de mesure. Étalonnage Bien que l'instrument laser GRL160DHV soit étalonné conformément aux spé laser pour localiser le faisceau. *A 5500ftf.t.(1(155mm) ) Si l'appareil de mesure dépasse la divergence maximale de précision pour un des contrôles, le faire réparer par un service après-vente Bosch - Bosch GRL160DHV | Operating Instructions - Page 30
de la deuxième étape. Utilisez les flèches 23 et 25 de positionnement du mode de tramage/balayage linéaire du laser nivelé (horizontal) afin de positionner le faisceau laser sur le mur original. 12. Faites tourner la base de l'outil de 90° et positionnez-la de façon que sa - Bosch GRL160DHV | Operating Instructions - Page 31
laser GRL160DHV que tout autre récepteur-détecteur laser. Le dispositif RCR1 permet une détection précise du faisceau laser faisceau laser horizontal ou vertical. La pince de fixation du support est laissez le récepteur laser s'adapter à la température ambiante avant de me mettre en service. En cas de - Bosch GRL160DHV | Operating Instructions - Page 32
deux flèches de l'affichage ACL sont illuminées et le bip sonore est continu, indiquant que le détecteur est correctement centré. X Bipeur désactivé, détecteur laser activé, résolution grossière, laser de mise de niveau, mode de rotation Level laser detection -32- Plumb - Bosch GRL160DHV | Operating Instructions - Page 33
, appuyez sur son Interrupteur Marche/Arrêt. Un double bip sonore de confirmation se fait entendre, l'affichage ACL s'efface et les lasers sont mis hors tension. Indicateur de contrôle de charge Lorsque le symbole pour l'indicateur de charge des piles 37 sur l'écran d'affichage correspond à 17, - Bosch GRL160DHV | Operating Instructions - Page 34
Applications Mise de niveau, mise d'aplomb, alignement (menuiserie) Mise de niveau (bétonnage) Mise de niveau (faux-plafond) Mise de niveau (charpenterie) Mise d'aplomb (bétonnage) Mise d'aplomb (charpenterie) Nivellement (bétonnage) Alignement (revêtement de sol) Alignement (charpenterie) - Bosch GRL160DHV | Operating Instructions - Page 35
pied (accessoire en option) Un trépied 50 offre l'avantage d'être un support de mesure stable à hauteur réglable. Placez l'appareil de mesure avec le rayon laser, rendant le point laser plus visible. Ces lunettes sont particulièrement utiles lors de l'utilisation de l'instrument laser GRL160DHV à - Bosch GRL160DHV | Operating Instructions - Page 36
en particulier les surfaces se trouvant près de l'ouverture de sortie du laser en veillant à éliminer les poussières. Si, malgré tous les paration ne doit être confiée qu'à une station de service après-vente agréée pour outillage Bosch. PROTECTION DE L'ENVIRONNEMENT Recyclez les matières premières - Bosch GRL160DHV | Operating Instructions - Page 37
incorrecte par des personnes autres que le Vendeur ou des prestataires de services agréés par le Vendeur. L'OBLIGATION DU VENDEUR ET VOTRE REM BOSCH remplacera votre produit laser ou votre instrument de mesure qui est devenu défectueux, malgré le fait qu'il a été utilisé conformément aux instructions - Bosch GRL160DHV | Operating Instructions - Page 38
el riesgo de exposición a radiación láser. La utilización de controles o ajustes, o la realización de procedimientos que no sean los especificados en este manual, puede causar exposición a radiación peligrosa. Asegúrese SIEMPRE de que todas las personas que se encuentren en la vecindad del lugar de - Bosch GRL160DHV | Operating Instructions - Page 39
ón de FCC Este producto ha sido testeado y hallado en cumplimiento con las limitaciones para un dispositivo digital Clase B, de conformidad con la Parte 15 de las reglas RCC. Estos límites han sido diseñados para brindar una protección razonable contra interferencias perjudiciales en una instalaci - Bosch GRL160DHV | Operating Instructions - Page 40
retirar y reemplazar las baterías. Se recomiendan baterías alcalinas para la herramienta. El compartimiento de las baterías está ubicado en la parte inferior de la unidad, debajo del interruptor de alimentación y el puerto de CA/CC. Abra dicho compartimiento y reemplace las baterías. Tenga presente - Bosch GRL160DHV | Operating Instructions - Page 41
ón de encendido y apagado (rayo láser horizontal) Otras Características 47 Grfas para láser 48 Cible de Laser 49 Soporte para el receptor láser 50 Trípode* (no mostrado) 51 Caja 52 Support de fixation murale * Los accesorios descritos e ilustrados no corresponden al material que se adjunta de serie - Bosch GRL160DHV | Operating Instructions - Page 42
Datos Técnicos Número de artículo 3601K61210 Número de puntos láser 2 rayos rotativos (nivel y plomada) con funcionamiento independiente y simultáneo. Alcance de trabajo (diámetro) Con receptor láser hasta 305M Intervalo de autonivelación horizontal y vertical hasta ±6° Precisión Intervalo de - Bosch GRL160DHV | Operating Instructions - Page 43
ndar, utilizando la montura de trípode de 5/8- 11 (ubicada en la parte inferior de la unidad). Nota: Debido a la alta precisión de la Energía Cuando no se reciban comandos durante 20 minutos, la herramienta láser GRL160DHV 0 ingresará automáticamente en el modo de Reserva de Energía para ahorrar - Bosch GRL160DHV | Operating Instructions - Page 44
con respecto a los puntos de referencia después de la renivelación. Modos de funcionamiento: Rotación y punto/oscilación La herramienta de láser rotativo GRL160DHV tiene dos modos de funcionamiento básicos para rayos láser tanto horizontal como vertical. Estos modos son el modo de rotación y el - Bosch GRL160DHV | Operating Instructions - Page 45
passe au vert et le rayon laser s'arrête de clignoter. L'instrument laser GRL160DHV revient au mode de la dernière calibración ubicadas en un lado y en la parte delantera de la unidad. Guarde las cubiertas de los aparato de medición en un servicio técnico Bosch. Nivelación En la posición de nivel, - Bosch GRL160DHV | Operating Instructions - Page 46
.. (15mm)) B 11. Repita los pasos 3-7 para confirmar la posición de C y luego vaya al paso 12. 12. Rote la unidad base 90° y posiciónala con la parte delantera orientada hacia la superficie vertical. Marque la altura del rayo láser como D. 13. Compare la altura de D con la de C. Si la altura de - Bosch GRL160DHV | Operating Instructions - Page 47
LCD Display XY Activado/Desactivado del Beeper Localizador del Rayo Laser del Detector Indicador de Poca Batería Resolución Fina Resolución en la parte inferior de la pantalla LCD, mostrando todas las opciones disponibles. Esto confirma que la unidad está activada, pero que la GRL160DHV y el RCR1 - Bosch GRL160DHV | Operating Instructions - Page 48
X Plomada láser, modo de Giro, Detector Láser desactivado Pulse el botón de Oscilación/Barrido 24 y 30 de Líneao del nivel o la plomada nuevamente para cambiar al modo de Oscilación/Barrido de Línea. X Nivel láser, modo de Oscilación/Barrido de Línea, Detector Láser desactivado X Beeper activado, - Bosch GRL160DHV | Operating Instructions - Page 49
Level laser detection 6. Para apagar el RCR1, oprima su botón de encendido y apagado. se muestra en la pantalla 17, el receptor láser aún se puede utilizar durante aproximadamente 4 horas. Plumb laser detection Nota: La orientación del detector láser depende de si éste se usa para localizar el rayo - Bosch GRL160DHV | Operating Instructions - Page 50
Aplicaciones Nivelar, Verticalizar, Alinear (Carpintería) Nivelar (Concreto) Nivelar (Cielorrasos Suspendidos) Nivelar (Estructuras) Verticalizar (Concreto) Verticalizar (Bastidores) Pendiente (Concreto) Alinear (Pisos) Alinear (Bastidores) Alinear (Calefacción, Ventilación y Aire - Bosch GRL160DHV | Operating Instructions - Page 51
hacia arriba o hacia abajo hasta la línea láser deseada, la parte superior de la montura se debe posicionar de manera que la ranura ubicada láser. Estas gafas resultan particularmente útiles cuando la herramienta láser GRL160DHV se emplea en exteriores o en ambientes muy iluminados. 5. Ajuste - Bosch GRL160DHV | Operating Instructions - Page 52
ón y control, el aparato de medida llegase a averiarse, la reparación deberá encargarse a un taller de servicio autorizado para herramientas eléctricas Bosch. Al realizar consultas o solicitar piezas de repuesto, es imprescindible indicar siempre el nº de artículo de 10 dígitos que figura en la - Bosch GRL160DHV | Operating Instructions - Page 53
-53- - Bosch GRL160DHV | Operating Instructions - Page 54
-54- - Bosch GRL160DHV | Operating Instructions - Page 55
-55- - Bosch GRL160DHV | Operating Instructions - Page 56
días. Si no está completamente satisfecho con el rendimiento de su producto de herramienta láser o de medición, por cualquier motivo, puede devolverlo a distribudor BOSCH dentro del plazo de 30 días a partir de la fecha de compra para obtener un reembolso completo o un reemplazo. Para obtener este
-
 1
1 -
 2
2 -
 3
3 -
 4
4 -
 5
5 -
 6
6 -
 7
7 -
8
-
9
-
10
-
11
-
12
-
13
-
14
-
15
-
16
-
17
-
18
-
19
-
20
-
21
-
22
-
23
-
24
-
25
-
26
-
27
-
28
-
29
-
30
-
31
-
32
-
33
-
34
-
35
-
36
-
37
-
38
-
39
-
40
-
41
-
42
-
43
-
44
-
45
-
46
-
47
-
48
-
49
-
50
-
51
-
52
-
53
-
54
-
55
-
56
 |
 |

IMPORTANT:
IMPORTANT :
IMPORTANTE:
Read Before Using
Lire avant usage
Leer antes de usar
Operating/Safety Instructions
Consignes de fonctionnement/sécurité
Instrucciones de funcionamiento y seguridad
For English Version
Version française
Versión en español
See page 6
Voir page 22
Ver la página 38
1-877-BOSCH99 (1-877-267-2499)
www.boschtools.com
Call Toll Free for
Consumer Information
& Service Locations
Pour obtenir des informations
et les adresses de nos centres
de service après-vente,
appelez ce numéro gratuit
Llame gratis para
obtener información
para el consumidor y
ubicaciones de servicio
GRL160DHV