Bosch HEI7282U Installation Instructions
Bosch HEI7282U - 30" Integra 700 Series Slide-In Electric Range Manual
 |
UPC - 825225844365
View all Bosch HEI7282U manuals
Add to My Manuals
Save this manual to your list of manuals |
Bosch HEI7282U manual content summary:
- Bosch HEI7282U | Installation Instructions - Page 1
Installation Instructions Guide d'installation Manual de instalación Slide-in Electric Ranges with European Convection fr Cuisinières électriques à encastrer es Estufas eléctricas empotrables - Bosch HEI7282U | Installation Instructions - Page 2
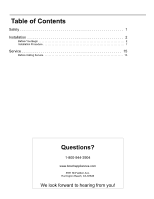
Table of Contents Safety 1 Installation 2 Before You Begin 2 Installation Procedure 7 Service 15 Before Calling Service 15 Questions? 1-800-944-2904 www.boschappliances.com 5551 McFadden Ave. Huntington Beach, CA 92649 We look forward to hearing from you! - Bosch HEI7282U | Installation Instructions - Page 3
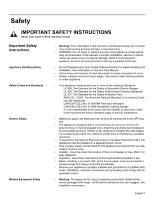
is not followed exactly, fire or shock may result causing property damage or personal injury. • WARNING: Do not repair or replace any part of the appliance unless specifically recommended in the manuals. Improper installation, service or maintenance can cause injury or property damage. Refer to this - Bosch HEI7282U | Installation Instructions - Page 4
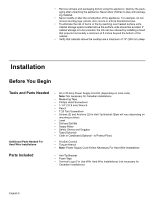
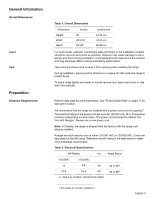
5 inches beyond the bottom of the cabinet. • Verify that cabinets above the cooktop are a maximum of 13" (330 mm) deep. Installation Before You Begin Tools and Parts Needed Additional Parts Needed For Hard Wire Installations Parts Included • 40 or 50 Amp Power Supply Cord Kit (depending on local - Bosch HEI7282U | Installation Instructions - Page 5
to handle remove door (see instructions in Use and Care manual). Refer to data plate for more information. See "Product Data Plate" on page 17 for data plate location. We recommend that the range be installed with a power cord set (not supplied).1 The electrical rating of the power cord set must - Bosch HEI7282U | Installation Instructions - Page 6
AC circuit. Check local codes for proper amperage ratings.A four wire connection is preferred. Most local building regulations and codes require that electrical wiring be done by licensed electricians. Be sure to install your range according to the electric codes in place in your region. This unit - Bosch HEI7282U | Installation Instructions - Page 7
Cutout Requirements Note: The slide-in range can also replace a freestanding range. In this case, verify that the opening is at least 30 inches.1 30" (76.2 cm) min. Figure 3: Cutout Requirements - Replacing a Free-Standing Model 1.In Canada, a clearance of 12 mm from range sidewall to cabinet is - Bosch HEI7282U | Installation Instructions - Page 8
Canada) Figure 4: Cabinet Preparation Required Clearance1 From cooktop to materials above: There must be a minimum clearance of 30 inches electrical or gas connections, etc.) so that range will rest against wall properly. Countertops must be smooth and level. Install Anti-Tip Bracket 1.Instructions - Bosch HEI7282U | Installation Instructions - Page 9
adjustable leg supports on the bottom of the range, using 1-1/4" rating of not less than 300 CFM is recommended. The range hood must be installed according to instructions furnished with the hood. Installation Procedure Apply Foam Tape Install Backwall Trim Apply foam tape to underside of cooktop - Bosch HEI7282U | Installation Instructions - Page 10
Electric - Range Cord Note: In Canada, the range is shipped from the factory with the range cord already installed. Continue to "Complete the installation" on page 15. For installations other than those in Canada, connect the range cord at the terminal block (See next page for detailed instructions - Bosch HEI7282U | Installation Instructions - Page 11
purpose). Use only cord kits rated 125/250 volts (minimum), 40 or 50 amperes (depending on local code) and labeled "For Use with Ranges". Strain relief provided with cord must be installed per instructions Figure 9: Grounding Requirements Warning: To prevent electrical shock, the grounding prong on - Bosch HEI7282U | Installation Instructions - Page 12
Four Wire Range Cord Connection 1. Disconnect electrical power at breaker box. (Recommended Method) 2. Remove the terminal from center post, rotate so that wide end is at top and attach wide end to range through hole below junction box. Attach green wire on top of ground strap. Tighten Screw. - Bosch HEI7282U | Installation Instructions - Page 13
Wire Range Cord Connection The Four Wire Connection (above) is preferred, but where local codes and ordinances permit grounding through neutral and where conversion to four wire is impractical, the unit may be connected to the power supply via a three wire connection. 1. Disconnect electrical - Bosch HEI7282U | Installation Instructions - Page 14
for detailed instructions. Connect Electric - Flexible The range can also be connected via flexible conduit. If using this method, always Conduit Connection use the lugs supplied. Note: In Canada, the range is shipped from the factory with the range cord already installed. Continue to "Complete - Bosch HEI7282U | Installation Instructions - Page 15
8. Strip 3/8 (9.53 mm) inches of insulation from the end of the wire. 3/8 " Figure 16: Wire Stripping 9. Insert the insulated grounding wire into the lug below the terminal block. 10. Insert stripped end of white wire into the center lug. Secure the clamping- screw. lug clamping screw wire Figure - Bosch HEI7282U | Installation Instructions - Page 16
in range at to the power supply via a three wire connection. 1. Disconnect electrical power at the breaker box. 2. Remove the terminal block nut or internal wire leads. 4. Place one terminal lug (packaged with this manual) on each post. Replace the star washer and round washer and secure with - Bosch HEI7282U | Installation Instructions - Page 17
of opening from floor to top of countertop. 3. Measure back left corner of range to bottom of cooktop trim. Use a wrench to adjust leveling leg until this height is the same as the corner dimension. drawer Slide Range into Opening wrench adjustable leg Figure 23: Adjust the Front Leveling Leg - Bosch HEI7282U | Installation Instructions - Page 18
off power at the breaker and return to "Connect Electric - Range Cord" on page 8. Service Before Calling Service See Use and Care Manual for troubleshooting information. Refer to the Warranty in the Use and Care Manual. To reach a service representative, see the contact information at the front of - Bosch HEI7282U | Installation Instructions - Page 19
Product Data Plate The data plate shows the model and serial number. Refer to the data plate on the appliance when requesting service. It is located on the frame near the drawer. Open the drawer to view it. Data Plate Figure 24: Data Plate English 17 - Bosch HEI7282U | Installation Instructions - Page 20
Table des matières Sécurit 1 Installation 2 Avant de commencer 2 Marche à suivre d'installation 7 Service 17 Avant d'effectuer un appel de service 17 Questions? 1.800.944.2904 www.boschappliances.com 5551 McFadden Ave. Huntington Beach, CA 92649 Nous attendons vos nouvelles ! - Bosch HEI7282U | Installation Instructions - Page 21
été ou des blessures. Consulter ce guide. Tout autre service doit être effectué par un technicien qualifié. • Ne pas soulever l'appareil par la poignée. Enlever la porte pour faciliter la manutention et l'installation. Voir les instructions du guide d'utilisation et d'entretien. • L'appareil est - Bosch HEI7282U | Installation Instructions - Page 22
S'assurer que le dispositif est bien enclenché. Voir les instructions d'installation. • Enlever tout ruban et emballage avant d'utiliser l' ou 50 amp (selon les codes locaux) Remarque : non nécessaire pour les installations au Canada • Ruban à mesurer • Tournevis à lame Phillips • Clé 1 1/4 po - Bosch HEI7282U | Installation Instructions - Page 23
à raccordement fixe) (non nécessaires pour installation au Canada) Tableau 1: Dimensions hors tout Dimension Hauteur Largeur Profondeur Poids 36 29 5/16 po 25 5/8 po Centimèters 91,44 cm 74,55 cm 65,09 cm Pour de meilleurs résultats, les armoires, plans de travail, murs et plancher de - Bosch HEI7282U | Installation Instructions - Page 24
1/2 po (88,9 mm) 21 po (533,4 mm) 4 1/2 po 30 po (114,3 mm) (762 mm) Figure 1: Dégagements de la surface la résidence et l'interrupteur de service doivent être augmentés pour supporter la charge électrique requise par lectricien qualifié. S'assurer d'installer la cuisinière conformément aux codes - Bosch HEI7282U | Installation Instructions - Page 25
où la cuisinière est installée1. Voir figure 2: Exigences de découpe for more information.. 23 1/16 po (585,4 mm) 30 po (762 mm) Figure que l'ouverture a au moins 30 po.1 30 po (76,2 cm) min. Figure 3: Exigences de découpe - remplacement d'un modèle amovible 1.Au Canada, un dégagement de 12 mm - Bosch HEI7282U | Installation Instructions - Page 26
doit y avoir un dégagement minimum de 30 po entre le haut de la surface de d'armoires ne peuvent supporter les températures permises uni et de niveau. Installer le dispositif anti bascule 1.Les instructions ont été déterminé dimensions adéquatement. 2.Au Canada, un dégagement de 12 mm du mur - Bosch HEI7282U | Installation Instructions - Page 27
, une hotte certifiée ayant une cote de pas moins de 300 pi3/min est recommandée. La hotte doit être installée selon les instructions fournies avec l'appareil. Marche à suivre d'installation Apposer du ruban mousse Apposer du ruban mousse sur le côté inférieur de la garniture de surface de cuis - Bosch HEI7282U | Installation Instructions - Page 28
, la cuisinière est expédiée de l'usine avec un cordon d'alimentation déjà installé. Poursuivre à "Compléter l'installation" à la page 16. Pour les installations autres qu'au Canada, brancher le cordon de la cuisinière au bloc de bornes. (voir la page suivante pour plus de détails). Accéder au bloc - Bosch HEI7282U | Installation Instructions - Page 29
50 ampères et étiquetés « Pour utilisation avec cuisinière ». Le réducteur de tension fourni avec le cordon doit être installé selon les instructions fournies avec le cordon. CONNEXION à 3 FILS CONNEXION à 4 FILS Figure 9: Exigences de mise à la terre Avertissement : pour éviter les choc électriques - Bosch HEI7282U | Installation Instructions - Page 30
Connexion du cordon à 4 fils (méthode recommandée) 1. Débrancher l'alimentation électrique au disjoncteur. 2. Enlever le couvercle du bloc de bornes pour exposer le bloc de borne.. Figure 10: Connexion à 4 fils 3. Enlever l'écrou supérieur, rondelle étoile et rondelle ronde de chaque tige. - Bosch HEI7282U | Installation Instructions - Page 31
8. Fixer le fil noir, rondelle ronde, rondelle étoile et écrou DANS CET ORDRE sur la tige droite.. Connexion de cuisinière à 3 fils noir rouge blanc Figure 12: Connexion de cuisinière à 4 fils (suite) 9. Serrer toutes les connexions adéquatement et remettre le couvercle du bloc de bornes. 10. - Bosch HEI7282U | Installation Instructions - Page 32
Remarque : au Canada, la cuisinière est expédiée de l'usine avec un cordon d'alimentation déjà installé. Poursuivre à "Compléter l'installation" à la page la tige centrale. Jeter. 6. Fixer une cosse (fournie avec ce guide) par le trou sous le bloc de bornes avec la vis de mise à la terre. 7. - Bosch HEI7282U | Installation Instructions - Page 33
8. Dégainer 3/8 po (9,53 mm) d'isolant de l'extrémité du fil.. 3/8 po (9,53 mm) Figure 16: Dégainer le fil 9. Insérer le fil de mise à la terre isolé sur la cosse sous le bloc de bornes. 10. Insérer l'extrémité dénudée du fil de mise à la terre blanc isolé dans la cosse centrale. Fixer avec une vis - Bosch HEI7282U | Installation Instructions - Page 34
de chaque tige. Remarque : NE PAS enlever la dernière rondelle ronde, dernier écrou ou fils de câblage interne. 4. Placer une cosse (fournie avec ce guide) sur chaque tige. Remettre la rondelle étoile et la rondelle ronde et fixer avec une force de 20 po/lb. - Bosch HEI7282U | Installation Instructions - Page 35
5. Dégainer 3/8 po (9,53 mm) d'isolant de l'extrémité du fil.. 3/8 po (9,53 mm) Figure 20: Dégainer le fil 6. Insérer l'extrémité dégainée du fil blanc dans la cosse centrale. Fixer avec une vis de serrage.. Cosse fil Vis de serrage Figure 21: Fixer le fil à la cosse 7. Insérer l'extrémité dé - Bosch HEI7282U | Installation Instructions - Page 36
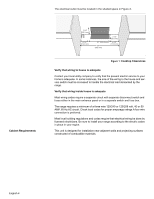
moment de mettre en place. Conseil : enlever le tiroir pour éviter tout dommage. Vérifier le dos de la cuisinière pour une installation adéquate 1. Lorsque bien installée, la garniture de surface de cuisson autour du dos de la cuisinière repose légèrement sur le plan de travail. 2. Il ne devrait - Bosch HEI7282U | Installation Instructions - Page 37
Vérifier l'installation Mettre en circuit au coupe-circuit Attention : si l'affichage clignote et émet cordon de cuisinière" à la page 8. Service Avant d'effectuer un appel de service Plaque signalétique Voir le guide de dépannage du guide d'utilisation et d'entretien. Consulter la garantie. - Bosch HEI7282U | Installation Instructions - Page 38
Tabla de Contenidos Seguridad 1 Instalación 2 Antes de comenzar 2 Procedimiento de Instalación 7 Servicio 16 Antes de llamar al servicio 16 ¿Preguntas? 1-800-944-2904 www.boschappliances.com 5551 McFadden Ave. Huntington Beach, CA 92649 ¡Estamos a sus órdenes! - Bosch HEI7282U | Installation Instructions - Page 39
una descarga eléctrica y provocar lesiones o daños a la propiedad. ADVERTENCIA: No repare o reemplace ninguna parte del aparato a menos que se recomienda específicamente en los manuales. La instalación, servicio o mantenimiento no apropiado puede causar lesiones o daños a la propiedad. Consulte este - Bosch HEI7282U | Installation Instructions - Page 40
Todas las estufas pueden volcarse. Esto puede causar lesiones. Instale el dispositivo antivolcadura que se incluye con la estufa. una profundidad máxima de13" (330 mm). Instalación Antes de comenzar Herramientas y partes que • se necesitan Juego de cable de alimentación eléctrica de 40 - Bosch HEI7282U | Installation Instructions - Page 41
Centímetros 91.44 cm 74.55 cm 65.09 cm Para lograr mejores resultados, las paredes y los instala la estufa. Durante la instalación, coloque una parte de la caja o un pedazo de tela debajo el manejo de la estufa (vea las instrucciones en el manual de uso y cuidado). Consulte la placa con información - Bosch HEI7282U | Installation Instructions - Page 42
La tomacorriente debe quedar ubicada en el espacio sombreado en la Figura 3. 7 1/2" (190.5 mm) 4 1/2" (114.3 mm) 3 1/2" (88.9 mm) 21" (533.4 mm) 30" (762 mm) 4 1/2" (114.3 mm) Figura 1: Espacios libres para los gabinetes Verificar que el cableado a la casa sea apropiado Contacte a su proveedor - Bosch HEI7282U | Installation Instructions - Page 43
2: Requerimientos del recorte para más información. 23 1/16" (585.4 mm) 30" (762 mm) Figura 2: Requerimientos del recorte Nota: La estufa deslizable puede En este caso, verifique que la abertura sea de al menos 30 pulgadas (762 mm).1 30" (76.2 cm) min. Figure 3: Requerimientos del recorte - - Bosch HEI7282U | Installation Instructions - Page 44
para espacio libre1 Figura 4: Preparación para los gabinetes Desde la parrilla a los materiales arriba: Debe haber un espacio libre mínimo de 30 pulgadas entre la parte superior de la superficie de cocinar y el fondo de un gabinete de madera o metal no protegido. Vea Figura 4: Preparación para los - Bosch HEI7282U | Installation Instructions - Page 45
altura de la estufa y nivélela girando las patas ajustables en la parte inferior de la estufa, usando una llave de 1-1/4". 2. Tome medidas autoestable). Vea 'Requerimientos para los gabinetes" en página 4 para más información. Instale 2 tornillos a través de los orificios en la moldura y en la pared - Bosch HEI7282U | Installation Instructions - Page 46
Tira de la moldura de la pared trasera Figura 6: Tira de la moldura de la pared trasera Trasera de la estufa Figura 7: Instalar la tira de la moldura de la pared trasera Conexión eléctrica Cable de la estufa Instalar el prensacables Nota: En Canadá, se envía la estufa desde la fábrica con el - Bosch HEI7282U | Installation Instructions - Page 47
quitar el panel botador de la estufa (abajo del bloque de terminales) para instalar el prensacable Quite el panel botador de la estufa, instale el prensacable en el panel y vuelva a fijarlo. NO quite todo el panel trasero de la estufa. Figura 8: Agujero ciego del prensacable Advertencia: Riesgo - Bosch HEI7282U | Installation Instructions - Page 48
ancho quede arriba y fije el extremo ancho a la estufa a través del agujero abajo de la caja de conexiones. Fije el cable verde en la parte superior de la tira de conexión a tierra. Apriete el tornillo. tornillo verde de conexión a tierra tira de conexión a tierra cable de tierra Figura 11 - Bosch HEI7282U | Installation Instructions - Page 49
, la última tuerca o los cables internos. 4. Fije el cable blanco, la arandela redonda, la arandela de estrella y la tuerca EN ESTE ORDEN en la parte superior de la tira a tierra sobre el poste central. 5. Fije el cable rojo, la arandela redonda, la arandela de estrella y la tuerca EN ESTE ORDEN - Bosch HEI7282U | Installation Instructions - Page 50
la estufa está transportado del fábrica con el conducto flexible ja instaló. Continúe a "Terminar la instalación" en página 15. Conexión con el tornillo de tierra. 7. Coloque una terminal de orejeta (incluida con este manual) en cada poste. Reemplace la arandela de estrella y la arandela redonda y - Bosch HEI7282U | Installation Instructions - Page 51
10. Inserte el extremo pelado del cable blanco en la terminal central. Fije el tornillo de apriete. terminal cable tornillo de apriete Figura 17: Fijar el cable a la terminal 11. Inserte el extremo pelado del cable rojo en la terminal izquierda. Fije el tornillo de apriete. 12. Inserte el - Bosch HEI7282U | Installation Instructions - Page 52
cada poste. Nota: NO quite la última arandela redonda, la última tuerca o los cables internos. 4. Coloque una terminal de orejeta (incluida con este manual) en cada poste. Reemplace la arandela de estrella y la arandela redonda y fíjelos con un torque de 20 pulgadas-libra. 5. Pele 3/8 pulg. (9.53 mm - Bosch HEI7282U | Installation Instructions - Page 53
2. Mida la esquina trasera izquierda de la abertura desde el piso a la parte supe- rior de la cubierta. 3. Mida la esquina trasera izquierda de la quede instalado correctamente, la moldura de la parrilla alrededor de la parte trasera de la estufa descansará ligeramente sobre la cubierta. 2. No - Bosch HEI7282U | Installation Instructions - Page 54
eléctrica. Desconecte la corriente de inmediato en el cortacircuito y regrese al "Instale 2 tornillos a través de los orificios en la moldura y en la pared al servicio Vea el manual de uso y cuidado para información sobre cómo resolver problemas. Consulte la garantía en el manual de uso y cuidado. - Bosch HEI7282U | Installation Instructions - Page 55
Abra el cajón para verla. Etiqueta de información Figura 24: Etiqueta de información Español 17 - Bosch HEI7282U | Installation Instructions - Page 56
5551 McFadden Avenue, Huntington Beach, CA 92649 • 800-944-2904 • www.boschappliances.com 9000135012 (No ECO) • 10086 Rev B • 03/06 • © BSH Home Appliances Corporation • Litho U. S. A.
-
 1
1 -
 2
2 -
 3
3 -
 4
4 -
 5
5 -
 6
6 -
 7
7 -
8
-
9
-
10
-
11
-
12
-
13
-
14
-
15
-
16
-
17
-
18
-
19
-
20
-
21
-
22
-
23
-
24
-
25
-
26
-
27
-
28
-
29
-
30
-
31
-
32
-
33
-
34
-
35
-
36
-
37
-
38
-
39
-
40
-
41
-
42
-
43
-
44
-
45
-
46
-
47
-
48
-
49
-
50
-
51
-
52
-
53
-
54
-
55
-
56
 |
 |

Guide d'installation
Installation Instructions
Manual de instalación
Slide-in Electric Ranges with European Convection
fr
Cuisinières électriques à encastrer
es
Estufas eléctricas empotrables