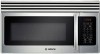
Bosch HMV3051U Installation Instructions - Page 25
Cabine
 |
UPC - 825225879046
View all Bosch HMV3051U manuals
Add to My Manuals
Save this manual to your list of manuals |
Page 25 highlights
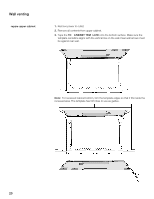
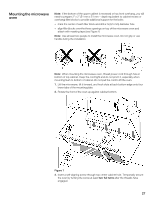
Room venting Prepare upper cabinet 1. Remove power to outlet. 2. Remove all contents from upper cabinet. 3. Tape the TOP CABINET TEMPLATE onto the bottom surface. Make sure the template centerline aligns with the vertical line on the wall. Rear wall arrows must be against rear wall. Note:ĄFor recessed cabinet bottom, trim the template edges so that it fits inside the recessed area. The template has trim lines to use as guides. 25
-
 1
1 -
2
-
3
-
4
-
5
-
6
-
7
-
8
-
9
-
10
-
11
-
12
-
13
-
14
-
15
-
16
-
17
-
18
-
19
-
 20
20 -
 21
21 -
 22
22 -
 23
23 -
 24
24 -
 25
25 -
 26
26 -
 27
27 -
 28
28 -
 29
29 -
 30
30 -
31
-
32
-
33
-
34
-
35
-
36
-
37
-
38
-
39
-
40
-
41
-
42
-
43
-
44
-
45
-
46
-
47
-
48
-
49
-
50
-
51
-
52
-
53
-
54
-
55
-
56
-
57
-
58
-
59
-
60
 |
 |
²±
!55
<+4³/4-
1.
*6>@G6 A@H6C
E@
@FE=6E.
².
*6>@G6 2== 4@?E6?ED
7C@>
FAA6C
423:?6E.
3.
,2A6 E±6
#O
CABINE#
#EM LA#E
@?E@
E±6 3@EE@>
DFC7246.
%2<6 DFC6 E±6
E6>A=2E6 46?E6C=:?6 2=:8?D
H:E±
E±6 G6CE:42= =:?6 @?
E±6 H2==.
*62C
H2==
2CC@HD
>FDE
36 282:?DE
C62C
H2==.
N5³+:
Zf@C
C646DD65
423:?6E
3@EE@>·
EC:>
E±6 E6>A=2E6 6586D
D@
E±2E
:E 7:ED
:?D:56 E±6
C646DD65 2C62.
,±6 E6>A=2E6 ±2D
EC:>
=:?6D
E@
FD6 2D
8F:56D.
8+·’8+ ;··+8
)’(/4+³