Bosch MUM4405UC Use & Care Manual
Bosch MUM4405UC Manual
 |
View all Bosch MUM4405UC manuals
Add to My Manuals
Save this manual to your list of manuals |
Bosch MUM4405UC manual content summary:
- Bosch MUM4405UC | Use & Care Manual - Page 1
mixing liquids; pureeing vegetables; preparing special diet and infant foods; pulverizing fruit, vegetables, nuts and dried bread (for 4620 UC and the MUM 4420 UC Bosch Compact Series Kitchen Machines include the MUZ 4 MX2 blender accessory. The blender accessory consists of, figure 5: 13 First - Bosch MUM4405UC | Use & Care Manual - Page 2
the blade assembly counterclockwise until it stops and then lift up see figures 7c and 7e. Wash the blade/base assembly under running water. Do not place the blade/ base assembly in the dishwasher or allow it to stand in water. This will tend to wash out the lubricant. After cleaning, rinse - Bosch MUM4405UC | Use & Care Manual - Page 3
tend to wash out the bearing lubricant of the blade/base assembly. Do not use scouring cleaners on any of the blender parts. The power unit of the kitchen machine should be cleaned with a clean, damp cloth only. Never use coarse or caustic cleaning products to clean this appliance. Never immerse the - Bosch MUM4405UC | Use & Care Manual - Page 4
the continuous shredder fully assembled and with cover in place. The MUM 4635 UC and the MUM 4420 UC Bosch Compact Series Kitchen Machines include the MUZ 4 DS2 continuous shredder attachment. The continuous shredder attachment consists of, figure 9: a. Cover closure/pusher b. Cover c. 3 slicer - Bosch MUM4405UC | Use & Care Manual - Page 5
or grated in feeding funnel and be sure to use the pusher to feed items into the discs when in operation. Learning how to feed food properly into the feed funnel is the most important factor for proper slicing and grating: 17 - Bosch MUM4405UC | Use & Care Manual - Page 6
bowl may now be poured into a suitable container or bowl, as desired. 2. Foods that are to be used together may be sliced together. This can be used to use scouring cleaners on any of the continuous shredder parts. The power unit of the kitchen machine should be cleaned with a clean, damp cloth only - Bosch MUM4405UC | Use & Care Manual - Page 7
Service and Repair The Bosch Compact Series Kitchen Machines require no special care other than the care and cleaning noted in this manual. If you are having a problem with your machine, before calling our Customer Support group, please refer to the TROUBLESHOOTING section below. If, after reviewing - Bosch MUM4405UC | Use & Care Manual - Page 8
garlic 1/4 cup shelled pinenuts Lightly toast pinenuts. Let cool. Place olive oil in Bosch blender or food processor. Turn on power and gradually add Parmesan cheese, garlic and basil leaves. Process in size. Bake 30 minutes at 400° F. Toss with cooked pasta or spread on bread or crackers. 20 - Bosch MUM4405UC | Use & Care Manual - Page 9
8-10 minutes. Cool before removing from pan. Makes 5 dozen. Acknowledgements: The sample recipes listed above were submitted by: Salsa - Caroline Ciarelli, BSH Home Appliances Pesto - Kitchen Resource Fruit Smoothies - Marni Rader, BSH Appliances French Bread - Bosch MUM4405UC | Use & Care Manual - Page 10
SPECIAL ACCESSORIES 22 - Bosch MUM4405UC | Use & Care Manual - Page 11
you require service of your BOSCH small appliance, please contact customer service at 1-866-44-BOSCH. Repair of BOSCH appliances should only be performed by qualified technicians. This warranty is limited to the original consumer purchase and is not transferable. Specifically excluded from this - Bosch MUM4405UC | Use & Care Manual - Page 12
Looking for more information about BOSCH products? Visit our Web site: www.boschsmallappliances.com 24
-
 1
1 -
 2
2 -
 3
3 -
 4
4 -
 5
5 -
 6
6 -
 7
7 -
8
-
9
-
10
-
11
-
12
 |
 |

13
Care and Cleaning
of Bowl and Its Accessories
The mixing bowl, whisks, dough hook,
dough deflector and anti-splash cover are
dishwasher safe.
To facilitate cleaning:
The power unit of the kitchen machine
should be cleaned using a clean, damp
cloth only. Never use coarse or caustic
cleaning products to clean this appliance.
Never immerse the power unit in water.
Blender with Unbreakable Plastic Jar
(MUZ 4 MX2)
WARNING
1. There is a risk of injury from sharp
blades when using the blender
attachment.
2.
Keep hands and utensils out of the
blender jar while it is attached to the
power unit.
3.
Blades are sharp. Handle carefully.
4. To avoid injury, never place blade
assembly on power unit without
blender jar properly attached.
5.
Always operate the blender with the
cover in place. Always hold the cover
in place when in operation to prevent
the cover from being knocked off.
6. The use of attachments, including
canning jars, not recommended by
the manufacturer, may cause a risk
of personal injury.
7. When blending hot and/or frothing
liquids, process a maximum of 18 fluid
ounces (0.5 litres) at a time.
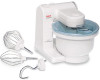
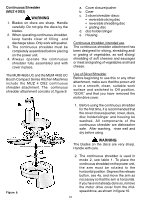
The MUM 4635 UC, MUM 4620 UC and the
MUM 4420 UC Bosch Compact Series
Kitchen Machines include the MUZ 4 MX2
blender accessory. The blender accessory
consists of, figure 5:
How to Use Blender
The blender has been designed for crushing
ice; mixing liquids; pureeing vegetables;
preparing special diet and infant foods;
pulverizing fruit, vegetables, nuts and dried
bread (for bread crumbs); and preparing
mayonnaise and sauces.
Use of blender
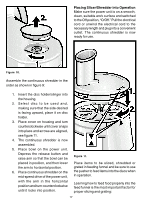
Before beginning to use the blender
attachment, make sure that the power unit
is on a clean, smooth, suitable work
surface and switched to off position, “O/Off,”
and that you have removed the drive cover
from the high-speed drive where the blender
will be placed.
Figure 5.
5a.
Cover closure/funnel
5b.
Cover
5c.
Blender jar
5d.
Blade/base assembly with
gasket and locking ring.
1.
Before using the blender for the first
time, it is recommended that the
blender jar cover, closure/funnel and
blade/base assembly, gasket and
locking
ring
be
washed.
All
components, except the blade/base
assembly, are dishwasher safe.
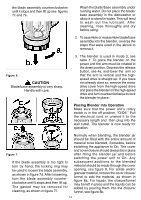
Remove the blade/base assembly from
the blender:
First remove the locking ring, as shown
in figure 6a and 6b. Then turn the
blender over so that the base is facing
upward, as shown in figure 7, and
remove the blade assembly by turning