Bosch NET7452UC Installation Instructions
Bosch NET7452UC - 30" Smoothtop Electric Cooktop Manual
 |
View all Bosch NET7452UC manuals
Add to My Manuals
Save this manual to your list of manuals |
Bosch NET7452UC manual content summary:
- Bosch NET7452UC | Installation Instructions - Page 1
Installation Instructions Instuctions d'Installation Instrucciones de Instalación Cooktop Model: NET 74.., NET 75.. 3 Ć 7 8 Ć 12 13 Ć 17 - Bosch NET7452UC | Installation Instructions - Page 2
- Bosch NET7452UC | Installation Instructions - Page 3
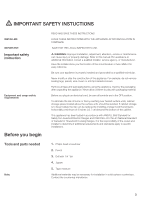
AND SAVE THESE INSTRUCTIONS LEAVE THESE INSTRUCTIONS WITH THE APPLIANCE AFTER INSTALLATION IS COMPLETE. SAVE FOR THE LOCAL INSPECTOR'S USE. d WARNING: Improper installation, adjustment, alteration, service or maintenance can cause injury or property damage. Refer to this manual. For assistance or - Bosch NET7452UC | Installation Instructions - Page 4
shavings as they can affect the function of electrical components. d WARNING: To reduce the risk of ignition combustible materials surround the installed cooktop are not permitted. Solid surface countertops often require special installations. For example, heat reflective tape and rounded corners - Bosch NET7452UC | Installation Instructions - Page 5
be located within 3 feet of the cooktop connection. It should be easily accessible for service purposes. We strongly recommend the installation of a ventilation system with this appliance. Installation procedure Secure cooktop to countertop The cooktop should be secured to the countertop using the - Bosch NET7452UC | Installation Instructions - Page 6
Electrical connection Test the installation U240 in the Display Place cooktop into cutout. Insert clamping screw into the bracket and secure cooktop to countertop. Use a wood block to protect fragile countertop materials. d CAUTION:Before installing, turn power OFF at the service panel. Lock sevice - Bosch NET7452UC | Installation Instructions - Page 7
details on a center close to you. When you contact our customer service, please have the E number and the FD number for your appliance available. You can find the identification plate with these numbers on the underside of the appliance. Questions? Please contact us. We look forward to hearing from - Bosch NET7452UC | Installation Instructions - Page 8
curité pour l'équipement et l'utilisation LIRE ET CONSERVER CES INSTRUCTIONS LAISSER CES INSTRUCTIONS AVEC L'APPAREIL APRÈS AVOIR TERMINÉ L'INSTALLATION. À CONSERVER POUR L'USAGE DE L'INSPECTEUR LOCAL. d AVERTISSEMENT : Une installation, un réglage, une modification, un entretien ou une maintenance - Bosch NET7452UC | Installation Instructions - Page 9
mm) 4. Scie sauteuse 5. Ruban à mesurer Des matériaux supplémentaires peuvent être nécessaires pour installer les plans de travail à surface solide. Contacter le fabricant du plan de travail. 1. Supports de fixation 2. Vis de serrage (4) 3. Vis à tôle (4) Zone plate Zone plate Distance de retrait - Bosch NET7452UC | Installation Instructions - Page 10
Contacter le fabricant du plan de travail pour obtenir des instructions spécifiques à votre installation. La distance allant depuis le haut de la table d'épaisseur ou de cuivre de 0,020 po (0,5 mm) d'épaisseur. Environ 12 po (30,4 cm) Boîte de jonction (Conduit env. 3 pi (91,4 cm)) Recommandations - Bosch NET7452UC | Installation Instructions - Page 11
blocage dans le support et fixer fermement la table de cuisson au plan de travail. Utiliser une cale en bois pour protéger le matériau fragile du plan de travail. d ATTENTION ! Avant l'installation, mettez l'appareil hors service au panneau de service. Verrouillez le panneau de service pour éviter - Bosch NET7452UC | Installation Instructions - Page 12
Vérifier l'installation U240 sur l'écran Service Brancher les fils conducteurs de la table de cuisson aux renseignements détaillés sur le centre de réparation le plus proche. Lorsque vous prenez contact avec notre service client, veuillez avoir les numéros E et FD de votre appareil à portée de main. - Bosch NET7452UC | Installation Instructions - Page 13
. Consulte este manual. Para obtener asegúrese de que todos los controles estén en posición OFF. Para eliminar cm) como mínimo de la parte inferior del gabinete. Este electrodom Electric Ranges) 858 de ANSI/UL y la Norma nacional de Canadá para estufas de uso doméstico (National Standard of Canada - Bosch NET7452UC | Installation Instructions - Page 14
Antes de empezar Herramientas y piezas necesarias Nota: Piezas incluidas Preparación Requisitos de la superficie de trabajo 1. Destornillador con cabeza Phillips 2. Lápiz 3. Taladro con broca de 1/4" 4. Sierra caladora 5. Cinta métrica Es posible que se necesiten otros materiales para la instalaci - Bosch NET7452UC | Installation Instructions - Page 15
12" Caja de empalme (Conducto aprox. 3 pies) Recomendaciones de ventilación Puede encontrar la placa de identificación con las especificaciones eléctricas en la parte inferior del electrodoméstico. La caja de empalme debe estar ubicada dentro de los 3 pies de la conexión de la placa. Se debe poder - Bosch NET7452UC | Installation Instructions - Page 16
Procedimiento de instalación Asegure la placa a la superficie de trabajo Conexión eléctrica 16 La placa debe asegurarse a la superficie de trabajo con los soportes de sujeción provistos. Antes de introducir la placa en el hueco, dé vuelta la placa y fije los soportes a la caja de hornillas con las - Bosch NET7452UC | Installation Instructions - Page 17
a la mano el número E y el número FD de su electrodoméstico. Puede encontrar la placa de identificación con estos números en la parte inferior del electrodoméstico. ¿Preguntas? Comuníquese con nosotros. ¡Esperamos tener noticias suyas pronto! 800-944-2904 www.boschappliances.com 5551 McFadden Ave - Bosch NET7452UC | Installation Instructions - Page 18
- Bosch NET7452UC | Installation Instructions - Page 19
- Bosch NET7452UC | Installation Instructions - Page 20
9000131389 240486 5551 McFadden Ave. Huntington Beach, CA 92649 • 800-944-2904 • www.boschappliances.com • E BSH Home Appliances Corporation
-
 1
1 -
 2
2 -
 3
3 -
 4
4 -
 5
5 -
 6
6 -
 7
7 -
8
-
9
-
10
-
11
-
12
-
13
-
14
-
15
-
16
-
17
-
18
-
19
-
20
 |
 |

Cooktop
Installation Instr ctions
3±"±7
Inst ctions d'Installation
8±"±12
Instr cciones de Instalaci!n
13±"±17
Model:
NET 74.., NET 75..