Bosch SGE63E06UC Installation Instructions - Page 8
Inlet Water Connections - white
 |
UPC - 825225877738
View all Bosch SGE63E06UC manuals
Add to My Manuals
Save this manual to your list of manuals |
Page 8 highlights
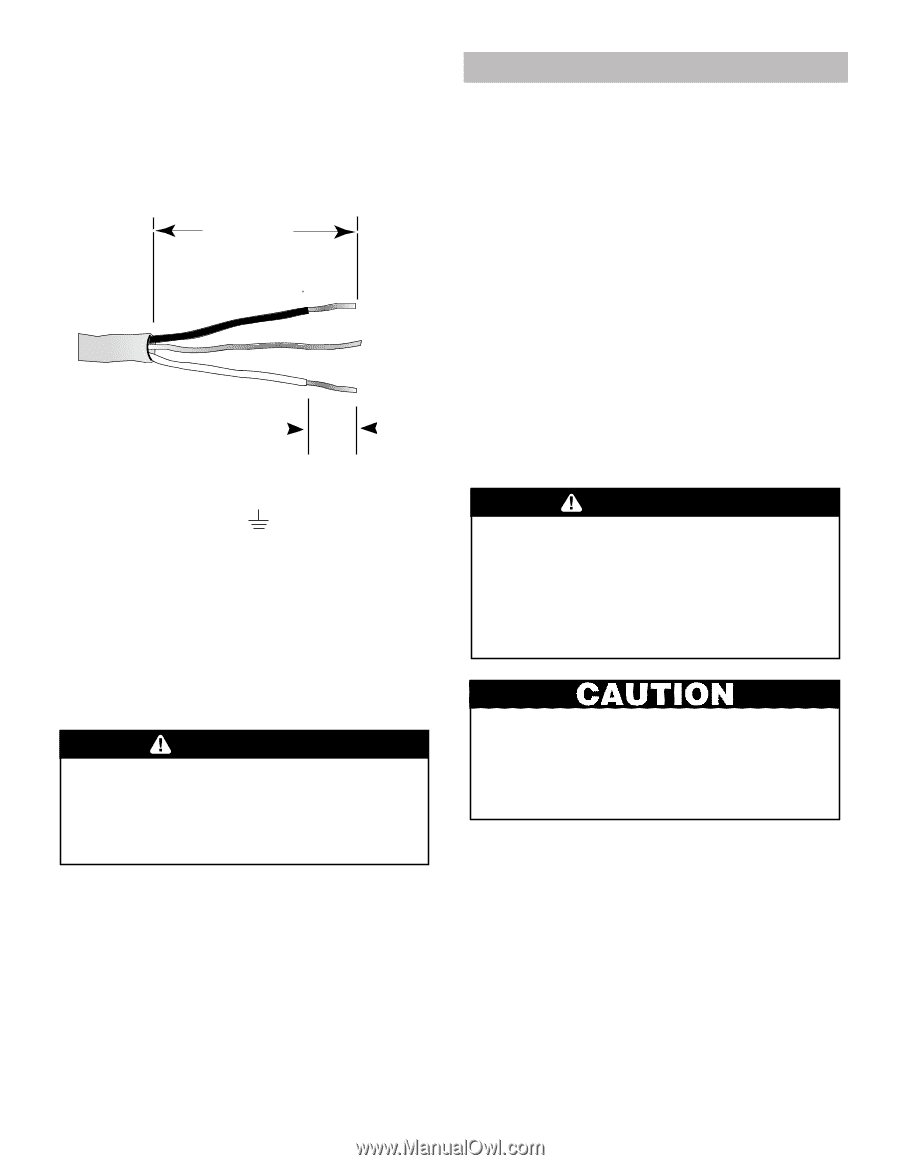
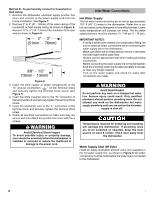
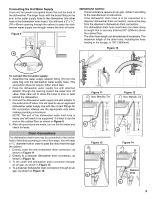
Method B - To permanently connect to household or field wiring: 1. Remove the dishwasher electrical supply junction box cover and connect to the power supply cord from the house installation. See Figure 7. 2. Remove 2″ to 3″ (51 - 76mm) of the outer casing of the household or field supply wiring as shown in Figure 8. Remove 3/8″ to 1/2″ (10 - 13mm) of the insulation from each wire as shown in Figure 8. 2" - 3" (51mm - 76mm) 3/8" - 1/2" (10mm - 13mm) Figure 8 3. Insert the bare copper or green wire(ground) to the "G" ground connection " " of the terminal block and securely tighten the terminal block screw (see Figure 7). 4. Insert the white (neutral) wire to the "N" connection of the terminal block and securely tighten the terminal block screw. 5. Insert the black(hot) wire to the "L" connection of the terminal block and securely tighten the terminal block screw. 6. Check all electrical connections to make sure they are secure and then attach the junction box cover with the 4 screws. WARNING Avoid Electrical Shock Hazard To avoid possible injury or property damage, care should be exercised when the dishwasher is installed or removed to reduce the likelihood of damage to the power cord. Inlet Water Connections Hot Water Supply The hot water heater should be set to deliver approximately 120° F (49° C) water to the dishwasher. Water that is too hot can cause some detergents to lose effectiveness. Lower water temperatures will increase run times. The hot water supply pressure must be between 15 - 145 psi (1 - 10 bar). IMPORTANT NOTES: · If using a solder joint instead of a compression fitting, be sure to make all solder connections before connecting the water supply line to the dishwasher. · Make sure there are no sharp bends or kinks in the water line that might restrict water flow. · Always use the appropriate seal when making plumbing connections. · Before connecting the water supply line to the dishwasher, flush the incoming water line for approximately 5 minutes to clear any foreign material. · Turn on the water supply and check for leaks after connections are made. WARNING Avoid Scald Hazard Do not perform any work on a charged hot water line. Serious injury could result. Only qualified plumbers should perform plumbing work. Do not attempt any work on the dishwasher hot water supply plumbing until you are certain the hot water supply is shut off. Temperatures required for soldering and sweating will damage the dishwasher. If plumbing lines are to be soldered or sweated, keep the heat source at least 6 inches (152.4 mm) away from the dishwasher. Water Supply Shut Off Valve Install an easily accessible shut-off valve (not supplied) in the hot water supply line, as shown in Figure 9. All solder connections must be made before the water line is connected to the dishwasher. 8 8
-
 1
1 -
2
-
 3
3 -
 4
4 -
 5
5 -
 6
6 -
 7
7 -
 8
8 -
 9
9 -
 10
10 -
 11
11 -
 12
12 -
 13
13 -
14
-
15
-
16
-
17
-
18
-
19
-
20
-
21
-
22
-
23
-
24
-
25
-
26
-
27
-
28
-
29
-
30
-
31
-
32
-
33
-
34
-
35
-
36
-
37
-
38
 |
 |